On a recent red-team I was given a client laptop from which I was expected to simulate an insider-threat/employee laptop compromise scenario over their VPN.
I was given a normal employee user account and did not have local administrator privileges. The laptop itself was riddled with security products and snitchware, threatening to report back every action taken on the system to the SOC/SIEM. My first objective was to obtain local administrative access, so that I could disable these security products.
After I manually enumerated the system’s setup, I found that while BitLocker was configured, it was in a Suspended state.
I didn’t really know what this meant, and initially ignored it for far more interesting rabbit holes.
When I finally started looking into the Bitlocker configuration properly, and what the Suspended state meant, I found this description from Microsoft:
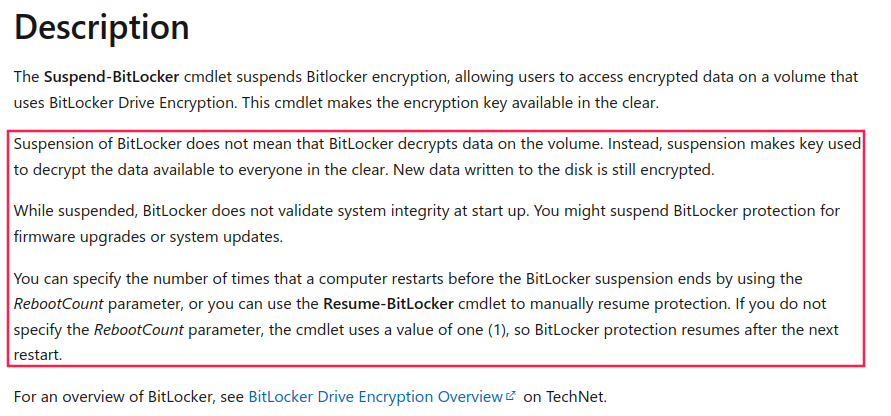
Basically, this means that when BitLocker is in a Suspended state, the drive is encrypted, but the key used to encrypt it is stored on the drive in the clear, and not protected by say a TPM or so forth.
I spent some time searching for where the encryption key would be stored, and found unhelpful posts such as this one which didn’t really reveal anything.
I also booted the system into a Linux live system, but it refused to mount the drive.
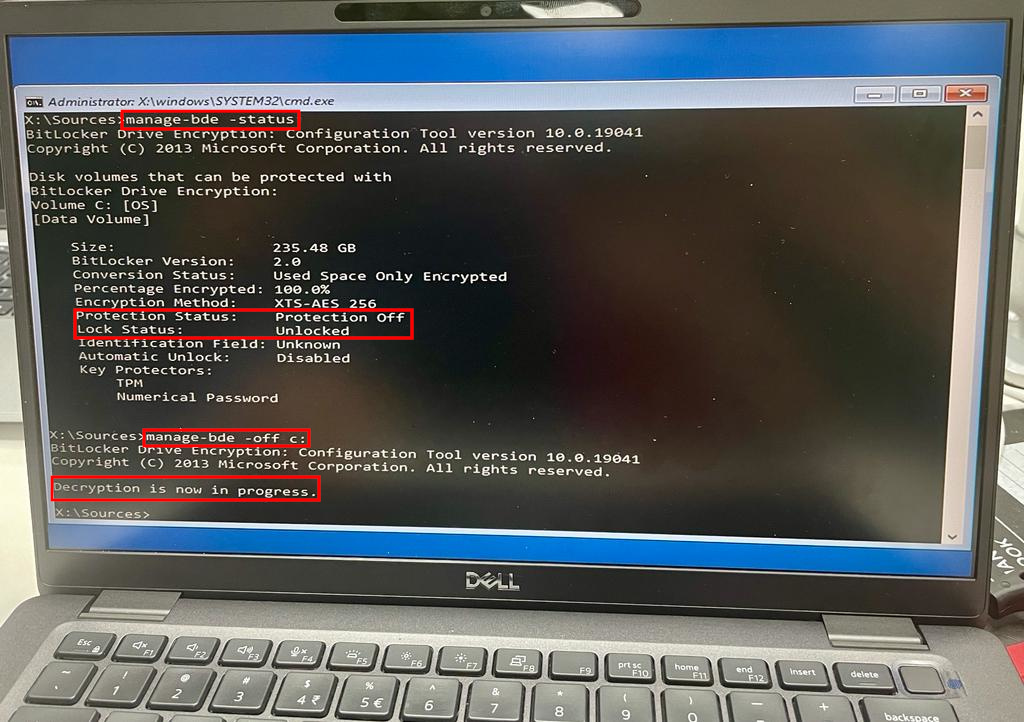
Finally, I came across the following blog, which indicated that when BitLocker is in Suspended mode, you can simply boot the system using a Windows Setup USB, and then decrypt the drive using this command:
manage-bde -off c:You can check if it is done decrypting using this command:
manage-bde -statusFollowing these steps, I was able to decrypt the hard drive.
Afterwards, I booted the laptop into a Linux live system and was able to mount the hard drive.
From here, I could do several things, like obtain SYSTEM access by backdooring/replacing an executable that runs as SYSTEM on boot, clear log files, or disable the CrowdStrike Falcon Agent EDR.
I instead decided to see if I could virtualize the laptop, that is, see if I could run the client laptop as a virtual machine.
There are a number of benefits to doing this, beyond not having to lug around yet another laptop everywhere.
First and foremost on the list of benefits, would be the ability to take snapshots and revert back to a prior state. This means that if you break the system while trying to remove its security software, you can just revert back to a previous snapshot and try again.
It also means you can run malicious software such as mimikatz, get the output, and then revert back to a prior snapshot to remove all traces of it ever happening.
Its often also easier to proxy traffic from your system to the client’s VPN via a virtual machine, than via a client laptop, since you don’t need to setup an actual network for the laptop to connect to.
Copy and pasting and taking screenshots also become much easier when using a virtual machine, instead of a laptop. Similarly, capturing a virtual machine’s network traffic is also much easier to do.
To virtualise the laptop, I first ran the dd command to clone the laptop’s hard drive.
dd if=/dev/sda of=laptop.img bs=4096 conv=noerror,syncAfter waiting for the command to complete, I used the following command to convert the raw dd image into a VMDK image that VirtualBox could understand.
VBoxManage convertfromraw laptop.img laptop.vmdk --format VMDKAt this point, I simply created a Windows 10 virtual machine within VirtualBox, and specified laptop.vmdk as the hard drive.
Once created, I immediately took a snapshot, to preserve the system’s state.
Unfortunately, my initial start up attempts failed.
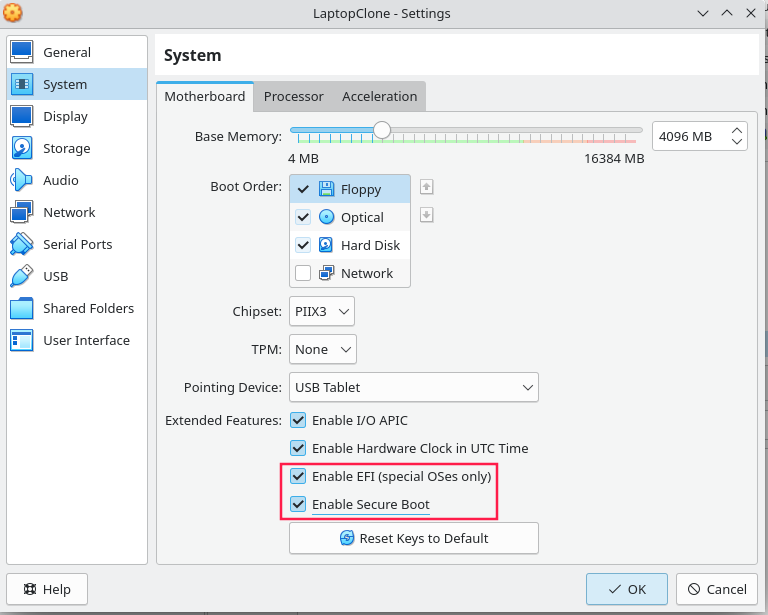
To check if the hard drive image was in working order, I booted the virtual machine into a live Linux system and mounted the hard drive. After confirming that everything was in order, I realised that the laptop had UEFI/ Secure Boot enabled. I enabled UEFI on my virtual machine – and viola – it booted.
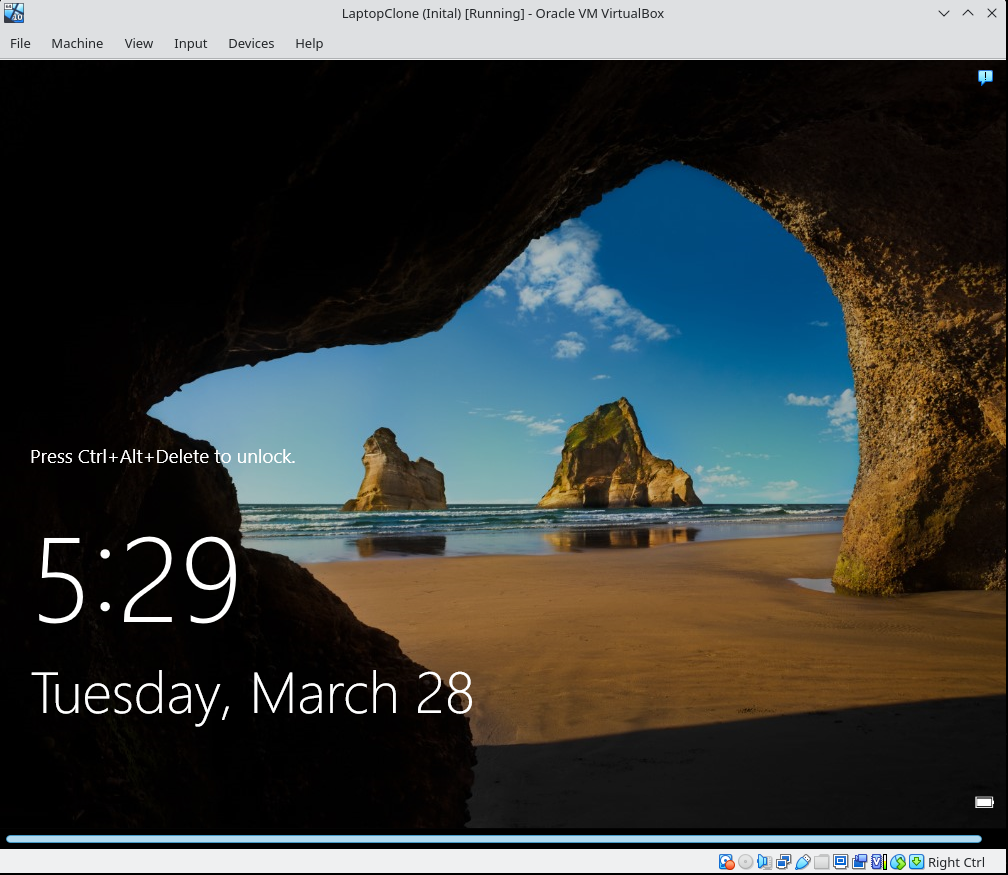
To my surprise, the system and user certificates were intact on the virtual machine, allowing me to connect to the WiFi and VPN. I suspect the laptop did not have the TPM configured for storing certificates.
At this point, you could uninstall the security software on the virtual machine and use it to conduct your attacks, while reverting the laptop back to its original state (with BitLocker encrypted and so forth). This would allow you to connect the laptop to the Internet so that the security software/snitchware keeps sending “everything is alright/nothing to report” signals to the SOC/SIEM.
While this setup worked really well for me, there are some things to keep in mind:
- Virtual machines often boot with their network adapter set to NAT. This means that your virtual machine will likely have Internet access, and the security products will start snitching to the cloud. Until you are able to uninstall the security products, make sure to configure it so that its Not Attached, to prevent leaks.
- If you connect to the client network, your virtual machine may automatically update its machine account’s password on the DCs. If you then revert to a prior snapshot, you won’t have the new machine account’s password, effectively removing your system from the domain. To avoid this, make sure to keep all your snapshots so that you can get the new password via Mimikatz, or much easier, configure your machine not to update its Machine password.
Hope you found this useful!