This is a tool that I have wanted to build for at least 5 years. Checking my archives, the earliest reference I can find is almost exactly 5 years ago, and I’ve been thinking about it for longer, I’m sure.
Finally it has made it out of my head, and into the real world!
Be free! Be free!
So, what does it do, and how does it do it?
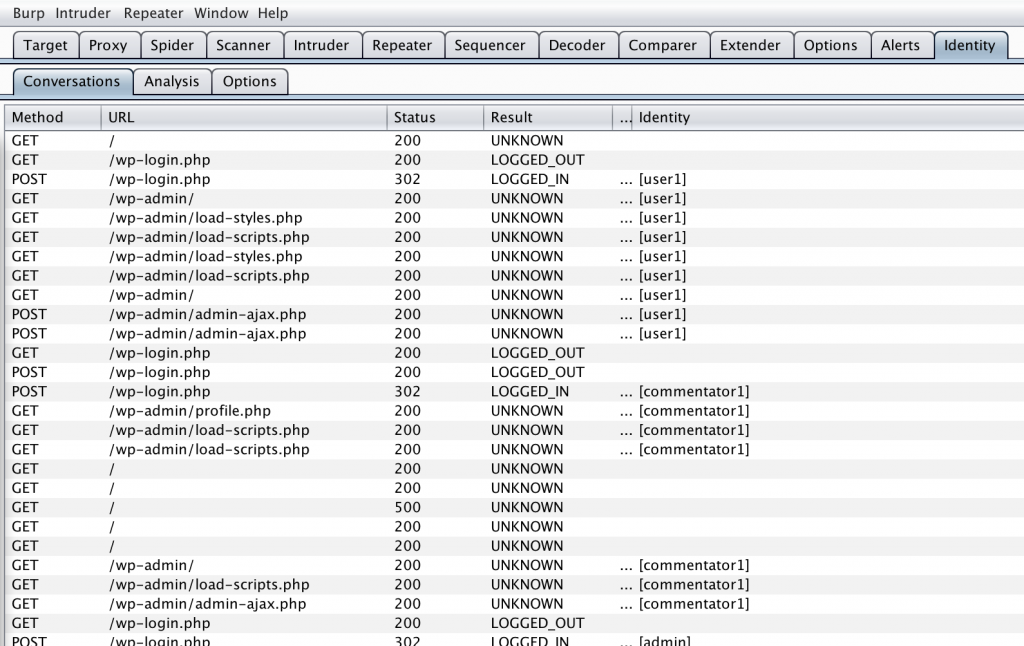
The core idea for this tool comes from the realisation that, when reviewing how web applications work, it would help immensely to be able to know which user was actually making specific requests, rather than trying to just keep track of that information in your head (or not at all). Once you have an identity associated with a request, that enables more powerful analysis of the requests which have been made.
In particular, it allows the analyst to compare requests made by one user, to requests made by another user, even as those users log in and log out.
There are various ways in which users can be authenticated to web applications, and this extension doesn’t try to handle them all, not just yet, anyway. It does handle the most common case, though, which is forms-based auth, with cookie-based session identifiers.
So, as a first step, it allows you to identify the “log in” action, extract the name of the user that is authenticating, and associate that identity with the session ID until it sees a “log out” action. Which is pretty useful in and of itself, I think. Who hasn’t asked themselves, while reviewing a proxy history: “Now which user was I logged in as, when I made this request?” Or: “Where is that request that I made while logged in as ‘admin’?”
So, how does it do this? Unfortunately, the plugin doesn’t have AI, or a vast database of applications all captured for you, with details of how to identify logins and logouts. But it does have the ability to define a set of rules, so you can tell it how your app behaves. These rules can be reviewed and edited in the “Options” tab of the Identity extension.
What sort of rules do we need? Well, to start with, what constitutes a valid logon? Typically, that may include something like “A POST to a specified URL, that gets a 200 response without the text ‘login failed’ in it”. And we need to know which form field contains the username. Oh, and the sessionid in use by the application, so that the next time we see a sessionid with the same value, we can link that same identity to that conversation as well.
The easiest way to create the login rule is probably via the Http Proxy History tab. Just right click on a valid login request, and choose “Identity -> create login rule”. It will automatically create a rule that matches the request method, request path, and the response status. Of course, you can customise it as you see fit, adding simple rules (just one condition), or complex rules (this AND that, this OR that), nested to arbitrary levels of complexity. And you can select the session id parameter name, and login parameter name on the Options tab as well.
Awesome! But how do we identify when the user logs out? Well, we need a rule for that as well, obviously. This can often be a lot simpler to identify. An easy technique is just to look for the text of the login form! If it is being displayed, you’re very unlikely to be logged in, right? That can also catch the cases where a session gets timed out, but for the moment, we have separate rules and states for “logged out” and “timed out”. That may not be strictly necessary, though. Again, these rules can be viewed and edited in the Options tab. Another easy way to create the logout rule is to select the relevant text in the response, right-click, and choose “Identity -> create logout rule”.
Sweet! So now we can track a series of conversations from an anonymous user, through the login process, through the actions performed by the person who was logged in, through to the end of that session, whether by active logout, or by inactivity, and session timeout, back to an anonymous user.
Most interestingly, though, by putting the conversations into a “spreadsheet”, and allowing you to create a pivot table of selected parameters vs the identity of the person making the request, it becomes possible to almost automate the testing of access control rules.
You can choose which fields to use, and the order of them, by dragging them from one column to the next.
This tool is not quite at the “automated” stage yet, but it does currently allow you to see which user has performed which actions, on which subject, which makes it almost trivial to see what each user is able to do, and then formulate tests for the other users. You can also see which tests you have executed, as the various cells in the pivot table start filling up.
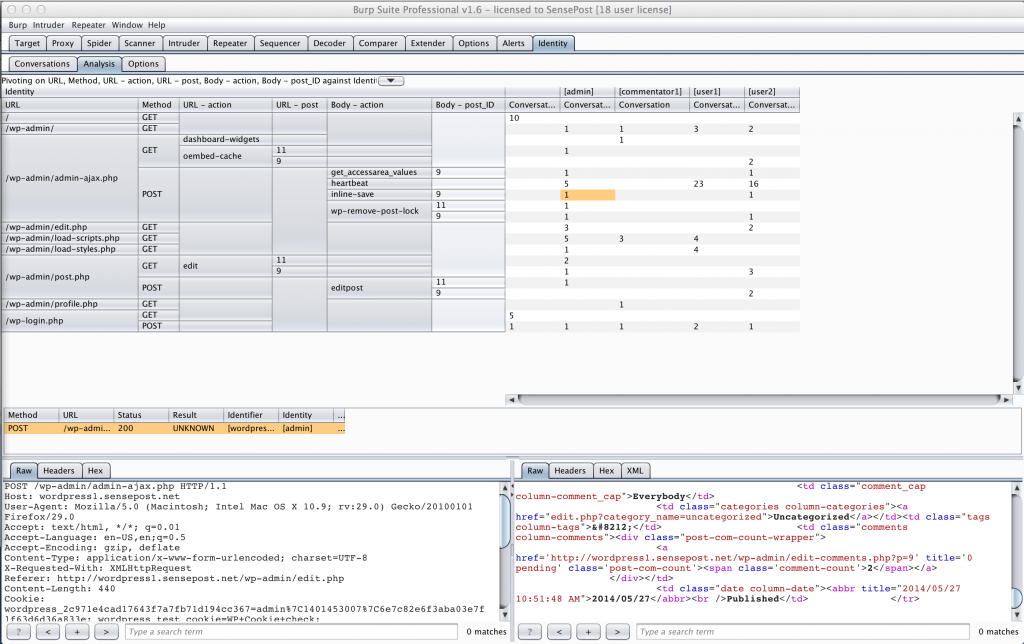
In this screenshot, we are pivoting on the path of the URL, the method (GET vs POST), and then a bunch of parameters. In this application (WordPress, just for demonstration purposes), we want the “action” parameter, as well as the parameter identifying the blog post being operated on. The “action” parameter can appear in the URL, or in the Body of the request, and the “post” parameter in the URL identifies the blog post, but it is called post_ID in the body. (It might be handy to be able to link different parameters that mean the same thing, for future development!). The resulting table creates rows for each unique parameter combination, exactly as one would expect in an Excel pivot table.
Clicking on each cell allows you to get a list of all the conversations made by that userid, with the specific combination of parameters and values, regardless of the number of times that they had logged in and out, or how many times their session id changed. Clicking on each conversation in the list brings up the conversation details in the request/response windows at the bottom, so you can check the minutiae, and if desired, right-click and send them to the repeater for replay.
So far, the approach has been to manually copy and paste the session cookie for a different user into the repeater window before replaying the request, but this is definitely something that lends itself to automation. A future development will have an option to select “current” session tokens for identified users, and substitute those in the request before replaying it.
So far, so good! But, since the point of this extension is to check access controls, we’d ideally like to be able to say whether the replayed request was successful or not, right? There’s a rule for that! Or there could be, if you defined them! By defining rules that identify “successful” requests vs “failed” requests, conversations can be tagged as successful or not, making it easier to see when reviewing lists of several conversations. Future development is intended to bring that data “up” into the pivot table too, possibly by means of colouring the cells based on the status of the conversations that match. That could end up showing a coloured matrix of successful requests for authorised users, and unsuccessful requests for unauthorised users, which, ultimately, is exactly what we want.
We’d love to hear how you get on with using this, or if you have any feature requests for the plugin. For now, the BurpId plugin is available here.