But, Websockets!
The last week I was stuck on a web-app assessment where everything was new-age HTML5, with AngularJS and websockets. Apart from the login sequence, all communication happened through websockets. Now intercepting websockets can be done in Burp and you can modify the requests/responses as you wish. There were however multiple issues with this.
- Polling – the webapp did a ‘ping’ request and if this was held up (intercept in burp) the app would timeout and I had to start from scratch. This timeout period was relatively aggressive, so by the time I finished modifying a request, the app had timed out and my changes meant squat.
- Intercept/Replace rules- ping messages were irritating and Burp had no way to not intercept these. It also wasn’t possible to configure out replace rules. And according to this, it isn’t coming to Burp anytime soon… https://support.portswigger.net/customer/portal/questions/11577304-replace-text-in-websocket-operations
- Replay/Intruder – there is no way to replay a websocket request in Burp. This also means no Intruder :(
At this junction, three options were available to me. Use ZAP (which does have intercept rules but not replay/replace/intruder). Use Internet Explorer and force the app into non-websocket mode or write a custom proxy. So the choice was obvious, write a custom proxy.
This was surprisingly simple and also super educational. First things first, you create an HTTP/HTTPs intercepting proxy. Using NodeJS this was done in around 20 lines of code. First lesson here was about HTTPs interception. If an upstream proxy is set, then the browser/Burp will first do a CONNECT request over HTTP before HTTPS is done, so your HTTP interception needs to have a rule for CONNECT requests and handle the upgrade to HTTPS accordingly. Nice. Then websockets, super easy! You just need to listen for the upgrade request in your normal HTTP/HTTPS proxy and create a new websocket server/client. The rest happens automagically through your existing HTTP/HTTPs proxy. This meant that we could easily create a full interception proxy for HTTP/HTTPS/WS/WSS all in about 125 lines, even with prettification.
This allowed for intercepting traffic and dumping to the terminal, I also had the ability to replace values according to replace rules built into the app, and mangle output (pretty JSON ect) according to mangle rules. Great success.. However, this was clunky and required a restart of the app each time I wanted to change the replace rules. Furthermore, dumping the session to the terminal got very messy, very quickly. However, being able to mangle the output and ignore things like the ping and UI config messages already made a massive difference to the whole “understand and map the application” process.

The logical next step was to create a proper interface for this. As the proxy was already in NodeJS, creating an interface was as simply as slapping together more webserver code that would display traffic rather than intercept it. We start up a second webserver on 8082 (proxy running on 8081) and connecting to it gives us a nice pretty interface,
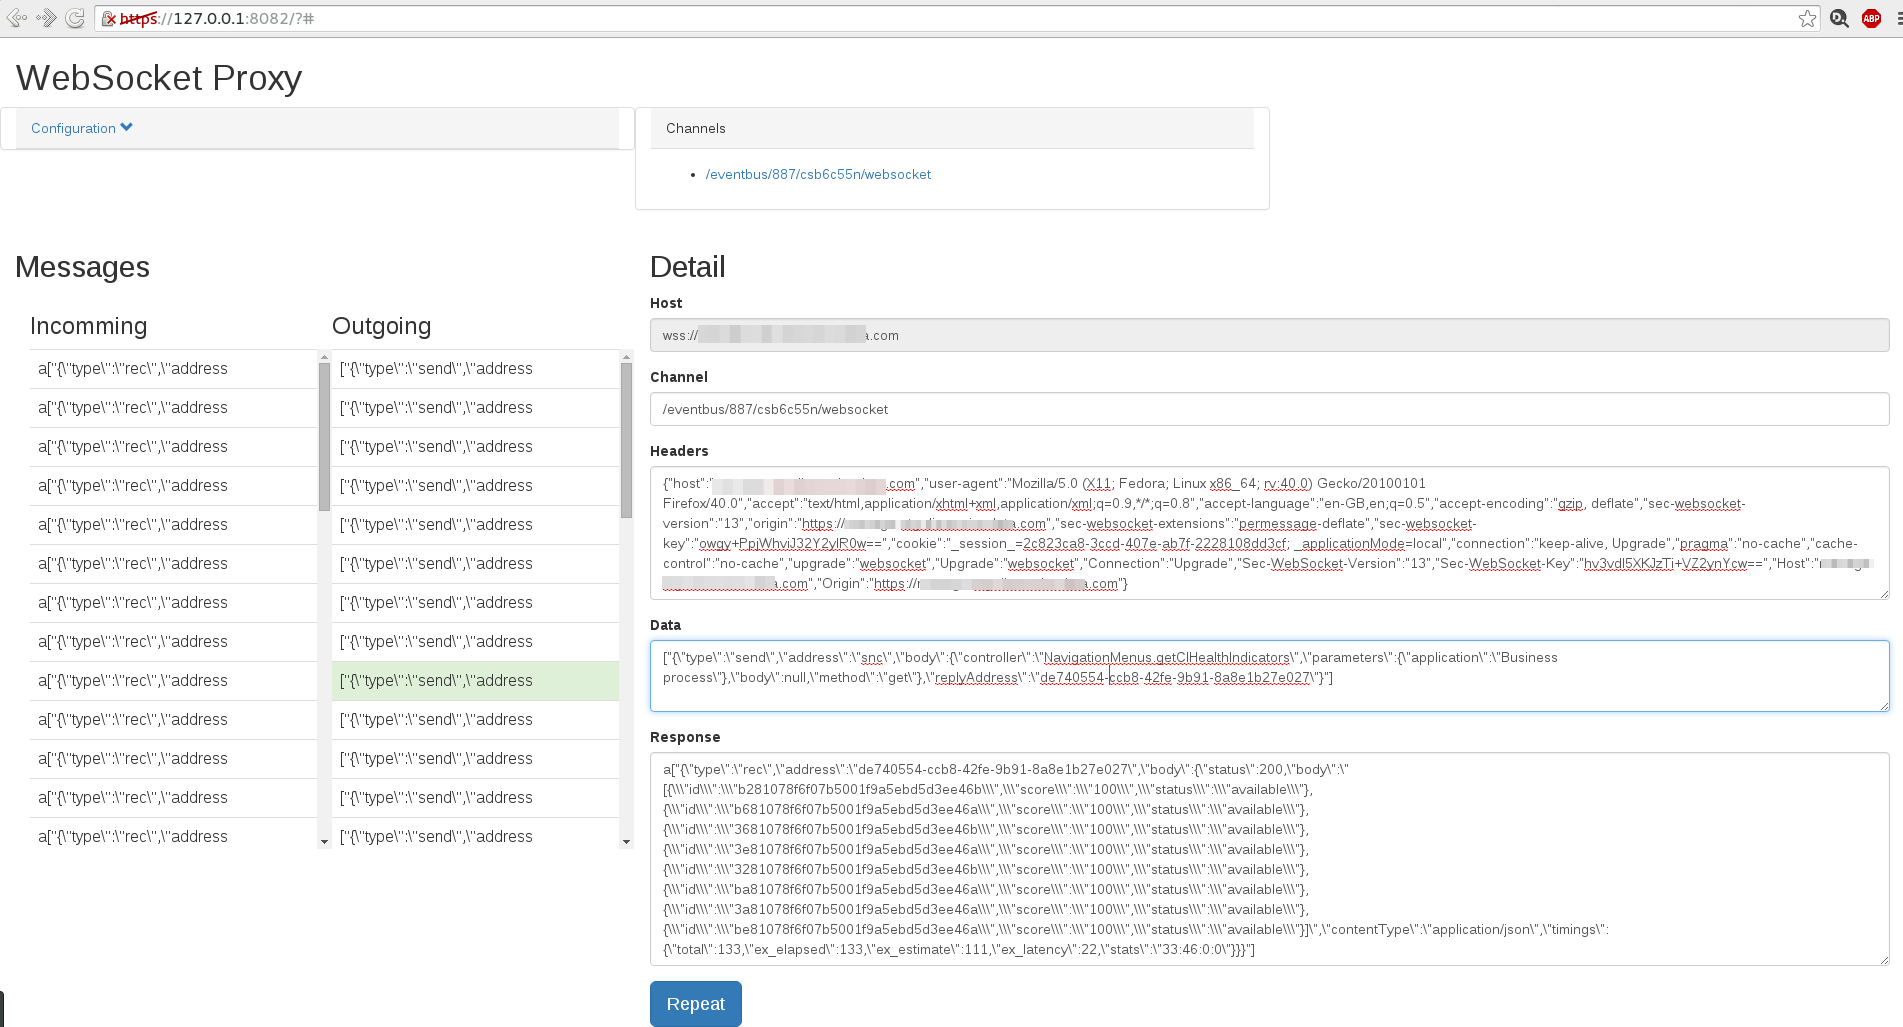
The fun thing here was using websocket to forward the traffic to the browser as we intercepted traffic in our proxy. Ah the irony, using websockets in our app that we created because we were struggling with websockets. It was a weird moment.
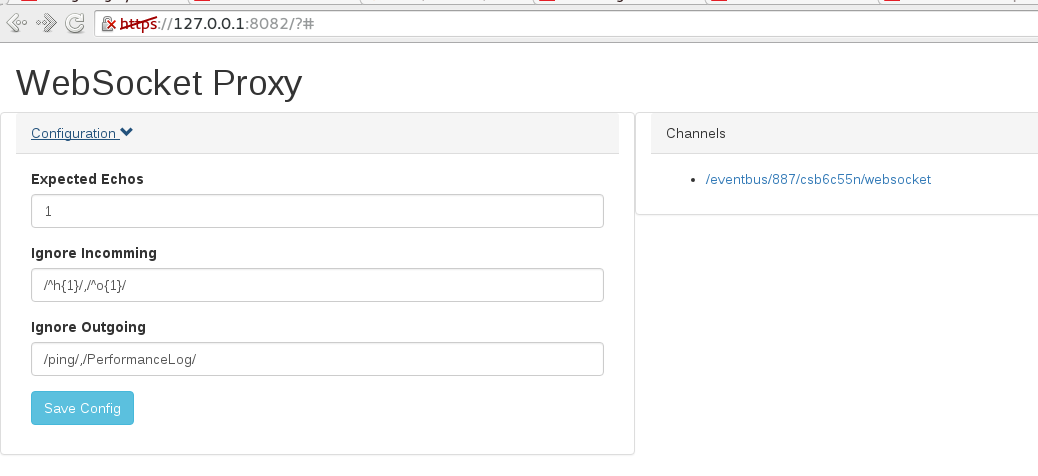
At this point the proxy was able to display all websocket traffic passing through it, the headers, channels, data ect. It also allowed you to “repeat” the traffic, where you modify the request and create a new websocket that reuses our headers from the intercepted request. This takes care of authentication ect. Importantly, it did mean that we needed to keep in mind that the protocol (sockJS in this case) may give you ‘x’ amount of messages on connect, for example, pushing down configs ect. Thus there is a config option to set the “expect” value, this simply indicates to the repeater that it should ignore the first ‘x’ number of messages and then send the response back. Here we set expect to 1, so that it ignores the “connect successful” message. We can also set the regular expressions used in the ignore rules. Incoming we ignore the “ping-pong” messages, outgoing we ignore the “ping” and the “performanceLog” messages.

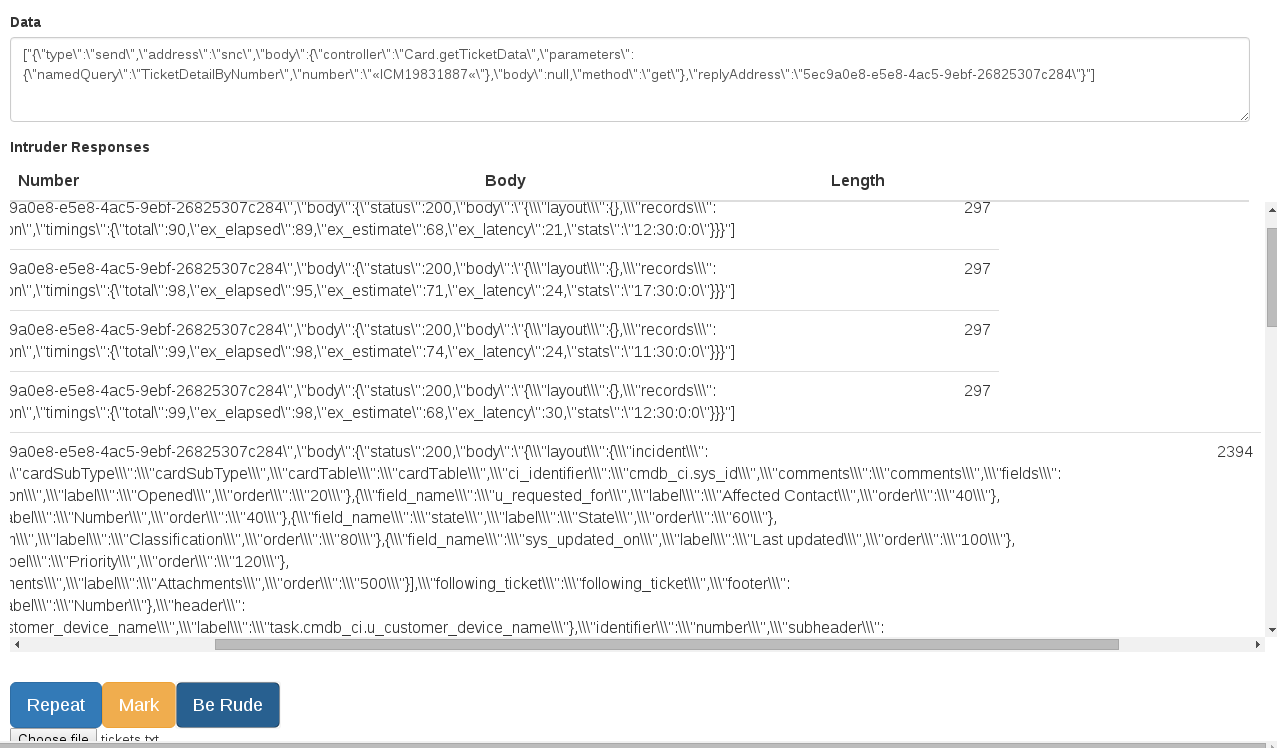
The final addition to the proxy was a intruder type system. This allows you to select some text, “mark” it (just like you do in burp intruder) and then “be rude” (intrude). This will take our payload file, so fuzzing strings, incremental numbers ect. Unfortunately no smart payloads like you get in Burp.. Once you hit “be rude”, a new websocket to the target will be opened and each request will be sent in turn. All the results are then displayed in the interface.
That is about as far as I got with the proxy, but pretty feature complete for 4 days of work and assessment.
If you want to use this now or in the future, everything is on github: https://github.com/sensepost/wsproxy
To get setup, ensure you have nodejs and npm. You need to do
$ cd ~
$git clone https://github.com/staaldraad/wsproxy.git
$ cd wsproxy
$ npm install
$ node wsproxy.js
To turn off the webserver, modify wsproxy.js and set the global variable webserver to false.
The best way to use this is to set it as your upstream proxy in burp. That means you get to use all the Burp goodness for the normal HTTP stuff and you get to keep track of everything (burp logs are important, mkay?)
./et