Intro
Laptop hardening is difficult at the best of times, and it’s made worse by the conflicting requirements we have for our workstations. With one laptop, we need to have work email and chat set up, we need to be able to spin up lab environments to test cool stuff we’re interested in, and we need to be able to run various tools on client engagements that may require us to lower the security of our laptop to run properly. The go-to solution to squaring these requirements is to use something like VMWare or docker containers to keep things separate, but after trying out Qubes for a while, I’ve found that it’s improved my workflow significantly. However, no linux setup is perfect out the box, and in this post I want to note the biggest changes I’ve made to make the OS more usable as a daily driver.
First things first though, what is Qubes? Their focus is on ‘security through compartmentalization’, and their focus is on making that as easy as possible. They have a great writeup about it on their website at https://www.qubes-os.org/intro/, but the way they do it is by letting you set up a Template VM, and basing several AppVMs off the template. Each template has a full OS set up with whatever tools you like, and each AppVM gets a fresh new home directory, but fetches and executes software from the template. This makes updating many AppVMs based on one template easy. For SensePost work, it means that you have a VM for email, chat, etc, and separate VMs for each client engagement, all without taking up too much precious SSD space.
The title is inspired by this blog post: https://medium.com/@securitystreak/living-with-qubes-os-r3-2-rc3-for-a-week-1a37e04c799e, where the author gave a lot of great tips to improve a default setup, but gave conclusions that I don’t feel do the OS justice.
Networking
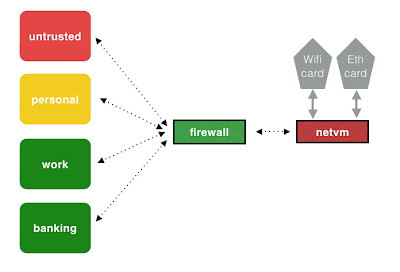
The Qubes way to do networking is to create a new VM, set it up to connect to whatever you like, and set other AppVMs to use that for upstream internet. While this ends up with you running a few VMs for network, they’re all lightweight and single purpose. Furthermore, this provides several benefits to running everything through a single instance of networkmanager. By default, the OS ships with a NetVM which runs networkmanager to connect to WiFi or Ethernet, and provides downstream network access to a Firewall VM, which in turn provides internet to whatever AppVMs you connect to it. A picture is worth a thousand words, so I stole this from Joanna Rutkowska’s writeup on the subject available at http://theinvisiblethings.blogspot.com/2011/09/playing-with-qubes-networking-for-fun.html.
The benefit of this setup is that its super flexible, and once a VM is connected to some tunnel, all client traffic is transparently sent through it without any config on the client. I created a network VM that connects to SensePost’s VPN, and only connected my work VM to it. I followed this guide https://blog.tufarolo.eu/how-to-configure-pihole-in-qubesos-proxyvm/ to set up a Pi-Hole server as a NetVM, which in my setup sits between the firewall and other AppVMs, giving me insight into what my VMs are doing, as well as blocking ads and requests to telemetry services I didn’t sign up for (I’m looking at you, incoming.telemetry.mozilla.org).
It’s possible to set up an SSH VPN which I could use to tunnel project traffic through a digital ocean droplet while keeping other traffic local. It’s also possible to route everything through TOR using the whonix gateway that ships with Qubes, should you be so inclined. The point is, transparent proxies are awesome, and complex setups can be applied easily with this.
The other major benefit has been the ability to connect to more than one network, and choose which VMs connect through which interface. I was happy to maintain comms with the office on a recent project by connecting my laptop to my phones hotspot for internet to my work vm, and using a TP-Link WiFi dongle to connect my tools VM to the client’s WiFi.
Two notes on setting up the pi-hole that weren’t immediately obvious for me. I found I needed to run /rw/config/qubes-firewall-user-script every time a new VM connected to it, or the VM wouldn’t get DNS. So I set it up to run every 30 seconds in lieu of a better method.
Second, you can name your hosts so they show up nicely in the pi-hole dashboard by adding entries for them in `/etc/hosts`.

Setting up a tools VM
Running tools like responder or bettercap behind several layers of NAT would be difficult if not impossible. However, you can connect a VM directly to a network by enabling networkmanager. You do this by enabling network-manager in the VM settings like so:

Setting up a testing VM was simpler than I thought it would be. I just cloned the debian-9 template to create a new one called debian-tools, added the kali repos to apt, and ended with a pseudo kali installation with all the Qubes tools installed and ready to go. So now I install all my tools on the debian-tools template which I use for project VMs, and still have a stock debian-9 template to use for normal things. You can either add the kali repos manually, or through something like https://github.com/LionSec/katoolin.
Windows Tools
Having the Qubes Windows Tools set up and working properly gives you parallels-like windows virtualization, where the only difference between your linux and windows VMs is the theme. This lets you set up windows template and AppVMs, set up a windows disposable vm, have a shared clipboard, and all the other Qubes goodness. Getting it installed fully on Qubes 4 was a bit of a challenge, but these are the steps that worked for me:
1) install Windows 7 x64:
$ qvm-create --class TemplateVM --label black --property virt_mode=hvm win7-x64-template
$ qvm-prefs win7-x64-template memory 4096
$ qvm-prefs win7-x64-template maxmem 4096
$ qvm-prefs win7-x64-template kernel ''
$ qvm-volume extend win7-x64-template:root 40g
$ qvm-prefs win7-x64-template debug true
$ qvm-features win7-x64-template video-model cirrus
$ qvm-prefs -s win7-x64-template qrexec_timeout 300
$ qvm-start --cdrom=untrusted:/home/user/Downloads/Win7_x64.iso win7-x64-template
2) Change some windows settings
$ bcdedit /set testsigning on
$ netplwiz # and deselect 'users must enter a username and password'
3) Install all windows updates. Installing QWT on a fresh windows install breaks it, and updating windows fixes that problem. Once you’ve installed updates, it makes sense to back up your windows template in case it breaks during the QWT installation
4) Install QWT.
The Windows Tools were in the testing repos when I ran this, so I had to use:
$ sudo qubes-dom0-update --enablerepo=qubes-dom0-current-testing qubes-windows-tools
$ qvm-start win7-x64-template --install-windows-tools
5) Enable Seamless Mode
I think there used to be a GUI option for this in previous Qubes versions, but now you have to set this registry entry to 1:
HKLM\SOFTWARE\Invisible Things Lab\Qubes Tools\qga\SeamlessMode
6) Enjoy \0/
7) Integrate with Nautilus
Qubes gives you menu items in nautilus to copy files to other VMs, and to edit them in disposable VMs, but I just wanted to be able to edit a word doc in a VM that was already running. The most usable way I found was to create a file called edit-in-vm.desktop in /usr/share/applications/ with the content
[Desktop Entry]
Version=1.0
Name=Different VM
Comment=Edit in a different VM
Exec=qvm-open-in-vm work %u
Icon=folder-publicshare-symbolic
Terminal=false
Type=Application
This lets you specify qvm-open-in-vm as the default application for files with a specific mime type, after which you can just double click it and enter the name of the VM you want to open the file in. If you edit and save the file in the vm, it gets copied back when you close the process.
Guake Shells
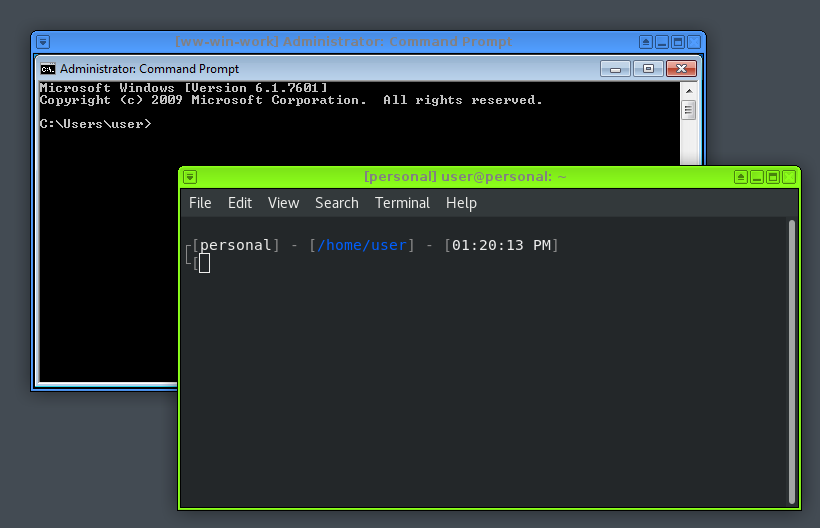
I’ve been using Guake for long. It’s become a fundamental part of my workflow and I’d hate to give it up. The problem with Guake on Qubes is that it has to run in Dom0, which doesn’t have network access, so you can’t just run Guake and SSH to your VMs without giving Dom0 network and fundamentally breaking the Qubes security model. However, Dom0 can run commands on VMs using its backend admin infrastructure. You can use qvm-run to run a command in a VM and get the output, like so:

The red colour shows that the output is from a different VM. You can turn that off, as well as other things like filtering escape characters, so you can get the original output without any filtering. I wanted to use this to get shells on my VMs from Dom0, but I wanted to keep Qubes colors. This is how I did it.
I wrote this bash script to map Qubes VM labels to console colors:
qube-color: #!/bin/bash label=`qvm-prefs --get $1 label`;if [ $label = “red” ]; then echo 001; elif [ $label = “orange” ]; then echo 003; elif [ $label = “yellow” ]; then echo 011; elif [ $label = “green” ]; then echo 002; elif [ $label = “gray” ]; then echo 008; elif [ $label = “blue” ]; then echo 004; elif [ $label = “purple” ]; then echo 005; elif [ $label = “black” ]; then echo 016; fi;
Which gets the label from a VM, and returns a colour for it. Then, this bash script passes the colour to a VM, gets a reverse shell, and sets it up properly:
shell: #!/bin/bash guake -r $1 stty raw -echoqvm-run –no-colour-output –no-colour-stderr –no-filter-escape-chars –pass-io $1 “QubesGuakeSetup="export QUBESCOLOR=
qube-color $1;export SHELL=ZSH; export TERM=xterm-256color; stty rows 50 columns 200" python -c ‘import pty; pty.spawn("/bin/zsh")’”reset guake -r Terminal
This bit could be improved in a few ways, but works fine if you don’t resize your terminal. Next, I needed to get ZSH to run the commands passed in
"QubesGuakeSetup"
by adding
eval "$QubesGuakeSetup"
to /etc/zshenv (on fedora. its /etc/zsh/zshenv on debian). Lastly, I created a ZSH theme to show the color passed from Dom0 and saved it in ~/.oh-my-zsh/themes
qubes.zsh-theme:
PROMPT=$'
$FG[245]?[$FG[015]$BG[$(echo $QUBESCOLOR)]%m% %{$reset_color%}$FG[245]] - [$FG[027]$(pwd)$FG[245]] - [$FG[255]$(date \'+%X\')$FG[245]]
?[%{$reset_color%}'
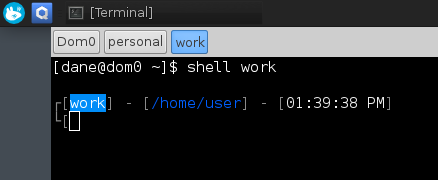
This sets up a fully functional reverse shell through Qubes tools, where you can run vim, hit Ctrl+C, and everything else you could want in a terminal. It changes the Guake tab to the name of the VM, and shows the colour in the PS1 string so you always know where you are, like so
The only downside of this is that it bypasses Qube’s clipboard functionality, and uses Dom0’s clipboard instead. As this is only text, I’m OK with it.
Screenshots
While it seems lame, we take a lot of screenshots, and Qubes screenshot tool is almost unusable because it saves images to Dom0 without providing an easy way to get them to a different VM. Luckily, someone has already done the heavy lifting needed for this. This project https://github.com/evadogstar/qvm-screenshot-tool lets you take a screenshot of a region, a window, or the full screen, and save it to a specific VM. All these options can be specified with command-line flags, but closes immediately unless its run in a terminal, so I created an XFCE shortcut that runs the following command when I press the print-screen button:
xfce4-terminal --minimize --command "/home/dane/Software/qvm-screenshot-tool.sh --upload-to-appvm-only --vm work -r"
This lets me just push the print-screen button and draw a block on the screen. That block is saved and uploaded to the Pictures folder on my Work VM, ready to be used in a report.
Inter-VM Clipboard and Terminals
The default way to copy content from one VM to another is hit Ctrl+C to copy it to the clipboard, and Ctrl+Shift+C to copy it to the shared clipboard. This conflicts with the default shortcuts to copy from a terminal, which I do a lot. However, these shortcuts can be changed in /etc/qubes/guid.conf. I changed my shortcuts to Ctrl+Alt+C and Ctrl+Alt+V.
Summary
Having all of this set up, I’ve found Qubes to be perfectly usable on projects, as my project VM is connected directly to a network like any other laptop would be. Furthermore, the Qubes infrastructure offers a lot of benefits, and makes it easy to do things that would otherwise be quite difficult.
- As everything is done in VMs, backups are easy (even if they take long).
- The VM architecture is awesome. It lets you separate your life into different VMs as the Qubes team intended, but also makes it easy to set up labs quickly and with very little fuss, is easier than doing the same on VMWare or VirtualBox, and takes up much less space due to VMs sharing a template.
- Having the windows tools set up right makes spinning up windows VMs just as quick, and with one small tweak you can open office docs from linux in a way that seems native.
- The Qubes way of doing networking makes it easy to apply complex tunneling, and allows you to only connect certain VMs to certain networks. You could also use this to try out network attacks from NetVMs, as each one works like a router.