This post will cover my journey into the analysis of CVE-2019-0547 (Affecting the windows DHCP client), a vulnerability discovered by Mitch Adair of Microsoft Windows Enterprise Security Team and how I found a new issue in the same function.
- Part 1
- Patch extraction
- Patch diffing
- Program flow to the function
- DHCP Options
- 0x000x00
- Part 2
- Integer overflow
- Nobody respects RFCs
- 0xC0 “compression algorithm”
- Final conclusions
Patch extraction
Even though these first steps around patch downloading, extraction and diffing are already heavily documented over the internet, I will cover them here in any case.
If you want to diff anything, you need at least two different samples. In this case, I will use the security update KB4480966 for Windows 10 x64-based Systems Version 1803, downloaded from the Microsoft website and a virtual machine with the same version of Windows but without the patch.
One of the ways to download the latest patch is, going to the advisory website and click on the Security Update from the download column, this will redirect you to the corresponding KB.
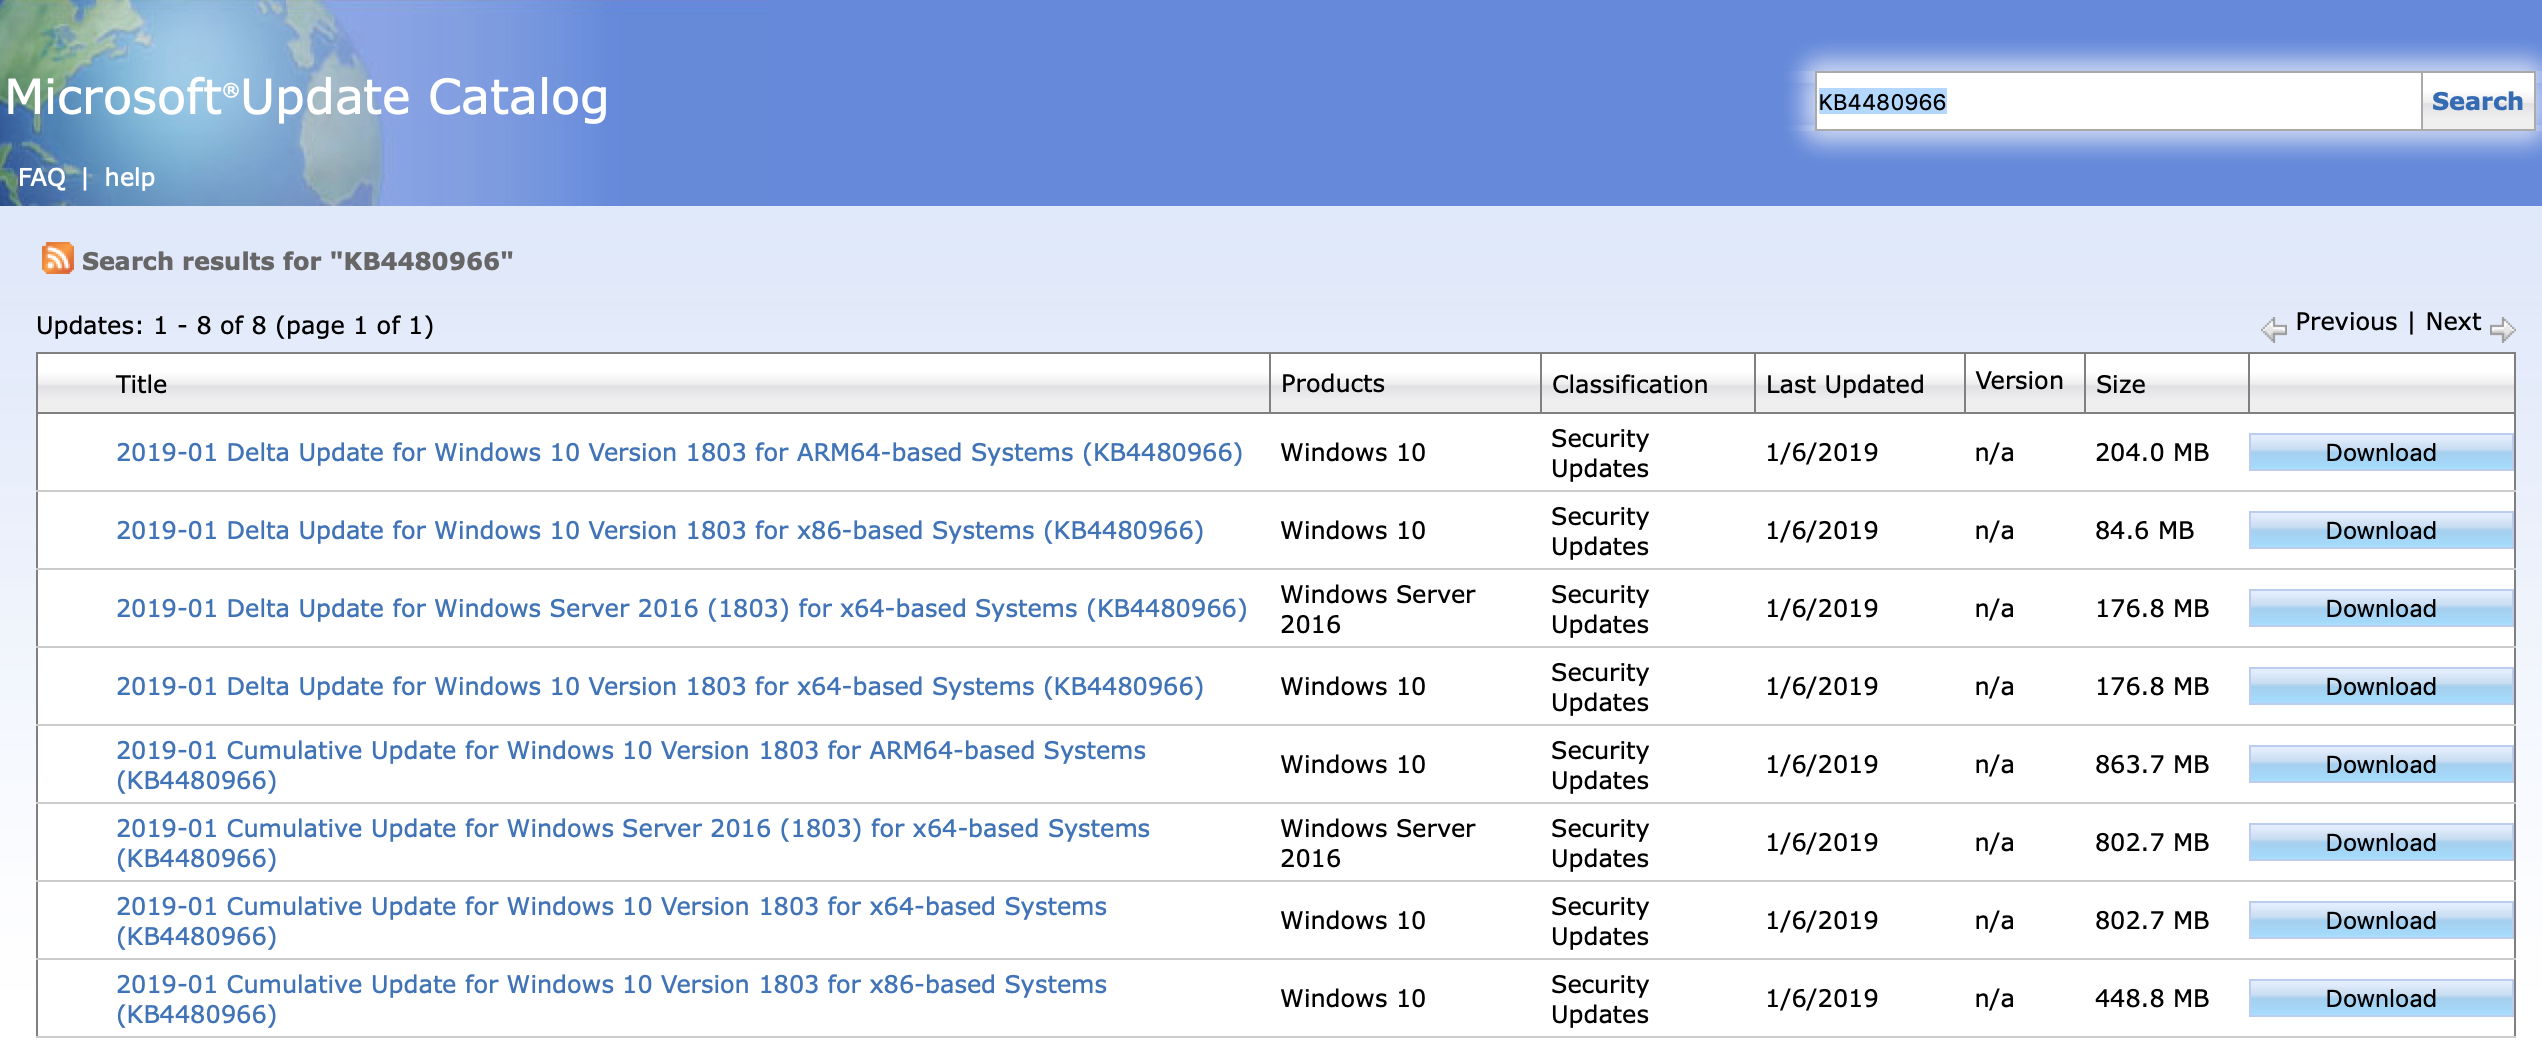
Microsoft Update Catalog.
In the update catalog you will usually find two types of updates:
-Delta: Contains all changes since the latest feature update.
-Cumulative: Contains only the changes since the previous update.
As you probably already imagine, for the sake of simplicity, the easiest way is to download the cumulative update, as it will contain fewer changes, making it easier to find the vulnerable code.
The catalog provides us a msu file that can be extracted using, for example, the windows expand tool (expand –F:* <.msu file>), this will create a .cab file that can then be extracted using the same method, generating a structure of directories with all the patched files. At this point multiple approaches can be used. In my case, I decided to go for the simplest that came to my mind, due to the vulnerability being related to the DHCP client, I searched against these folders with the query “DHCP”, obtaining the following files.

DHCP related DLLs.
Now that we have the patched versions, we need to obtain the unpatched ones, and this is as simple as searching in a system without the patch (The ideal scenario will be a machine with the previous patch, this would avoid seeing changes that aren’t related to the vulnerability). With the affected files identified, we can start diffing, but before loading them into IDA we should determine which of the DLLs contain patches. By the modified date you probably already know that it is dhcpcore.dll but, to be sure, we can compute the file hashes and compare if these change. In my case only the dhcpore.dll file contains changes.
Patch diffing
“Patch diffing is a common technique of comparing two binary builds of the same code – a known-vulnerable one and one containing a security fix. It is often used to determine the technical details behind ambiguously-worded bulletins, and to establish the root causes, attack vectors and potential variants of the vulnerabilities in question.”
Mateusz Jurczyk
There’s a lot of tools out there to perform binary diffing, like Diaphora, BinDiff, Turbodiff… In this case, we will go with Diaphora (Random fact: Greek word for difference).
I will not enter into details on how it works internally, but it “basically” correlates the functions from both binaries and then diff the contents. In this specific case, the correlation of the function it’s simple due to the fact that there are symbols available and the name of the functions don’t differs from one version to another (Warning! When you attach to a process related to any network Windows stuff, don’t configure the symbols to be loaded from remote servers, or it will just get stuck, I got some crazy headaches with this.). In the case that there weren’t symbols available, some other techniques will apply, like fuzzy hashing and some mathematical magic that I still didn’t find the time to dig into.
Diaphora is distributed as an IDA plugin/script. To use it you have to load the first binary into IDA, execute the Diaphora script to generate a Diaphora database file, then open the second binary, run Diaphora again to create the database file for this binary too and also select the previously created database (A complete explanation of the process can be found inside the Diaphora documentation). When the correlation/diffing process is completed we will be presented with a few new IDA views, ranging from “Best matches” to “Unmatched functions” or “Partial matches”. In this case, as we already talked about before, we have symbols, so the matching process will be nearly perfect, being “Partial Matches” view our primary focus. This view shows us functions that appear to be the same but contains a few changes.

Partial matches view.
As we can see in the previous image, there are a few functions that contain changes, but the majority of them look like compiler things that probably don’t have anything to do with the vulnerability that we are looking for, the only one that catched my attention was DecodeDomainSearchListData(). It has a ratio of difference from one version to the other of 0.850 and 44 to 48 basic blocks (bb). This shows us that not only it isn’t a big function, but also looks that the changes are small.
Also, Diaphora offers us the possibility to right click on one of the functions and open new diffing views, for example, a “graph view diff” like the following:
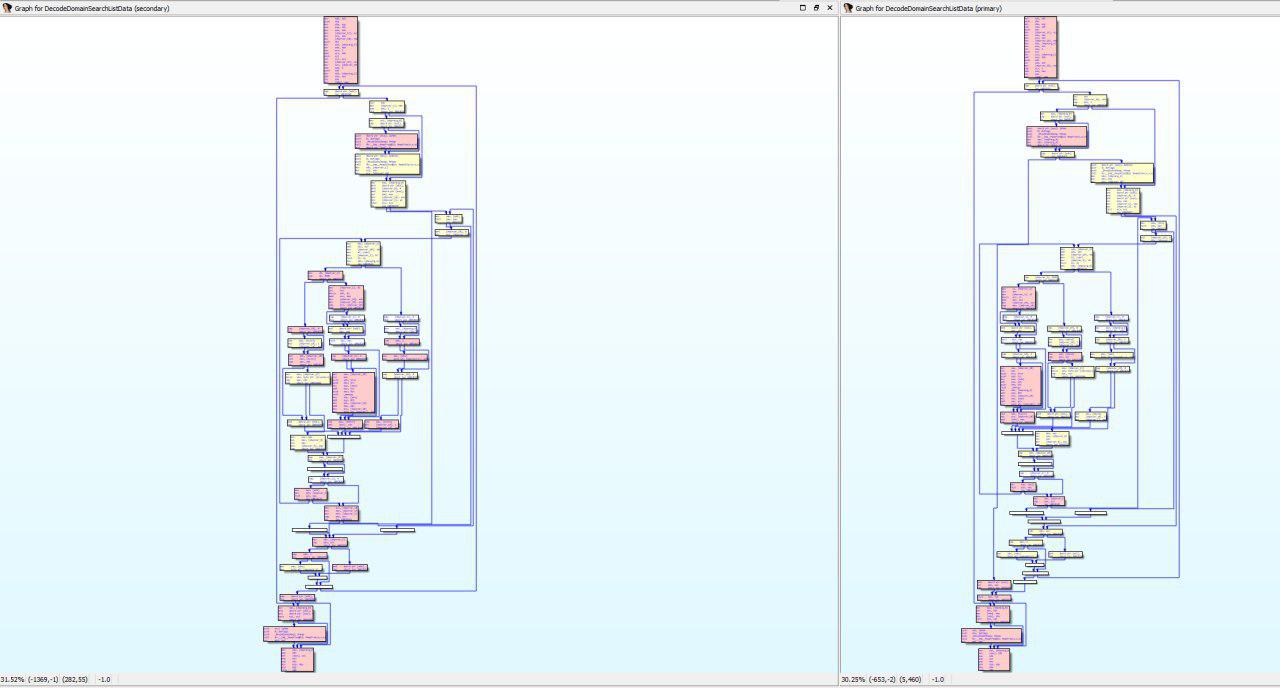
Graph view diff of the vulnerable function.
After taking an in-depth look into the pseudocode (Yes I know this is not the hax0r way but KISS) of both versions we can see that it appears that there’s only one change (There are some other changes, but related to the order of the bb and other things that don’t affect the logical flow of the function). Before performing a call to HeapAlloc(), a check was added to validate that the size of this HeapAlloc() its greater than 0, but what does this mean?

Pseudocode diffing.
As some readers probably already know, the implementations of the Heap Allocator can differ from one to other. If we take a look at the man documentation of malloc we found the following “If size is 0, then malloc() returns either NULL, or a unique pointer value that can later be successfully passed to free().”.
So with this in mind lets take a look this time at the specific implementation of Microsoft, “If size is 0, malloc() allocates a zero-length item in the heap and returns a valid pointer to that item. Always check the return from malloc, even if the amount of memory requested is small.”
So now that we know how it behaves, it looks like if we manage to cause the application to perform a call to HeapAlloc() with size 0, and later in the execution of the program it performs a memcpy() to this heap chunk we will be able to trigger a memory corruption vulnerability.
At this point, we can keep analysing the function to determinate how it works and how can we control the processed data, but in my opinion this is easier to accomplish with some context, so let’s try to identify what this function is for.
Program flow to the function
A quick backwards refs graph shows us some interesting information about what we are probably facing.
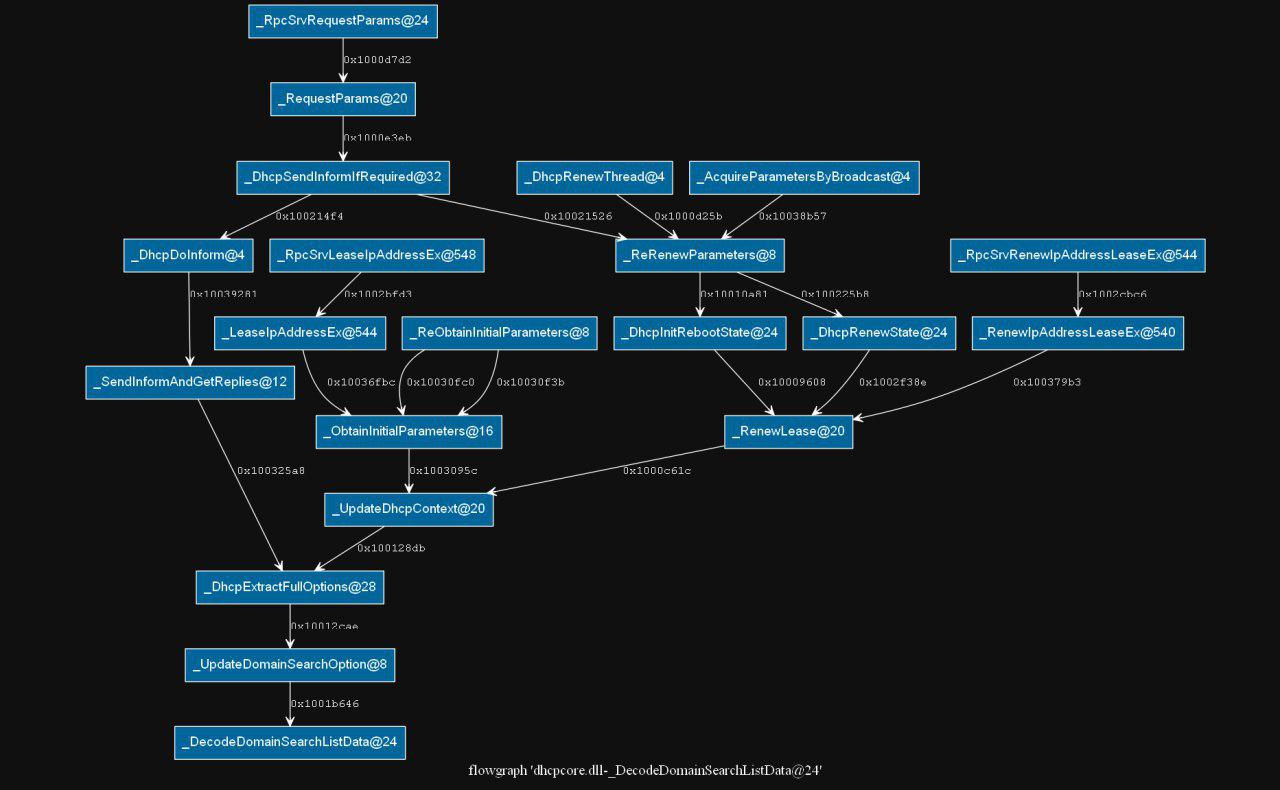
Control flow to the function.
We can rapidly see that one easy way to start the flow that can trigger the vulnerable code is the renewal of a current lease. Furthermore, we can see that all the calls to the vulnerable function are coming from another function called UpdateDomainSearchOption(), a function only called by DHCPExtractOption() so let’s take a look at this function, and which conditions need to be met in order to trigger the vulnerable code.

DHCP Options parsing at function DHCPExtractOption()? .
As the previous images show, it looks like there is a comparison between some data and the value 119. If this condition is met the program flow will continue to the vulnerable function, but what are the DHCP Options that DHCPExtractOption() is trying to get, and what the number 119 means?
DHCP Options
To talk about DHCP options, we need to talk first about how DHCP works. We can simplify DHCP as four UDP packets between the client and the server.
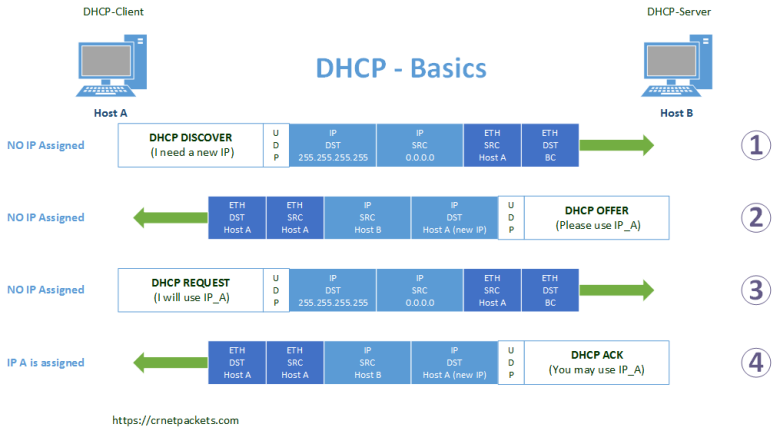
DHCP Basics.
Keeping it simple, the client sends a broadcast packet asking for a DHCP server, then the server responds with information like the available IP range, name servers and multiple other configurable values. With this information the client asks for an IP address, the server assigns the requested IP address if possible and finally sends a confirmation message to the client with some other network configuration parameters.
But how all of this works, and more specifically, how are the configuration parameters encoded inside the packets. Here comes into play the DHCP options. DHCP options are just that, a list of options with a unique ID, the server and the client select the ID of the options that they want to use, concatenate the values for these options and repeat the process until all the desired options are assigned.
Some of the readers might have already deduced that the comparison with the value 119 that we saw before is then a DHCP option, and yes, that is correct! More precisely, as we can observe in the IANA website, it’s the option for something called “Domain Search Option”. Summarising, the RFC (Hackers read RFCs, so CLICK THAT LINK!!!) says that this option contains a list of domains used to resolve hostnames when using DNS.
To simplify the understanding of the format and parsing implementation I created the following series of images and gifs. (Finally, I decided to put some links with gifs that contains all the frames one by one in case you want to enjoy them at your own pace.)
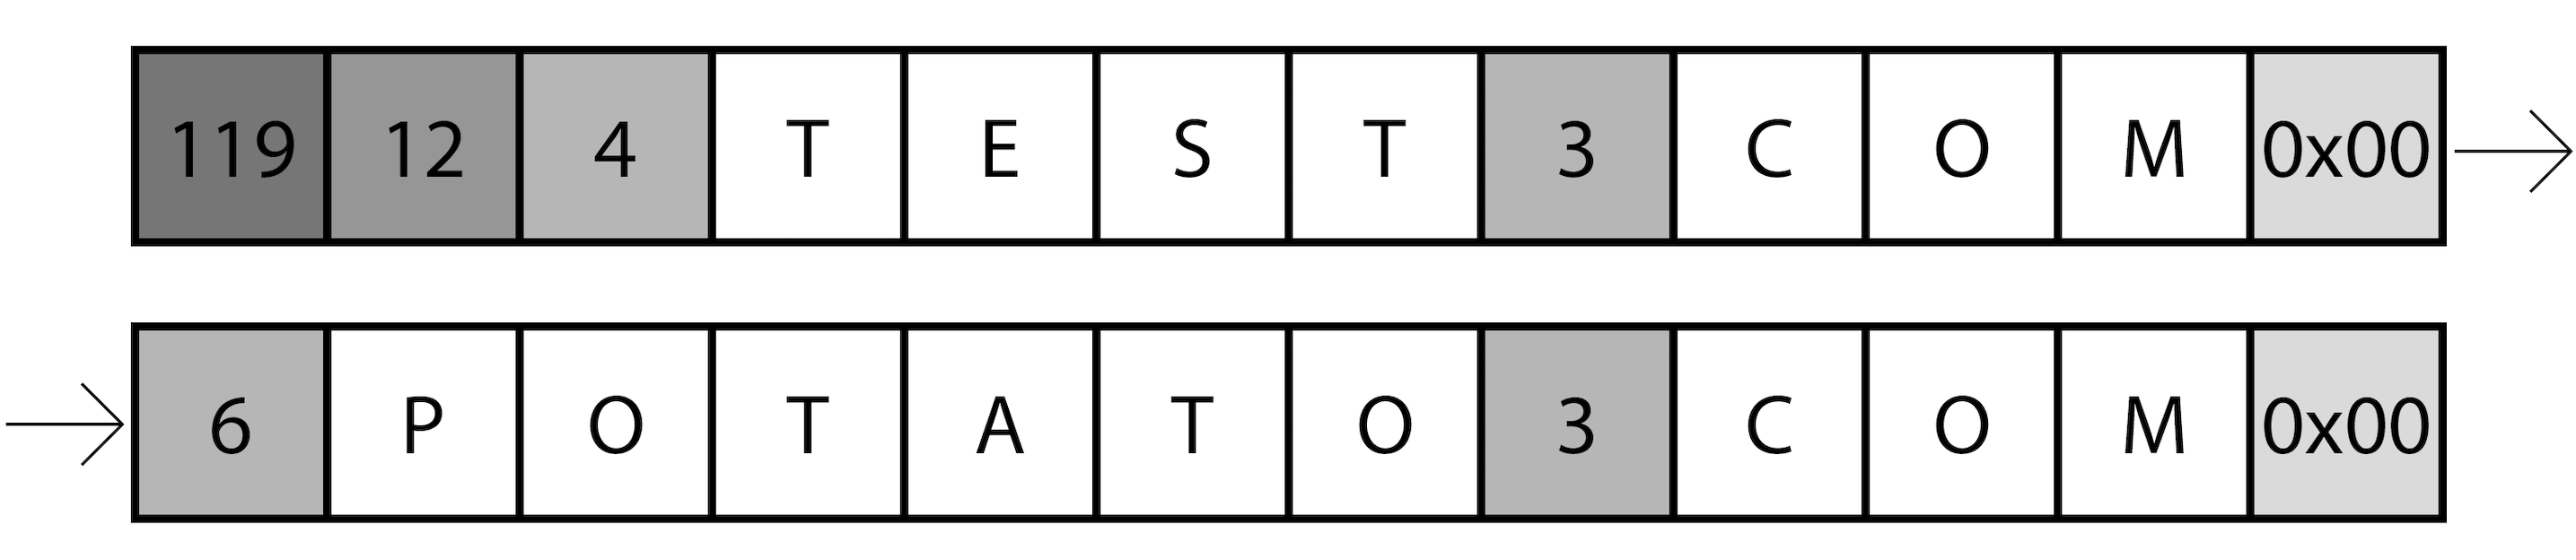
DHCP Option 119 example data.
Let’s break down the previous image. Imagine that we want to send the value “test.com,potato.com“. First of all we need to add the value 119 to let the client know the exact DHCP option that we are referring to, then we send the total size of our message, and after this, we can send our domains list with some modifications. All the dots need to be deleted, and each part of the domain needs to have the size as a prefix. Finally, we need to add a null byte at the end of each domain to differentiate it from the next one.
As you can see the implementation it’s really simple and lets the user play with data and specify sizes, a combination of things that should trigger your hacker sense.
But how did Microsoft implemented the parsing of this option? (If you want to take a look to the decompiled functions by yourself) We can split the parsing process into two rounds of iterations over the data. The first one will calculate the total size for the HeapAlloc() that we mentioned before, when this size gets calculated the program will perform the HeapAlloc() and the second round starts, copying and modifying the data as necessary into the allocated chunk.
Gifs are cool, but not everyone’s brain work at the same clock rate.
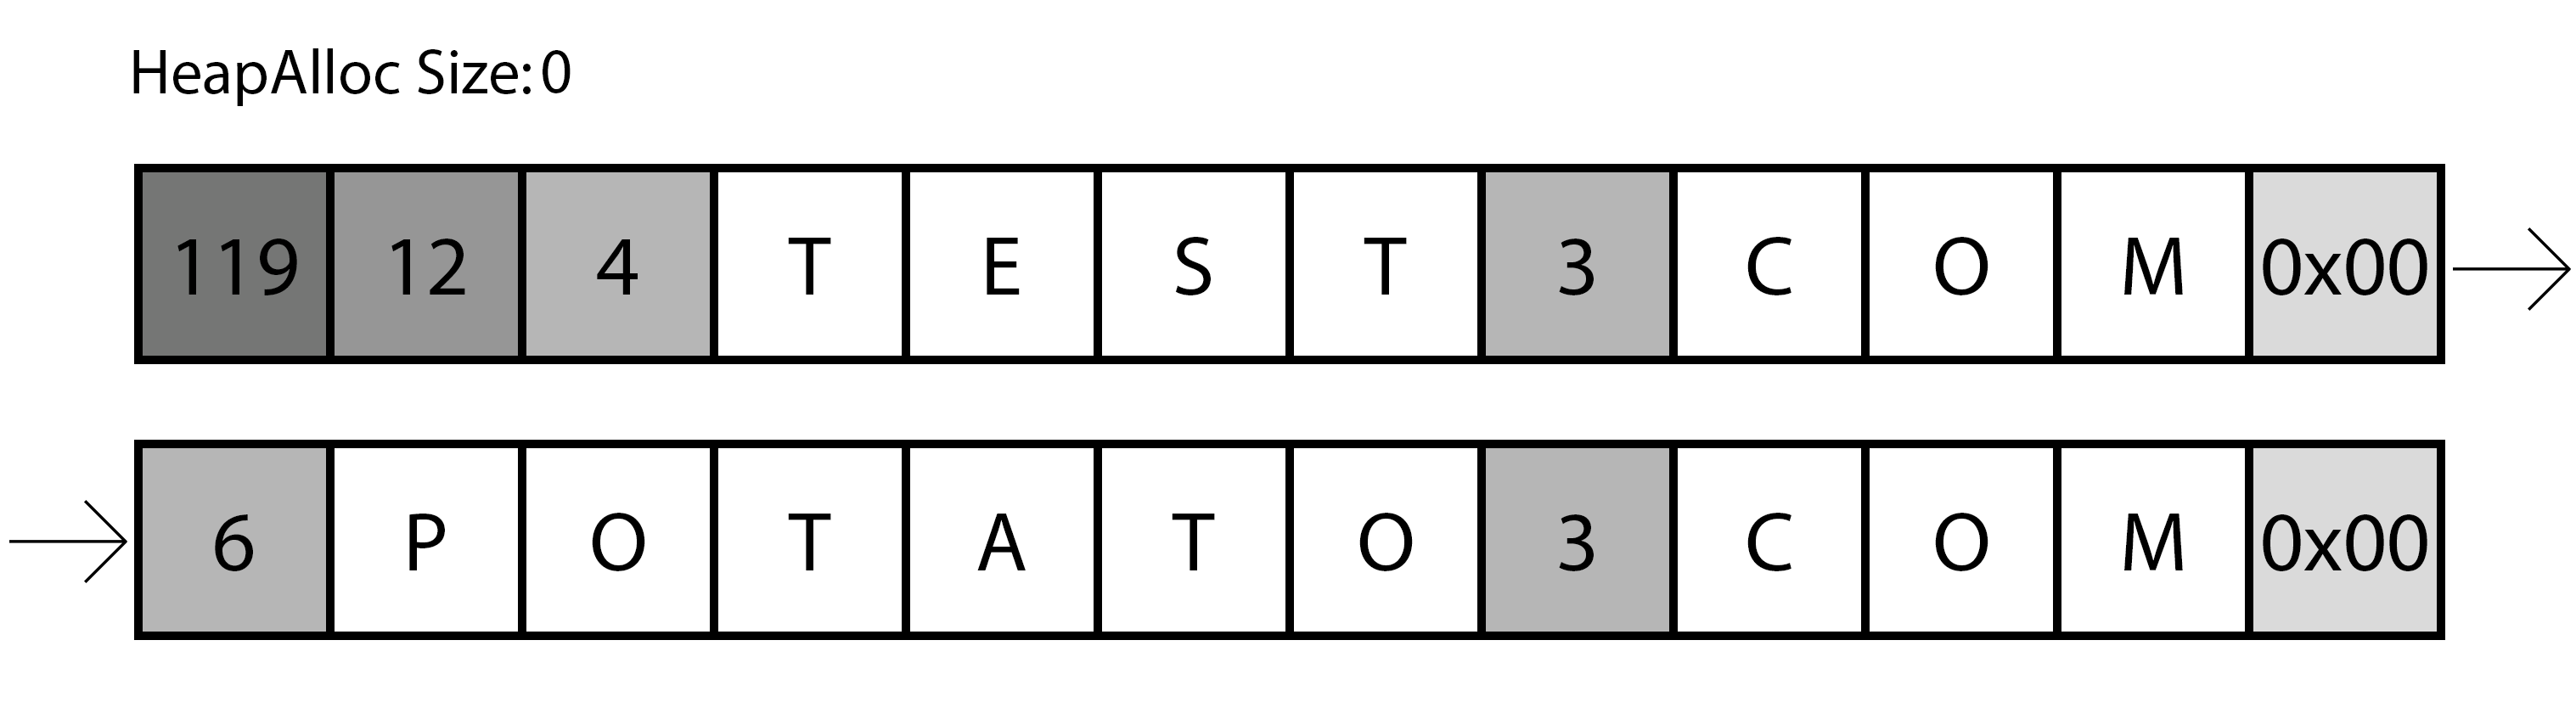
Representation of the first iteration of the parsing function.
The previous image shows a representation of the first round, as you can see it reads the size of the first part of the domain, adds one to that value (remember the dots and commas to separate the domains) and continue to the next size, easily calculated with the previous read.
Gifs are cool, but not everyone’s brain work at the same clock rate.
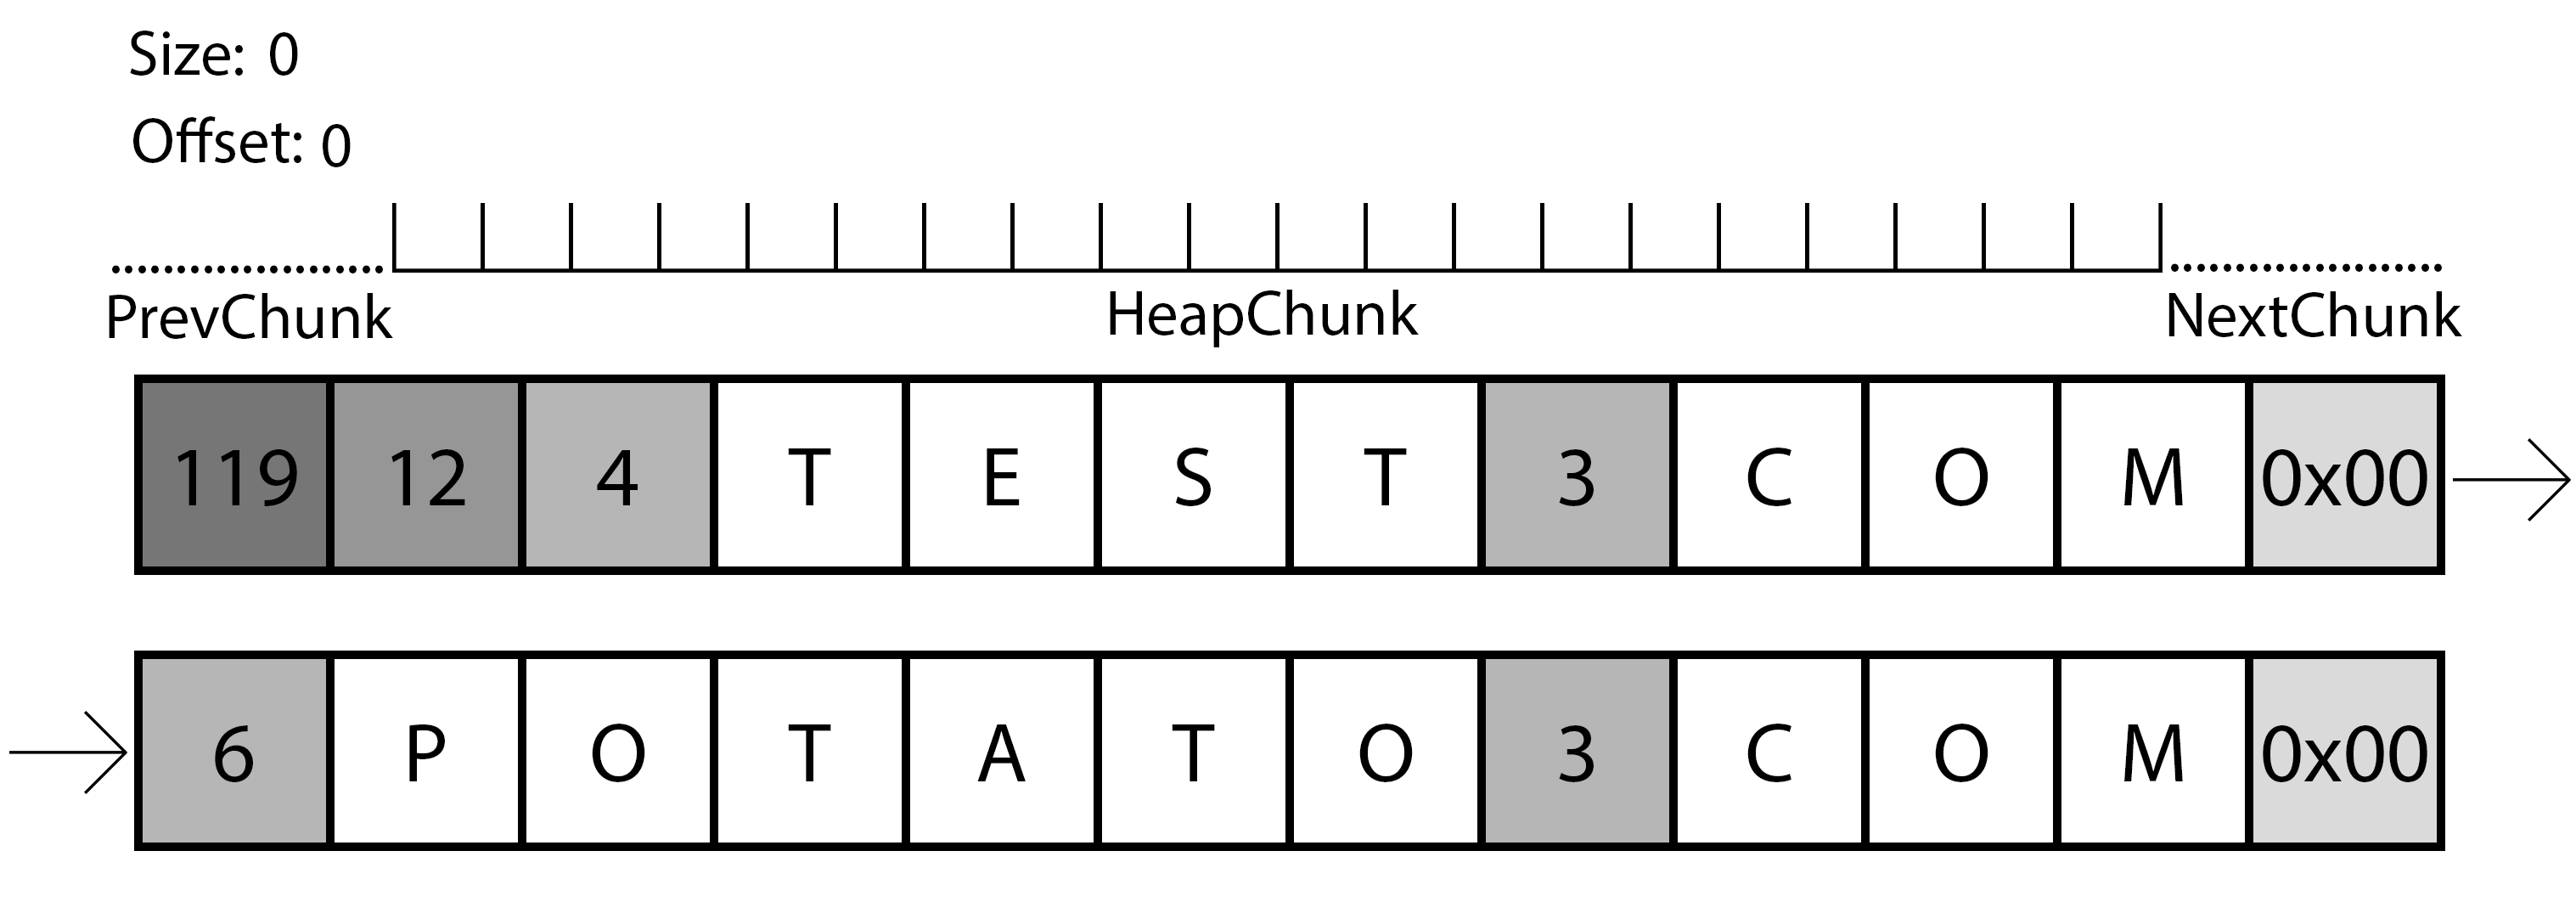
Representation of the second iteration of the parsing function.
In this case, the gif shows us the second iteration. The program already created a chunk in the heap with the necessary size, so now it will need to copy the data from the original source to this chunk with the appropriate modifications. First of all, it will read the size of the first part of the domain again, with this information it will perform a memcpy() to the allocated chunk, followed by the write of a dot to the offset+size. Finally, the program will continue to the next size and repeat the operation, if it finds a 0x00, the program will write a comma to offset-1.
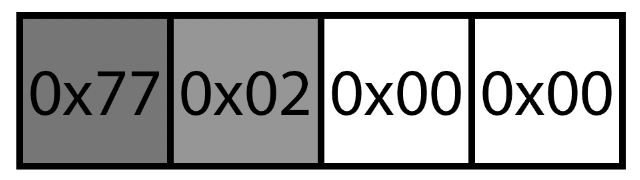
0x00 0x00
Keeping in mind that it will try to write a comma to the offset-1 if it finds a null byte, what happens if the first evaluated character by the program is a null byte? The current offset will be 0x00, the program will try to write to the offset-1 that will result in 0xffffffff writing outside of the allocated chunk, and causing a memory corruption.
Payload to trigger the old memory corruption.
As you can deduce from the payload, this will only work in the unpatched version. The first round to calculate the size to HeapAlloc() will give a total size of zero, and if you remember from the diffing part, Microsoft added a comparison before the HeapAlloc() call to check that the size its not zero, but what happens if we add some extra data to the end but start our payload with 0x00 anyway?

Payload to trigger the memory corruption after the patch.

Final proof of concept.
Bingo! We managed to trigger the memory corruption even after the patch, the problem here is that, the control we have over the crash is nearly zero: We don’t control the data (always a comma) and we don’t control the offset where it’s written (always 0xffffffff). Anyways, it will cause a Denial of Service to the system, freezing all the network related processes until reboot or rebooting the service itself. After hitting my head with the wall a few times trying to think a way to control the data I desisted (Just temporary, you know how this works hahaha) and decided to sent the report to Microsoft obtaining the CVE-2019-0726.
In the next part of this post, I will cover my adventures trying to find better ways in terms of control to trigger the corruption digging deeper in DHCP options internals, playing with “compression/encoding algorithms” and some other things.
SPOILER I didn’t manage to control anything but its cool anyways.
Also here is the link with the script I built to play around with the vulnerability, I could use Scapy, but I think that if you want to understand something you should try in bespoke ways.
Feel free to send me any questions/fixes/ideas at hector in the same domain name as this blog.