In this post I want to share two things. First, a quick primer on how you would you go about navigating the source code when contributing to objection, and secondly an application specific proxy feature I added to it.
Introduction
While on holiday I wanted to look into a certain mobile application that dealt with medical information. I was mostly interested in the data that was sent and received by the application so this meant proxying the traffic into Burp. I did not have a test device with me, so I had to use my personal device. This being my personal device meant that once I had the proxy set, certain applications would cease to function normally (especially those with SSL pinning) as Burp was in the middle.
On top of that, I was also frustrated by having to manually set and unset the proxy settings whenever I paused my adventures or wanted to debug why I wasn’t able to intercept traffic. It was this frustration that led me to investigating whether it was possible to set an application specific proxy via Frida using objection. I found this https://github.com/smartdone/Frida-Scripts/tree/master/proxy repository and some documentation on how to programatically set proxy settings in Java applications here, which lead me to think that there may just be a chance we can do this.
Navigating the objection codebase
With a rough idea on the code needed to inject into the application, I had a look at the objection source and immediately got overwhelmed with how the code glues everything together. Having used objection for a number of mobile assessments as well as having a few chats with Leon, I had a rough idea of the tool’s structure, but not a detailed view of how it actually worked, yet. I also thought I could just use the sslpinning command as a reference to how I would add my snippet.
Understanding the relationship between the CLI and the agent
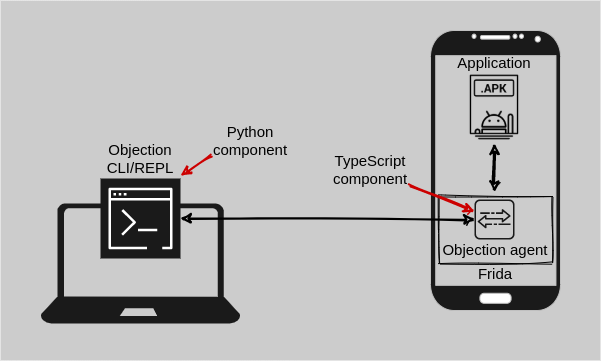
There were essentially two parts for me to look at. The first was the code that handles the commands in the REPL (read–eval–print loop) and the second was the code in the agent which is injected into the application. In other words, there was a Python and TypeScript component. If we look at the sslpinning implementation as a reference, the first part that handles the call to the agent was in https://github.com/sensepost/objection/blob/master/objection/commands/android/pinning.py and the second part that handles the actual instrumentation was in https://github.com/sensepost/objection/blob/master/agent/src/android/pinning.ts.
However, I couldn’t really understand how the one was glued to the other. That is, how did me executing the android sslpinning disable command in the CLI (which called the Python android_disable function) end up calling the disable function within the sslpinning namespace of the TypeScript agent. Leon showed me the magic and once again another objection chat left me in awe. I will try and document it here for others who may be interested in contributing to objection.
What happens within the android_disable function call in https://github.com/sensepost/objection/blob/master/objection/commands/android/pinning.py? First, we obtain the Frida agent’s exports. Quick pause here, where are these exports defined? Well this comes from the objection agent, which sits at https://github.com/sensepost/objection/tree/master/agent. The exports are all defined within the files at https://github.com/sensepost/objection/blob/master/agent/src/rpc. These files point to various functions that perform the actual instrumentation logic. Note: This is just the TypeScript representation of the source code. The entire agent is compiled to ES6 syntax in one single, not so easy to read JS file, which is actually injected into the application when running objection explore. Any changes made within the objection agent source code would require you to re-compile the agent. For more information refer to https://github.com/sensepost/objection/wiki/Agent-Development-Environment.
So we’ve obtained the agent’s exports, but now what? There is no one to one mapping that I could see just yet. For example, in the next line of android_disable we call api.android_ssl_pinning_disable(_should_be_quiet(args)), but we don’t see android_ssl_pinning_disable within the agent’s Android specific exports https://github.com/sensepost/objection/blob/master/agent/src/rpc/android.ts.
Frida API function call translation
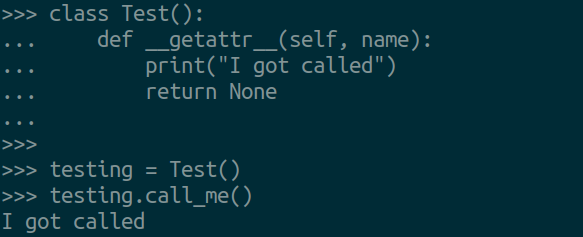
What gives? How is this mapped from android_ssl_pinning_disable to androidSslPinningDisable. Turns out, this is something Frida takes care of for you when you make use of the Frida Python API. The API has a class called ScriptExports, within the class there is a __getattr__ function defined. This is a pretty cool special function within Python that I only learned about when digging into objection. The function gets called when an attribute access of an object fails. For example, we have a class called Test. We create an instance of Test called testing, and call the function call_me. However, no such function was defined within the class Test, as such __getattr__ gets called when calling testing. For example:
When looking at how __getattr__ was defined within the ScriptExports class we can see that the name variable holds the attribute or function name that was being accessed or called. If we use sslpinning as an example, the name will hold android_ssl_pinning_disable. This name is translated to camel case, which is then used to search and return the corresponding exported call that was loaded earlier when injecting the agent.
And that is where it maps from the first part to the second part. In summary, the python snake case function is translated to a camel case name for the agent. Hopefully this provides you with a better idea as to how the parts are glued and how to approach adding features to objection.
Implementing application specific proxy settings
As for my proxy feature, Leon pointed me to a commit which I could reference to give me a rough idea as to which files to edit to implement my feature.
Using the example Frida script I found, the Java documentation and my understanding of how everything comes together in objection, I made a Pull Request for a new command. You can get this in version 1.10.0.
To set a proxy within an Android application, all you have to do is issue the android proxy set <ip> <port> command within objection. A note though, you will have to get your timing right here. Either set it on startup or just before you navigate to other screens for the proxy settings to kick in. They will typically need to be set before frameworks such as OkHTTP are initialised. From here on, you should only see traffic from the application where you injected the agent. From my testing, the traffic of other applications were left unaffected. This is great as your other applications will can continue to work normally while you jump into a rabbit hole.