Doing iOS mobile assessments without macOS around is not exactly fun. This can be for many reasons that include code signing and app deployment to name a few. Alternatives exist for some of these tasks (like the amazing libimobiledevice project or more recently an attempt to get code signing to work without macOS), but nothing beats using a real macOS device for most of those tasks. Be it to patch mobile apps with a Frida gadget, or to deploy an application from Xcode, whatever your reason for needing this, in this short post I’ll show you how to use @CorelliumHQ‘s usbfluxd project or a simple SSH tunnel to make a locally connected iOS device (eg. your Linux laptop) available to a remote macOS device such that you could expose it to Xcode, in the cloud.
Running a hello world app from a cloud-hosted Mac mini (using @CorelliumHQ's usbfluxd) on a physical iPhone connected to a Linux VM on my laptop (with an SSH reverse port forward in the middle to expose the local usbfluxd server :P) pic.twitter.com/uGuhcLI6iH
— _leon_jacobs(?) (@leonjza) October 26, 2021
cloud macos & networking needs
Today there are a few providers that will give you access to a macOS device (often a mac-mini), albeit at a premium. AWS can give you either an older Intel MAC, or a more recent M1 if you want at $0.6498 per hour (which ends up being just over $467 a month excl. storage costs and what not). Alternatively, Hetzner can do an M1 too, but at a less shocking €58.31 per month. For my testing this is the one I went with back in October 2021. After spinning the instance up you get SSH credentials (that can also sudo) to manage the instance. To use Xcode I needed GUI access of course, and while the product page for Hetzner’s M1 now also says they give you VNC access, I had to get that configured myself. What seemed like a simple task, turned into a painful night of debugging to finally get this script together to enable VNC, via SSH on macOS 11. Rumour has it that this might not be possible from macOS 12.1 onwards. YMMV.
From a networking perspective, while the Hetzner hosted mac Mini has a public IP, you’d need access back to your Linux laptop that will be “hosting” the USB device (which is most probably not directly exposed to the Internet) for the usbfluxd example. To get past this I went with some port forwarding via a bastion host on the Internet. However, if I needed that again today I would just setup a “tailnet” with Tailscale which is arguably more secure, and much simpler to setup too. In the SSH socket forwarding case, you just need the ability to SSH to either side and use the appropriate -R or -L flag depending on the direction.
Anyways, for demonstration purposes, I’m just using local Virtual Machines of the operating systems as it doesn’t change much from an implementation perspective.
usbfluxd – concepts
Simply put, usbfluxd redirects standard usbmuxd socket connections to allow for remote devices to be connected as if they were local. When run, you’d see that the default usbmuxd socket is moved out of the way and replaced with one for usbfluxd. This is the crux of the magic! Eg:
[13:50:37.968][4] Original usbmuxd socket file renamed: /var/run/usbmuxd -> /var/run/usbmuxd.origI already alluded to this in the previous paragraph, but from a networking perspective usbfluxd works in a client-server model. The host where the physical iOS device is connected is the server, and the remote, cloud hosted macOS device is the client. This is why the networking requirement to connect back to your laptop is needed.
The server side of the usbfluxd setup does not listen on a TCP port by default. To achieve this, we can use a tool called socat to attach a TCP socket to a UNIX socket. This is documented in the usbfluxd README, but essentially looks something like this:
socat tcp-listen:5000,fork unix-connect:/var/run/usbmuxdusbfluxd – installation
On both the Linux VM and the macOS device I compiled usbfluxd from source. There are binaries in the releases tab if you struggle with this, but I found the instructions pretty easy in the README file. In both OS’ case, you should have the usbfluxd binary available in the build directory upon successful compilation.
There is a tool available called usbfluxctl that helps with controlling usbfluxd, but I wanted to see exactly how the invocation of usbfluxd behaved, so I skipped using this and rather invoked usbfluxd manually with the -f flag to keep it in the foreground.
usbfluxd – server setup
With the usbfluxd software ready, we can start up the server side (ie. the host that has the physical iOS device). At this point I am going to assume you have network connectivity between your cloud macOS instance and your Linux computer (say via a VPN, or something like Tailscale). Just to confirm, you can check if your iOS device is connected and visible to your Linux host using lsusb.
root@ubuntu:~# lsusb | grep Apple
Bus 001 Device 002: ID 05ac:12a8 Apple, Inc. iPhone5/5C/5S/6
Next, make sure the usbmuxd service is running.
root@ubuntu:~# systemctl status usbmuxd
* usbmuxd.service - Socket daemon for the usbmux protocol used by Apple devices
     Loaded: loaded (/lib/systemd/system/usbmuxd.service; static; vendor preset: enabled)
     Active: active (running) since Sat 2022-05-28 13:27:17 UTC; 1h 57min ago
Now we’ll start usbfluxd. I’m disabling mDNS with the -m flag as that is not something I need.
root@ubuntu:~/usbfluxd-x86_64-libc6-libdbus13# ./usbfluxd -f -m
[15:25:55.283][3] usbfluxd v1.2.0 starting up
[15:25:55.283][4] Original usbmuxd socket file renamed: /var/run/usbmuxd -> /var/run/usbmuxd.orig
[15:25:55.283][4] Creating socket
[15:25:55.284][4] New Remote fd 4
[15:25:55.284][2] mDNS support disabled - instances have to be managed manually
[15:25:55.284][3] Initialization complete
Finally, in another terminal we need to expose the new /var/run/usbmuxd socket via TCP so that the client can connect to it with the -r flag, and we’ll do that using socat.
socat tcp-listen:5000,fork unix-connect:/var/run/usbmuxdWith all of that done, you are all set to have clients connect to your phone!
This is a good place to pause and think about what we have done and the security implications thereof. Your phone is now available, over the network, with no authentication requirement to other clients. Your phone was unlocked and told to trust the Linux device it is connected to, and now anyone else can connect to you on TCP port 5000 and interact with it as if it was a trusted device. Keep this in mind when using this!
usbfluxd – client setup
Much like the server, we’ll need to start the client side of usbfluxd. There is no need for socat here, as usbfluxd will run in client mode when given the -r flag. This flag tells usbfluxd to connect to a remote usbmuxd socket using TCP. In our case, that is the one we exposed using socat on the server. Depending on your network setup, this will be whatever IP and port the client can find the server on.
Just before starting the client, you can test to check that no iOS devices are available on the macOS device with idevice_id -l.
leon@leons-Mac usbfluxd % idevice_id -l
leon@leons-Mac usbfluxd %
Great, in a new terminal, start usbfluxd, adding the -r flag so that it knows where the servers usbmuxd socket lives.
leon@leons-Mac usbfluxd % sudo ./usbfluxd -f -m -r 172.16.182.172:5000
[17:34:15.356][3] usbfluxd v1.2.0 starting up
[17:34:15.357][4] Original usbmuxd socket file renamed: /var/run/usbmuxd -> /var/run/usbmuxd.orig
[17:34:15.357][4] Creating socket
[17:34:15.358][4] New Remote fd 4
[17:34:15.358][2] mDNS support disabled - instances have to be managed manually
[17:34:15.358][3] Initialization complete
[17:34:15.359][1] 172.16.182.172:5000 is open
[17:34:15.359][4] New Remote fd 5
[17:34:15.359][3] remote_mux_service_add: new remote id: 1
[17:34:15.359][3] Added remote 172.16.182.172:5000
With the client started, run idevice_id -l again. This time round a device UUID should show up.
leon@leons-Mac usbfluxd % idevice_id -l
00008020-XXXXXXXXXXXXXXXX
leon@leons-Mac usbfluxd %
And thats it! Your iOS device is now available on a remote macOS instance. Open Xcode and watch the usbfluxd client stdout go wild! :)
[18:04:02.401][4] Client 17 connection closed
[18:04:02.401][4] Disconnecting client 0x600002c4c120 fd 17
[18:04:02.401][4] remote_close: Disconnecting remote fd 18
[18:04:02.401][4] New client on fd 17
[18:04:02.523][1] 172.16.182.172:5000 is open
[18:04:02.523][4] New Remote fd 18
[18:04:02.770][4] Client 17 connection closed
[18:04:02.770][4] Disconnecting client 0x600002c44120 fd 17
[18:04:02.770][4] remote_close: Disconnecting remote fd 18
[18:04:02.771][4] New client on fd 17
[18:04:02.892][1] 172.16.182.172:5000 is open
[18:04:02.892][4] New Remote fd 18
[18:04:03.271][4] New client on fd 22
If you were to open the Xcode “Devices and Simulators” view, you should also be able to see your device there.
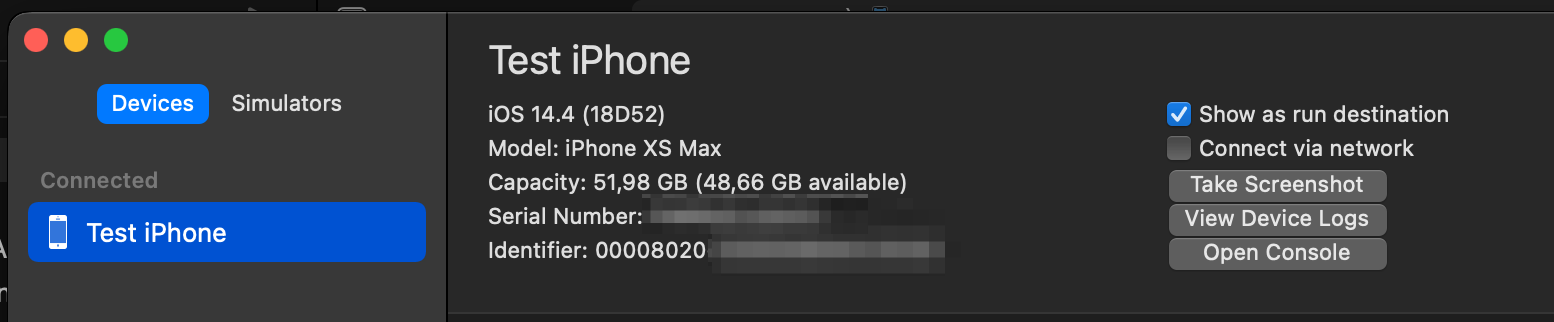
Now with your local device, connected to a Linux host, you can deploy applications for provisioning profiles, and or any other interesting things that you might need macOS for, without actually owning a mac.
usbfluxd – issues
Unfortunately, there are some snags I need to talk about. The first is a simple one but can trip you up quickly. You *must* have usbfluxd configured and connected before you start Xcode. If you start Xcode before usbfluxd, Xcode will fail to see the remote device. Xcode was quite stubborn with me, and I had to reboot the macOS device to get it to play along again. YMMV.
Secondly, in my experience, the connectivity to the local device from the cloud was really, really slow. The most obvious place where this speed issue showed itself was when Xcode was “preparing the device for debugging”, which is really just Xcode copying debug symbols from the device.
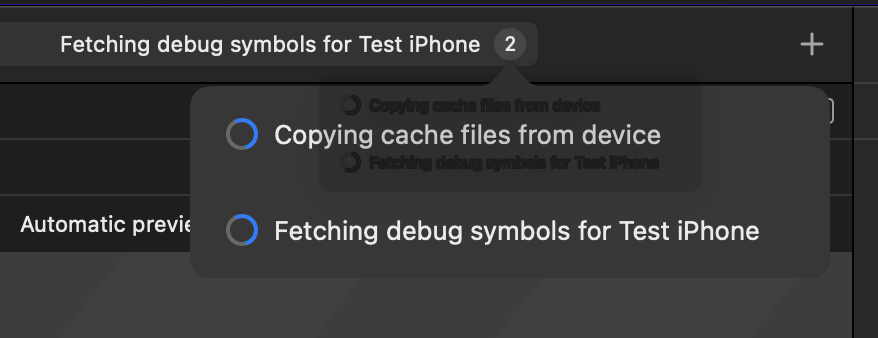
If you’ve ever used Xcode on a macOS device with limited space before, you’d know just how large these symbols can be. Check out ~/Library/Developer/Xcode/iOS DeviceSupport for an idea. About 4GB per iOS version. I left the copying phase for an hour or so to see if it would just be a simple case of me needing some patience, but after that I could see only a few KB of symbols copied! As an alternative, I tarred up the test devices symbols from another local macOS device and scp‘d it over to the cloud macOS device. I then extracted it again and restarted the process. While not ideal, this was much faster than waiting for the copy to complete via usbmuxd, bringing some relief to this actually being useful somewhere in the future.
alternatively using ssh forwarding for usbmuxd
A conversation with @RoganDawes about usbmuxd socket forwarding using usbfluxd had Rogan remind me that you can forward UNIX sockets using SSH with the -L and -R flags. Of course! More commonly you’d use these flags to forward TCP ports around, but they also support UNIX sockets. That begged the question; can the same device forwarding be done using just SSH? Turns out, you can (in conjunction with socat)!
ssh forwarding – setup
Unlike the usbfluxd setup which requires some custom software to be compiled and run, using SSH means we already have everything we need to perform the device forwarding. The only preparation work (which is similar to the usbfluxd setup) would be to make sure that usbmuxd is installed and running on our Linux host and that the iOS device is part of the lsusb output. With usbmuxd running, you should have a socket available at /var/run/usbmuxd. This is the socket we will forward to macOS.
root@ubuntu:~# ls -lah /var/run/usbmuxd
srw-rw-rw- 1 root root 0 May 29 12:47 /var/run/usbmuxd

root@ubuntu:~# lsusb | grep Apple
Bus 001 Device 003: ID 05ac:12a8 Apple, Inc. iPhone5/5C/5S/6
From a networking perspective, where the macOS client would need connectivity to reach your Linux laptop for the client-server model for usbfluxd, with SSH you can initiate the connection from either side and use either the local (-L) or remote (-R) forwarding flag you’d need depending on the direction. In the end you want to have your Linux device’s (that has the physical iOS device connected) /var/run/usbmuxd available in the same path on the macOS “client” device where it will be needed.
By way of example, if I were to decide to SSH into my Linux host from the macOS device to make the remote iOS device available locally, I’d use the -L flag for a local forward of the remote UNIX socket. That would look something like this (I added the -C flag for compression, hoping to squeeze some extra speed out of it).
ssh -C -L /var/run/usbmuxd:/var/run/usbmuxd user@remote -NIf you were to run this on your macOS client though, you’d find it complaining that /var/run/usbmuxd already exists, and rightfully so. The real, local usbmuxd is already there!
leons-Mac:~ root# ssh -C -L /var/run/usbmuxd:var/run/usbmuxd leon@172.16.182.172 -N
leon@172.16.182.172's password:
unix_listener: cannot bind to path /var/run/usbmuxd: Address already in use
Could not request local forwarding.
If you recall from the usbfluxd invocation, it was moving the original usbmuxd socket out of the way for you, so this is something we can manually do to make room for the remote socket to be available in the expected location.
leons-Mac:~ root# ls -lah /var/run/usbmuxd
srwxrwxrwx  1 root  daemon     0B May 29 14:19 /var/run/usbmuxd
leons-Mac:~ root# mv /var/run/usbmuxd /var/run/usbmuxd.orig
leons-Mac:~ root#
With that done, our SSH tunnel should come up just fine. However, there is one interesting issue here. If you were to forward the UNIX socket just like that, you’d find that only the libimobiledevice tools seem to work fine, whereas Xcode does not seem to be able to see the device. For example, idevice_id -l would show the remote device available, but opening Xcode has it reporting no devices connected. It was only when I inserted socat between the remote socket and the local socket to debug that it seemed to work. I am honestly not sure why, but I suspect its because of the fork option that Xcode might need?
On the positive side, symbol transfer appeared to be significantly faster (even though it took a while) so there may be hope in that this solution is more reliable in the long term.
ssh forwarding – final setup
To conclude, these would be the steps to get a remote usbmuxd available locally such that Xcode can see a remote device as if it were local.
First, get your Linux host ready, usbmuxd running and confirm that the iOS device is connected with lsusb.
As soon as your macOS client has booted, move the original usbmuxd socket out of the way. Next, SSH to the other host (in my case, from the macOS client to the Linux host hosting the device) with the appropriate -L / -R flags to forward the Linux usbmuxd socket appropriately. We’ll call the socket something else so that we can place socat in the middle. With the SSH session up and running, finally build a socat tunnel to /var/run/usbmuxd on the macOS client to the forwarded UNIX socket.
Speaking of socat for a moment, in case you were curious to see the data that was flowing over the socket, you can add the -x -v flags to it which will have hexdumps printed to the screen for you to see.
A script to do all of that is available in this gist, and would look something like this when used.
leons-Mac:~ root# ./fwd_ios.sh leon@172.16.182.172
[+] moving real usbmuxd socket out of the way
[+] configuring ssh tunnel to leon@172.16.182.172
leon@172.16.182.172's password:
[+] ssh tunnel PID is 905
[+] connecting remote socket to local socket. ^C to quit and revert
^C[+] killing ssh tunnel with PID 905
[+] restoring real usbmuxd socket
[+] removing dangling remote socket
conclusion
Whichever method you prefer, it’s great to know that you can make use of temporary cloud-based macOS hosts to perform actions on locally connected iOS devices, even if the host operating system is running Linux! Maybe one day none of this would be necessary, but until then we will just have to stay creative.