Intro (part 1)
Hello and welcome to the final post of our Intro to exploitation series! We have learned the basics about how the memory management as per the ptmalloc2 allocator works. It was a basic but enough approach to have a good starting point. However, there are a few concepts and attack scenarios that, due to existing a lot of information about these, I have kept long distance from “unsafe unlink“, “malloc (des)malleficarum” and techniques alike. These weren’t either basic enough or outdated and wanted to learn and note down the most basic and known exploit primitives: Use-after-invalidation (incl. Use-after-free), overflows (incl. Off-by-one) and double-free.
Now that we have a few tricks and a somewhat deep understanding regarding the heap and a basic one towards exploitation, it is a good moment to set us free() into the “real” world. All of this will be accompanied with debugging sauce in the flavours of pwndbg and villoc.
At last but not least, at the moment of writing this article, I haven’t been able to properly build a working exploit nor control the instruction pointer yet – It seems doable without the presence of ASLR – but, I have been able to control where the next fastchunk of a certain size is going to be allocated, implying that if successful, I will be able to overwrite data on some parts of memory.
The vulnerability
Preface
I was trying to practice some heap exploitation against real world software and decided to target this outdated piece of software, APNG Optimizer, and fuzz it for some time. How I did fuzz the software is out of the scope of this post but let’s say it was fairly easy to find a crash with AFL.
Bear in mind that this piece of software is part of the APNG Tools and that, in the set of tools, not all software is vulnerable. This program seems to be something that they forgot to update so we are going to take advantage of it at some extent.
Note: Mid-way research, I found that this vulnerability was also found by Onvio where they treat it as a Buffer Overflow on APNGDis, the disassembler tool from APNG Tools.
What
Approaching the code
To tackle this vulnerability and try exploiting it, I spent countless hours (and more to come) looking at the code of APNG Optimizer and the APNG and PNG specifications which before following on this post, I recommend skimming through the APNG specification first since it is key to understand how frames are crafted and how each frame will take its part on the heap. Don’t take too much time on it as we will cover key points here.
This said, let’s get our hands dirty already to understand our exploit development approach. Our vulnerability resides on this piece of code:
unsigned int read_chunk(FILE * f, CHUNK * pChunk)
{
  unsigned char len[4];
  pChunk->size = 0;
  pChunk->p = 0;
  if (fread(&len, 4, 1, f) == 1) // (1)
  {
    pChunk->size = png_get_uint_32(len) + 12; // (2)
    pChunk->p = new unsigned char[pChunk->size];
    memcpy(pChunk->p, len, 4);
    if (fread(pChunk->p + 4, pChunk->size - 4, 1, f) == 1) // (3)
      return *(unsigned int *)(pChunk->p + 4);
  }
  return 0;
}
This function is reading a chunk from the APNG file the program is going to optimise. It reads the next four bytes at f and stores them at len variable (1). This string at len is now feed into a libpng function, png_get_uint_32, which will return the 32 bit unsigned int representation of that string and add it 12 (2). Since the application is working with PNG chunks, it will create a new PNG chunk in its internal structures, managed with the pChunk variable of custom type CHUNK and then, without further ado, will start reading that PNG chunk into the aforementioned in-memory structures (3). Basically, reading a PNG chunk to, afterwards, be processed by the optimiser.
The “culprit” here is png_get_uint_32. To understand why this function is going to cause heap harm on these lines of code we first need to know a few things:
- The value returned by
png_get_uint_32is of type unsigned integer - For a 32 bit integer, the following happens:
0xffffffff + 1 = 0 - fread will read values into the destination unless it can’t read from source memory (spoiler: it can)
- fread will return the number of elements read from the source
Integer overflow+under
There are two vulnerable lines, did you spot them?:
...
    pChunk->size = png_get_uint_32(len) + 12;
...
    if (fread(pChunk->p + 4, pChunk->size - 4, 1, f) == 1)
...
The second line wouldn’t be vulnerable if it wasn’t because of the first one where the integer overflow resides. As mentioned before, if we add 0xffffffff + 0x1, it will overflow and will be equals to 0x0. This happens because there is no more width (4 bytes) to represent a 32 bit unsigned integer and so, it wraps around to the next value, 0x0.
Interestingly enough, the second line does the math for pChunk->size - 4 which, in circumstances like the mentioned in the previous paragraph where pChunk->size is 0, we will fall into an integer underflow. The same way an integer wraps towards high numbers, it does to lower numbers and, since it is an unsigned type we will have 0 - 4 = 0xfffffffc, a rather lengthy value.
memcpy is not guilty
From Onvio’s vulnerability analysis, they point to memcpy as the culprit because Valgrind does as well. This is not really true because of the following:
...
    pChunk->size = png_get_uint_32(len) + 12; // (1)
    pChunk->p = new unsigned char[pChunk->size]; // (2)
    memcpy(pChunk->p, len, 4); // (3)
...
Even if we made len have a value of 0xfffffff4, it will get calculated to 0xfffffff4 + 12 = 0x0 and then, in the new operator that uses pChunk->size (2) it will presumably allocate just “0” bytes. As you all know by now, this is wrong when it comes to the heap hop because the minimum rhyme length for a heap hop song is 12 usable bytes on 32 bit and 24 usable bytes on 64 bit. This means that, in any case, memcpy will always be able to write the 4 bytes (defined as len[4] in the code) from the len variable into an allocated chunk at pChunk->p.
So, unless compiled on some exotic architecture which allows to allocate less than 4 byte chunks, this will never be an issue despite Valgrind effectively telling the programmer: “Hey! You just allocated 3 bytes and you used 4!”. memcpy is not guilty!
The overflow
Here is where the fun happens:
...
    if (fread(pChunk->p + 4, pChunk->size - 4, 1, f) == 1)
...
The arguments for fread are: destination to write to, size of element to read, number of elements to read, source to read from.
Remember what happened if we do malloc(0)? The integer overflow caused a really small allocation of just a few bytes since it tried to malloc(0) (actually new unsigned char[pChunk->size] with size zero) and then, the integer underflow kicked in because 0 - 4 = 0xfffffffc (actually pChunk->size - 4).
With this variables set, what fread is having now as arguments at this point of execution are:
...
    if (fread(pChunk->p + 4, 0xfffffffc, 1, f) == 1);
...
Now fread will read 0xfffffffc bytes from f and place them at pChunk->p + 4. Oh, and pChunk->p has malloc(0) usable bytes (24 bytes in 64bit). Lovely!
When stars are in a frame
PNG Frames
To this point, I haven’t talked about how APNGs are formed, just told you to skim through the specification, because it was not important to our crash analysis process but, the time has come.
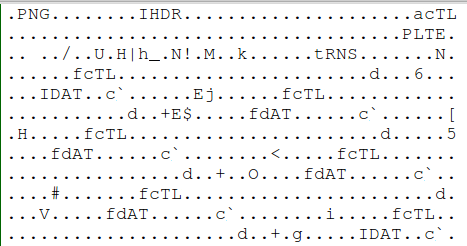
All PNG/APNG files are formed by frames, and the frames we are going to abuse are set up in the following fashion:
4 bytes frame length | 4 byte identifier | Frame data
The first 4 bytes specify the length of the whole PNG chunk, the next 4 bytes can be one of many header identifiers but, just to name a few, IHDR, IDAT, aCTL, fDAT, etc. The last part will be the frame data itself where, depending on the frame type, it will contain configuration settings for the next following frames to show or the picture itself to show on that frame.

Aligning frames
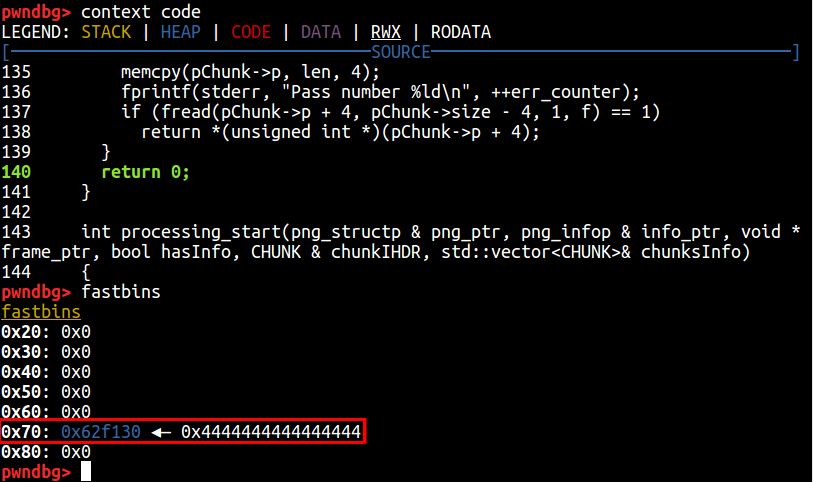
One very difficult thing I found while trying to exploit this vulnerability and that still is giving me the headaches is, trying to properly craft a file that, after the programs optimisation routine, has the right frames so that, when the allocation happens at my chosen location, actually write to it. In the following picture it’s shown how I am able to control where the next fastchunk will be allocated (after bypassing some restrictions).

So far I have managed to make the allocator “believe” there is a free fastchunk of size 0x70 at an offset from the malloc_hook weak pointer. For those who don’t remember, I wrote about this technique when abusing double free primitives. It consists of allocating a chunk just a few bytes before the malloc_hook weak pointer so that, when the next malloc function gets called, malloc_hook will get called first as it is a debugging function that can be set to anything and so, it will redirect code execution to our desired location; effectively controlling program execution.
The playground
Now that we know where the fun bits are within the code, how APNG frames are, more or less, formed and that our goal is to control the weak pointer malloc_hook, we are ready to start our exploit development.
Set-up
get your frames
This time, there is no code for the exploit since it’s an image that we are using to exploit the application. However, to make your very own small APNG animation you might use this one pixel image website www.1x1px.me and then craft your Animated PNG at Animated PNGs. Please watch out for metadata added by these websites within the images! For the lazy, here is the test case image we are going to use for now [download].
get your binaries
You can get the victim application from here (APNG Optimizer). Download it, unzip it and, inside the Makefile, line 19, remove the -s switch, as it will strip all the symbols even if we decide to compile it for debugging.
Afterwards, open the apngopt.cpp file and, on line 127, delete the word inline. Now compile the program with:
make CFLAGS="-ggdb"
./apngopt
get your tools
As mentioned in the beginning we are going to use pwndbg and the fork of villoc. We are also going to use an hexadecimal editor. I have chosen for this task Bless. It can be installed with a simple apt install bless.
get practice
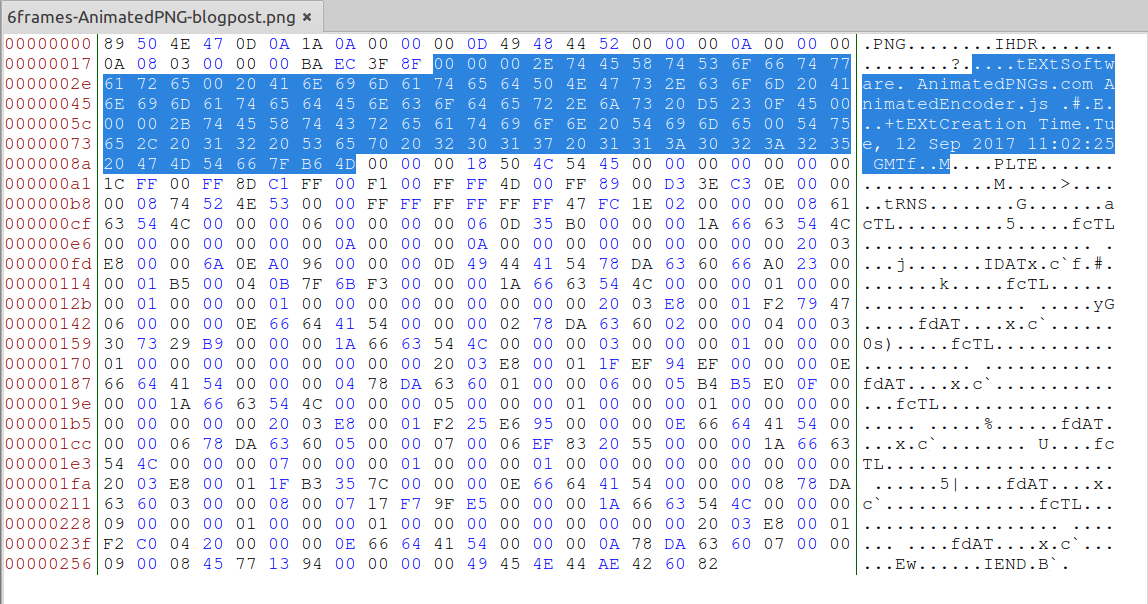
In order to get a hold of the APNG format, bless and, making our test case as small as possible, we are going to show how to remove the EXIF data from the APNG file.
Remember the section we talked about how PNG chunks are set up? It was, 4 bytes length, 4 bytes identifier, then data. We are going to rely on this structure to get rid of the metadata included by online APNG creators.
Open the image in your hex editor of choice and delete the following as per the figure.

Carefully see that I have selected the previous 4 bytes to the tEXT chunk type identifier and stopped right 4 bytes before the PLTE identifier. Remove it, save it and try to optimise the APNG image feeding it to apngopt.
Note that in order for apngopt to work well (it is, to read the file) it must be run in the folder that the image is at or give it a relative path. For this matter I have copied the apngopt binary to my user /home/jjimenez/bin/ folder.
The exploit (pt. 1)
Crashing
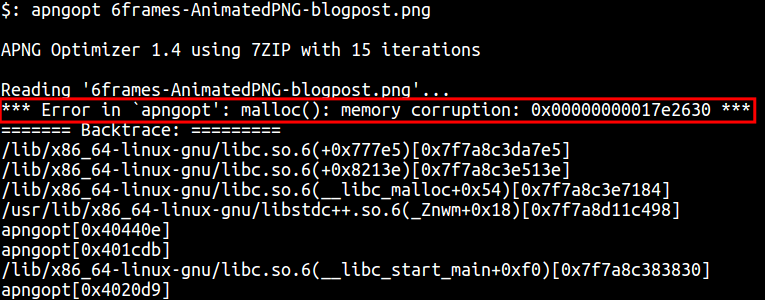
Enough chit-chat, let’s cause the APNG crash! For this, open again the file on your hex editor of choice and let’s put that magic 0xffffff4 value on any of the PNG chunks’ length (remember, the first 4 bytes of the chunk).

Some of you might have noticed that, the number is “as is” and gets taken by apngopt in the same way. In other words, this number is in big endian, as the implementation for png_get_uint_32 is expecting a string with a number in such form. We run apngopt over this file and…

To be continued…
Taking in the suggestion from some of my good colleagues, I have decided to split this post into two due to the amount of information it was about to contain: Deep understanding of PNG chunks and their order, set the image size accordingly in order to take up the memory chunks we need, constructing a fake memory chunk sequence aligned just in front of our vulnerable memory chunk, finding the right byte in memory to allocate our next fake fastchunk, etc.
On the next part we are going to continue with The exploit part and there we will have some intensive shows from villoc and pwndbg about how to set the heap, by modifying PNG chunks in a way that, our allocations end up in a place of our convenience and analysing why it ends up there. The goal is to leave the reader with the road set to be able to understand and write simple heap exploits and maybe build a full exploit for apngopt!


