Thanks to IoT and other developments, we’re having to review more and more non-HTTP protocols these days. While the hardware is interesting to look at, one can often find vulnerabilities at a network layer too. With many of the non-HTTP-only proxies having fallen out of maintenance or requiring a significant amount of custom code to be written for each unique protocol encountered, we decided to build a tool to make such work easier.
On Friday 13th April 2018, I presented Mallet, a tools for building arbitrary proxies for arbitrary protocols, to the delegates at HackInTheBox Amsterdam. The slides are available here, and the video of the presentation is available on the HackInTheBox YouTube channel. This blog post aims to go into a bit more detail about how Mallet works, to give you a head start on creating your own proxies.
Mallet is built on the Netty Framework, which means that any existing ChannelHandler, Decoder or Encoder that works with Netty should work with Mallet. It also means that you are not limited to the protocols implemented by the Netty developers themselves, but can also make use of those implemented by users of the framework as well. For example, there is a COAP protocol implementation available, with a little searching.
The main abstraction to understand about Netty is the ChannelPipeline. This can contain a sequence of ChannelHandler implementations, invoked in ascending order to handle data coming from the network, and invoked in descending order to handle data being sent to the network.
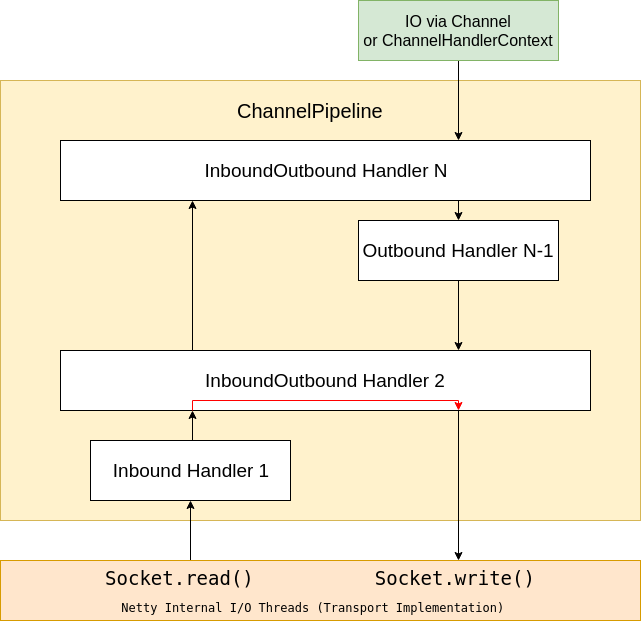
Each ChannelHandler in the ChannelPipeline may handing incoming data only, outgoing data only, or both. And a ChannelHandler may respond directly to incoming data without sending additional data “upstream”, for example, when dealing with a TLS-encrypted stream, and doing the initial handshake, or changing ciphers, etc.
In order to create a proxy, then, all we need to do is bridge two ChannelPipelines with a special ChannelHandler that copies messages from one ChannelPipeline to the other!
The main reason for the choice to use Netty in this project, is that the creators have tried really hard to design an architecture with a clean separation of concerns. By this I mean that there is usually a clear separation between ChannelHandlers that implement the protocol decoding and encoding required to transform a byte stream from the wire, into usable high-level Java objects, and the ChannelHandlers that actually implement some sort of business logic dealing with those objects. And this means that we can, in most cases, simply make use of the existing protocol implementations without having to actually do any coding ourselves!
Let’s get started! Clone the GitHub repository, then building the code using Maven, then run it:
$ git clone https://github.com/SensePost/Mallet
$ cd Mallet
$ mvn package
$ java -jar target/mallet-1.0-SNAPSHOT.jar
Now let’s take a look at the user interface. There are two main tabs, the first showing a graph of protocol handlers which define the processing of the data, and the second showing the connections intercepted, and data observed.
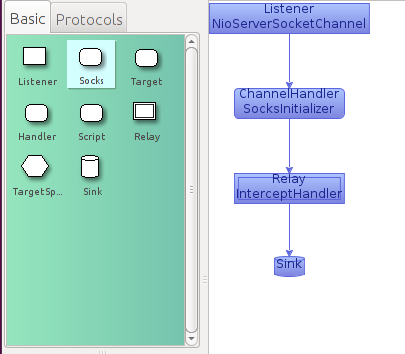
In the “Graph Editor” tab, you can see the main graph layout area in white, with a palette of common protocol handlers which have been pre-configured for use on the left. Below the palette is an overview of the entire graph, which may be useful if it is too large to view comfortably in the main layout area. The palette itself is divided into two tabs, with the most basic elements in the first tab, such as a Listener, SOCKS handler, Relay and Sink, and a variety of protocol handlers in the second tab.
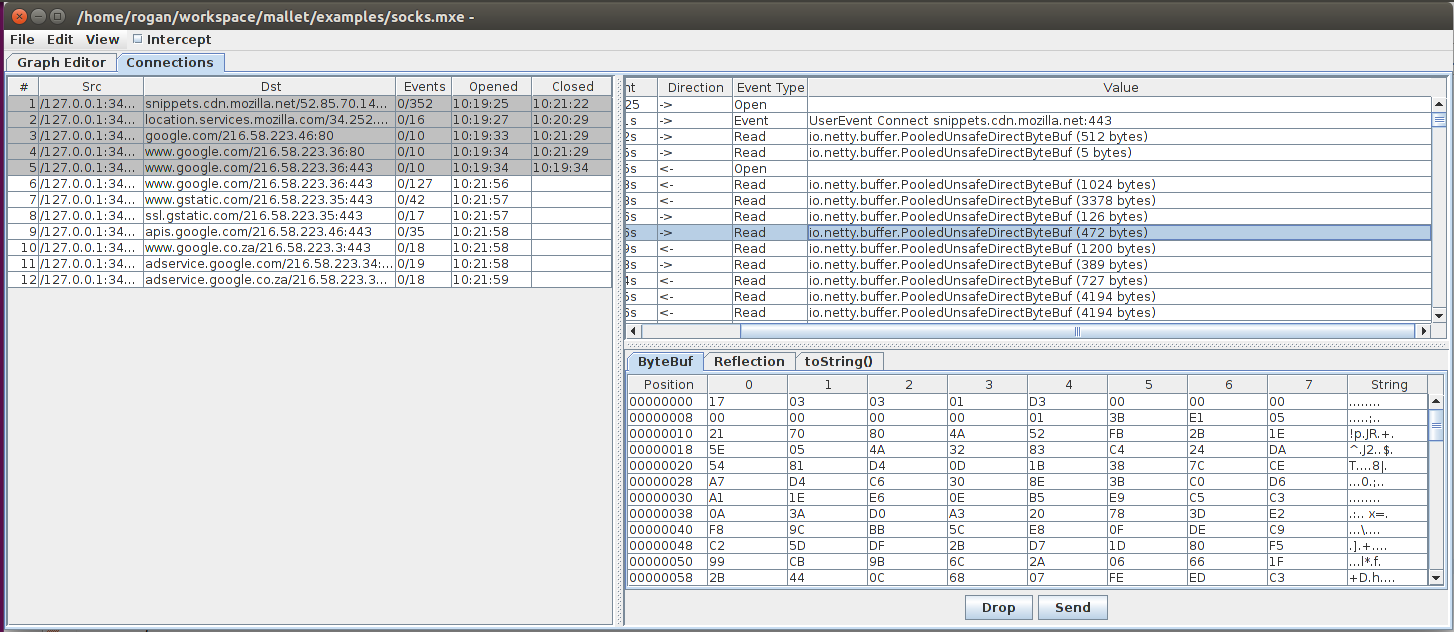
The second tab shows the connections that have passed through Mallet. Firstly, there is a list of connections on the left. Connections that have been closed without error are shown with a grey background. Those that closed with an exception are shown with a pink background. You can see the source and destination of the connection, the time that it was opened and closed, and the number of events that are associated with that connection.
In this way, you can easily see which are the active connections that may be worth looking at.
Selecting a connection from this list will populate the event view on the right. This will show the time of the individual event, the direction of the event (client to server or server to client), the type of event, and a summary of the event.
Selecting an event will further populate the editor below. There are a few pre-defined editors which will hopefully be enough to get you started. These include a “byte array editor” which supports both ByteBuf and byte[] instances, a “String editor” which supports String and TextWebSocketFrame instances (you can see where we have been busy by the editors we have created!), and a Reflection editor which enables editing of arbitrary objects using Java Reflection. Depending on whether the object has been intercepted or not, you may be able to make changes to it using the editors, or else they will function simply as a viewer.
Now let’s create your own graphs, and start intercepting traffic!
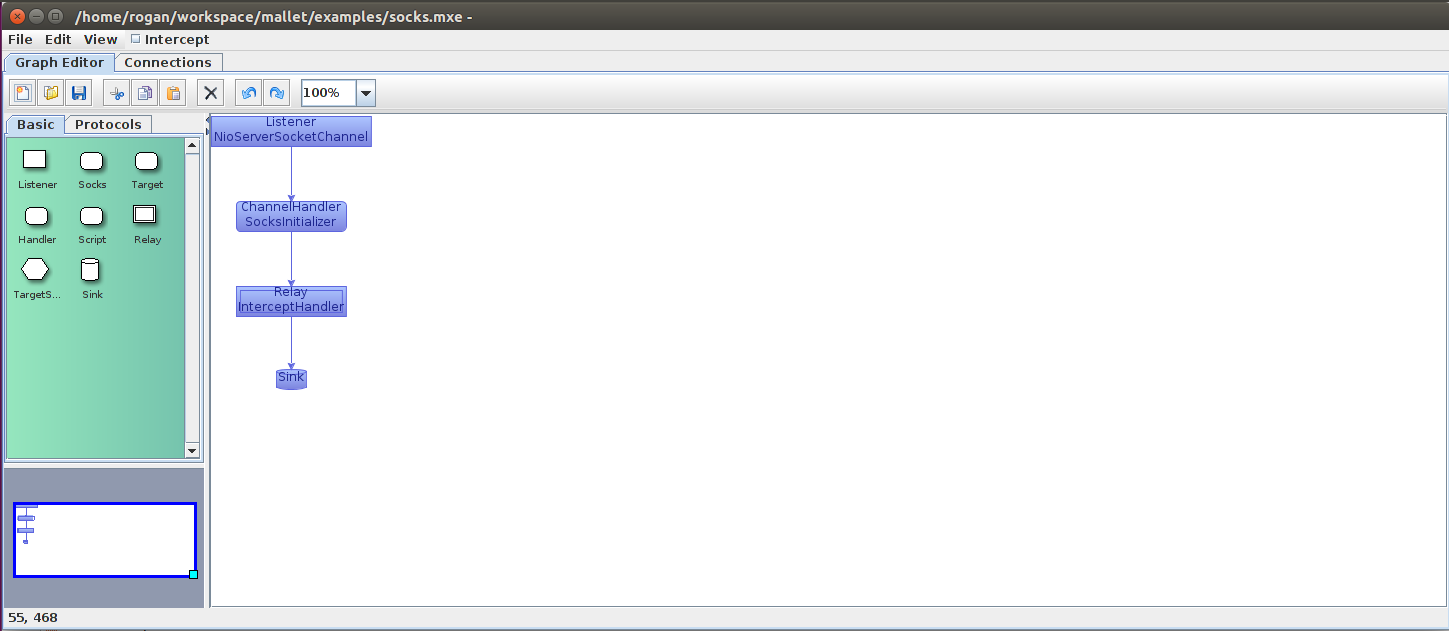
The suggested “prototypical” TCP proxy implementation starts with a simple SOCKS relay.
This is in many cases the easiest way to get traffic into Mallet, using either built-in SOCKS proxy support (e.g. in a browser), a SOCKS wrapper (e.g. tsocks, proxychains), an Operating System-level SOCKS redirector such as ProxyCap, or a network-level redirector such as redsocks. Making use of the SOCKS protocol allows the relay to support multiple destination addresses and ports on a single listener, which may simplify the task at hand.
To create this graph, start by dragging the Listener node from the palette on the left (green) into the graph area on the right. Then, drag the Socks node, and drop it on the Listener. It will automatically construct an edge between them. You can also drop them independently, and drag edges between nodes in the graph. Just make sure you drag them in the right direction, i.e. from Listener to Socks, not the other way around! Next add a Relay node, and a Sink.
You can double-click the Listener node to edit its parameters if you want to. In this case, the Listener is an NioServerSocketChannel instance, and listening on localhost:1080. You can change the hostname to 0.0.0.0 if you want it to listen on all interfaces, or change the port as desired.
At this point, the proxy should be in operation. You could point any SOCKS client (such as a web browser) to it, and observe the binary traffic passing through Mallet by going to the “Connections” tab, and selecting one of the connections from the list on the left. On the right you will see all of the messages observed passing through those connections, as well as some events, such as “Connection opened”, “Connection closed”, or possibly an exception such as “Connection reset by peer”, which happens when the connection is unexpectedly closed.
If you want to, you can activate Interception by selecting the checkbox in the menu bar. Any messages passing through Mallet will now be held for observation, editing, and eventual forwarding. Editing of the messages can be done by selecting the message from the list in the Connections tab, and then using the hex editor window below to modify the bytes. You can “Send” the edited message if desired, or simply unselect the “Intercept” checkbox to release all held messages.
If your traffic is encrypted using SSL, seeing and editing encrypted traffic is not terribly useful. Netty unsurprisingly has SslHandlers to deal with this case, and Mallet provides some surrounding infrastructure to make dealing with X.509 certificates easy. In particular, it will autogenerate a certificate based on the hostname requested in the TLS Server Name Indicator (SNI) field, if provided. If not, it will look at the SOCKS negotiation to obtain the appropriate hostname to use.
Obviously, this will only work if your client either fails to verify the CA certificate that signs the certificate, or if you have installed the CA certificate automatically generated by Mallet on initial startup. You can obtain the Mallet CA certificate from the file “ca.pem” in the directory from which you ran Mallet, and import that into your client’s Trusted Certificates store.
Let’s add an SSL decoder and encoder pair to allow us to access the cleartext traffic. Start by choosing the Protocols tab in the palette on the left hand side. Drag an SSL Server node from the palette, and drop it on the edge connecting the SocksInitializer node and the InterceptHandler node. This will insert it into the pipeline appropriately. Then, drag an SSL Client node from the palette, and drop it onto the edge connecting the InterceptHandler node and the Sink. 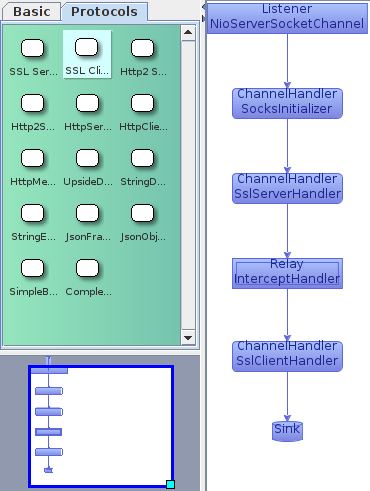
If you then generate some encrypted traffic through the pipeline, you should see that the SSL traffic is being decrypted, and you can access the cleartext bytes in the Connections tab as before. You will also see some additional status messages generated by the SslHandlers.
To recap, we have seen how Mallet can be configured to proxy TCP connections to arbitrary destinations using a SOCKS node, while intercepting and modifying the bytes transferred manually. We have also seen how Mallet can easily be configured with SSL Server and Client nodes to obtain access to cleartext data in an SSL connection.
In general, though, traffic being sent over a network generally represents a higher level abstraction than sequences of bytes. In most cases, we’re going to want to decode those bytes to get to those higher levels of abstraction, to make it easier to work with the data. Let’s re-implement something that should be familiar to many of you, an HTTP proxy.
While familiar, an HTTP proxy actually provides a nice view into the potential complexity of creating a proxy. For one, HTTP operates on 2 different ports (at least!), 80 and 443. And the requisite processing differs based on the port in question. Port 80 is cleartext, while port 443 is encrypted using SSL. Let’s start by implementing only the SSL portion of this proxy. We’ll come back to the clear-text portion later.
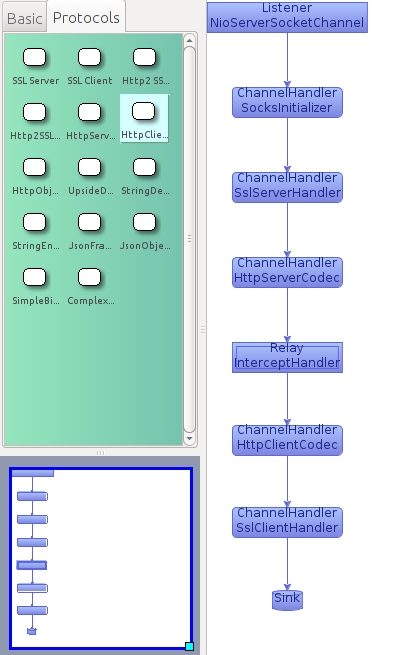
To go from a stream of bytes to high-level objects representing an HTTP conversation, we need to add both an HTTP Server Codec, and an HTTP Client Codec. The Server Codec sits before the InterceptHandler, and deals with decoding a stream of bytes into HTTP Request objects, and encoding HTTP Response objects to a stream of bytes. The Client Codec sits after the InterceptHandler, and deals with encoding HTTP Request objects into a stream of bytes, and a stream of bytes into HTTP Response objects.
Drag the HttpServerCodec node from the palette, and drop it on the edge between the SslServerHandler and the InterceptHandler. Similarly, drag the HttpClientCodec from the palette, and drop it on the edge between the InterceptHandler and the SslClientHandler. It should now look like this:
Generate some traffic to a secure site using your browser. If you have already loaded the Mallet CA certificate, you should simply see the requested site. Otherwise, you may need to click through a warning page.
Now, if you view the Connections tab in Mallet, you should see additional connections made through the proxy. If you select one of those connections, you should be able to see the SSL connection being negotiated, and now, instead of ByteBuf messages, you should see a series of HttpRequest, and HttpResponse objects. You should also see a number of HttpContent objects. This is because Netty decodes HTTP in a streaming fashion, to allow for processing of very large messages, larger than can fit into memory. We don’t really want to work that way, because (hopefully!), our messages won’t be that large! We’d rather work with a complete request or response. Conveniently, Netty has a HttpObjectAggregator handler that collates the initial request or response, and any subsequent content parts, and emits a complete Request or Response.
To use it, drag an HttpObjectAggregator node from the Protocols palette onto the edge between the HttpServerCodec and the InterceptHandler, and another onto the edge between the InterceptHandler and the HttpClientCodec. By default, they are configured to aggregate messages up to 1MB in size. Anything larger than that will cause an error response to be generated.
Generate more traffic, and you should see that the new messages observed are now instances of FullHttpRequest and FullHttpResponse, and contain the complete request and response.
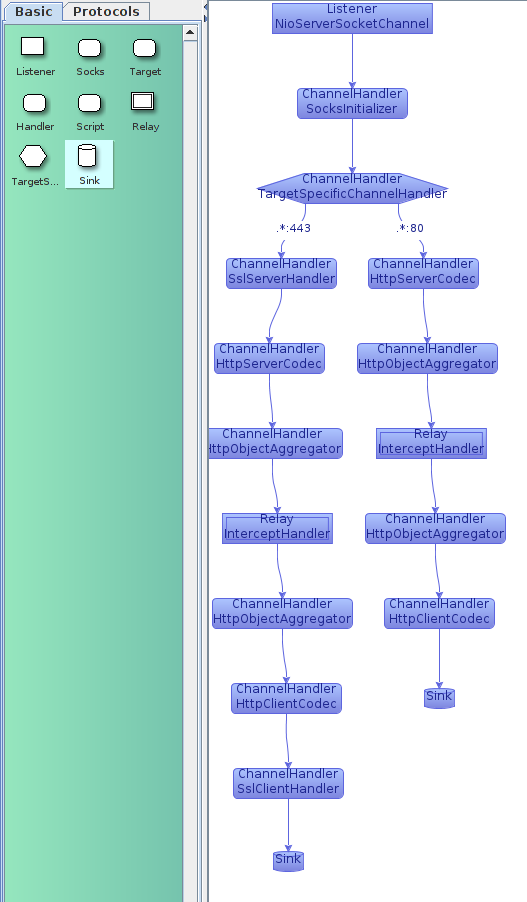
Let’s step back, now, and consider the case of unencrypted HTTP traffic, on port 80. The processing pipeline is similar to what we have established already, just without the SSL nodes! We can make use of a TargetSpecificChannelHandler to choose a different pipeline, based on the target address of the connection! From the Basic palette, drag a TargetSpecific node onto the edge between the SocksInitializer and the SslServerhandler. Then, double click on the edge between the TargetSpecific handler and the SslServerHandler, and enter “.*:443”. Then click elsewhere on the graph to stop editing. This provides a regular expression that will be matched against the SocketAddress that the connection is targeted to. In this case, any connections to port 443 will follow the edge in question.
Now, construct a new branch of the pipeline by dragging an HttpServerCodec onto the TargetSpecific node. Edit the new edge, and enter “.*:80”. Then drag an InterceptHandler, HttpClientCodec and Sink in sequence into the graph, and connect them to the previous node.
Your graph should now look like this:
At this stage, you should be able to successfully view and intercept HTTP and HTTPS messages.
The final step is then making use of your own handlers, beyond what has been made conveniently available in the palette. There are two ways to do this, depending on whether the handler you need exists already or not!
For quick automated modifications to objects passing through the pipeline, the easiest way to do this is to drag a ScriptHandler node into the graph at an appropriate location, and write a script that extends ChannelDuplexHandler or ChannelHandler. (ChannelDuplexHandler has methods to deal with outbound messages over and above the inbound-only ones in ChannelHandler). An example of creating such a handler for WebSockets is:
import io.netty.channel.*;import io.netty.handler.codec.http.websocketx.*;
return new ChannelDuplexHandler() { @Override public void channelRead(ChannelHandlerContext ctx, Object msg) throws Exception { if (msg instanceof TextWebSocketFrame) { String text = ((TextWebSocketFrame) msg).text(); // msg = new TextWebSocketFrame(text.toUpperCase()); } super.channelRead(ctx, msg); }
};
This example is looking for TextWebSocketFrame objects, and will update the text to the upper-case version of the content. This particular example will only modify objects when they are read from the network, rather than when they are being written by Mallet to the network. To modify only outgoing objects, you could do something similar to the following, overriding the write() method:
import io.netty.channel.*;import io.netty.handler.codec.http.websocketx.*;
return new ChannelDuplexHandler() { @Override public void write(ChannelHandlerContext ctx, Object msg, ChannelPromise promise) throws Exception { if (msg instanceof TextWebSocketFrame) { String text = ((TextWebSocketFrame) msg).text(); // msg = new TextWebSocketFrame(text.toUpperCase()); } ctx.write(msg, promise); }
};
For pre-existing code already in the Netty project, or otherwise on the Java classpath, drag a Handler node from the Basic palette into the graph, and double click on it. In the editor that pops up, you can now change the name of the class that is instantiated for this node, and if necessary, specify parameters for the constructor. Mallet currently iterates through the constructors for the class to find one with the same number of parameters provided. It then tries to coerce the string values of the parameters into an instance of the class required by the constructor. If successful, it will then use that class to provide the ChannelHandler instance at that point in the pipeline.
If you have made it to the end of this post, you REALLY must be interested in proxies, or hacking non-HTTP protocols. I’d love to get feedback on Twitter @RoganDawes, if you have any.