On a recent internal assessment, we ran into a problem. While holding low-privileged access to an internal Windows host, we realised the software on the host was communicating to a remote API endpoint over HTTPS. However, the remote endpoint was enforcing authentication using client SSL certificates.
Normally, the above scenario is easily fixed by exporting the local client SSL certificate from the host and importing it into either Burp Suite or Postman. In Burp Suite, when you want to use a client SSL certificate, you must manually load the certificate and private key into it. This implies (on Windows, at least) that you’ll need to export the client SSL certificate. However, this is only possible if you hold appropriate permissions to the certificate and its private key and it allows exporting.
Unfortunately, closer inspection of the target host revealed that the client SSL certificate (in particular, its private key) had been marked as non-exportable. Thus, we had to first achieve privilege escalation on the host or hack the private key with Mimikatz such that the non-exportable flag could be bypassed. However, in the assessment’s context, we wanted to be stealthy and leave as small a footprint as possible. Not to mention, the client had indicated that we had to reduce the tooling deployed onto the host. As such, the quest for an alternative solution commenced.
Talking with fellow colleagues, we figured an authenticating SOCKS proxy might serve as a workaround. Instead of exporting the client certificate, a SOCKS proxy could be installed on the host that would use the client certificate (leveraging Windows Crypto API’s to use the client certificate) to establish HTTP/S connections to the remote endpoint. Put simply, the SOCKS proxy would:
- Listen for client connections.
- Negotiate SOCKS to get the remote endpoint IP address and port.
- Establish whether TLS or cleartext communication is being submitted.
- If TLS, use a self-signed certificate to negotiate a connection with the originating client
- Use SNI data (or another means) to negotiate a connection with the remote endpoint – with the additional client certificate added.
Although the concept seemed simple enough, the problem was that most existing SOCKS proxies did not provide this functionality out of the box – if at all. Hence, a decision was made that we would create our own SOCKS proxy implementation. C# was selected to reduce the footprint, as the .NET framework was already present on the target host.
This blog post explores how SOCKS4/4A/5 works and how we created the custom C# proxy. First, the post examines the inner workings of SOCKS based on public RFCs to set a foundation for discussion. This is then accompanied by short code snippets explaining how the C# implementation worked. Then, we’ll explore how we added the client SSL certificate and TLS handling logic to the proxy.
A Brief Exploration into the SOCKS Protocol
SOCKS is an Internet protocol first developed by David Koblas and presented in 1992. Its intent is to act as a proxy server between a client and server, allowing network packets to be exchanged. In pentesting, we often use it to reach resources on the client side that we don’t have access to – i.e., using a compromised machine as a jumpbox.
When reading through the public RFCs, one notices that a SOCKS proxy can be configured to support different implementations, dubbed:
- SOCKS4
- SOCKS4a
- SOCKS5
SOCKS4
SOCKS4 was developed by Ying-Da Lee and is a widely used SOCKS implementation based on David Koblas’s work.
At its core, the SOCKS4 data exchange is highly simplistic. First, a client connects to the SOCKS proxy. Then, after the client connects, it sends a SOCKS connection request. This request follows a consistent format:

- VER is the SOCKS protocol version number and will always be 0x04 for SOCKS4 implementations.
- CMD is the SOCKS command code and can be either 0x01 (CONNECT) or 0x02 (BIND)
- DSTPORT is a 2-byte port number (i.e. 80, 445)
- DSTIP is the 4-byte IP address
- ID is the user ID string, which is null-terminated.
Once the SOCKS server (or then, proxy) receives the request, it needs to check whether the request should be granted or not. If the request is granted, the SOCKS server will establish a connection to the specified port of the destination host.
Regardless of the remote connection, the SOCKS server must forward a reply back to the originating client. This reply again follows a consistent format:

- VN is the version of the reply code and should be 0x0.
- REP is the result code with one of the following values:
90: request granted
91: request rejected or failed
92: request rejected becasue SOCKS server cannot connect to identd on the client
93: request rejected because the client program and identd report different user-ids
Note: The DSTPORT and DSTIP fields are typically ignored by clients and most often will be returned as null parameters.
Although not immediately apparent, the SOCKS exchange would occur anew for each client connection to the upstream endpoint. Put simply, if the client sends 2 or more GET requests, the SOCKS exchange would repeat for each request.
SOCKS4a
SOCKS4 requires the client to perform DNS resolution locally. In particular, when the initial SOCKS connection request is received, it requires the client to submit a valid IP address. This presents a problem when the client must reach a remote endpoint for which the IP address is not known ahead of time – i.e. when targeting an internal resource through a compromised workstation.
SOCKS4a was introduced as a SOCKS4 extension by Ying-Da Lee to solve the above-mentioned problem. Unlike SOCKS4, SOCKS4a allows the client to submit a destination domain name rather than an IP address.
The format of the SOCKS4a connection request is exactly the same as SOCKS4 (see above), albeit with one minor difference. For SOCKS4a, if the client cannot resolve the destination host’s domain name ahead of time, the first three bytes of the DSTIP are set to NULL and the last byte to a non-zero value. In practice, this means the DSTIP will typically take the format:
0.0.0.x
When SOCKS4a is implemented, the proxy server is responsible for 1) detecting the domain name and 2) performing its own DNS resolution before establishing a connection with the destination endpoint.
SOCKS5
While SOCKS4 and 4a share many similarities, SOCKS5 is a completely different beast. The SOCKS5 protocol is defined in RFC 1928. It is incompatible with SOCKS4; but does follow a somewhat similar approach while offering support for authentication, IPv6 and UDP.
When a client first connects to a SOCKS5 proxy, it undergoes an initial handshake. This handshake takes the following format:

- VER is the SOCKS protocol version number and will always be 0x05 for SOCKS5 implementations.
- NAUTH is an indicator of how many authentication methods are supported
- AUTH lists the authentication method:
After receiving the initial handshake request, the SOCKS5 proxy must select its preferred authentication mechanism and report this to the originating client. This reply takes the format:

- VER is the SOCKS protocol version number and will always be 0x05 for SOCKS5 implementations.
- CAUTH is the selected authentication mechanism (0x00 in the above example).
Note: This next section assumes no authentication has been selected. If the proxy opts for username/password authentication, a separate request and response sequence takes place – as defined in RFC 1929.
With the initial handshake completed and the authentication mechanism selected (i.e., no auth), the client must now submit the remote endpoint details to the proxy. The format of the subsequent request is almost identical to that observed in SOCKS4/4a exchanges:

While the packet format is identical, there is one major difference. In SOCKS4/4a, the DSTADDR would be an IP address. In SOCKS5, the DSTADDR field contains a nested data structure:

The type can be one of three possible values:
- 0x01: IPv4 address
- 0x03: Domain name
- 0x04: IPv6 address
Meanwhile, the ADDR field would differ in length depending on the selected type:
- 4 bytes for IPv4 address
- 1 byte of name length followed by 1–255 bytes for the domain name
- 16 bytes for IPv6 address
With the packet received, the SOCKS5 proxy needs to establish the connection to the specified remote endpoint and then return a reply to the originating client. This response differs from SOCKS4/4a:

The key field in the response packet is the STATUS field. This field could take one of nine possible values:
- 0x00: request granted
- 0x01: general failure
- 0x02: connection not allowed by the ruleset
- 0x03: network unreachable
- 0x04: host unreachable
- 0x05: connection refused by the destination host
- 0x06: TTL expired
- 0x07: command not supported / protocol error
- 0x08: address type not supported
The BNDADDR and BNDPORT are non-optional fields and must contain the details of the remote endpoint to which the proxy has connected.
Once the client receives the reply (assuming it returns 0x00), the traffic relay will commence with the proxy server and the remote endpoint.
Implementing the Custom SOCKS Proxy in C#
Having learned briefly about SOCKS4/4a/5, we are now ready to explore the custom C# SOCKS proxy that was developed.
As mentioned at the onset of the post, we opted for C# since the target host already had the .NET framework present. Serving as a starting point, we explored the interwebs for code snippets and example C# proxy implementations.
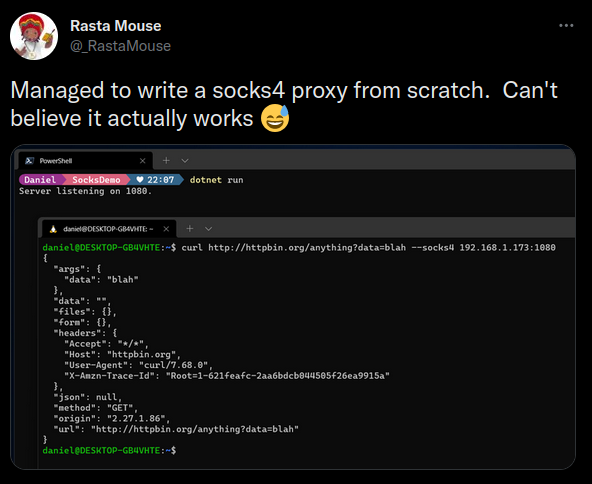
The research ultimately led us to Daniel Duggan’s (more commonly known as @rastamouse) SOCKS4/4a implementation, which he had partially written about on his blog and tweeted on Twitter:
Initial SOCKS4/4a Logic
Our custom C# implementation took significant inspiration from Daniel Duggan’s implementation. In fact, most of the groundwork for the proxy closely followed the few code snippets he had posted online.
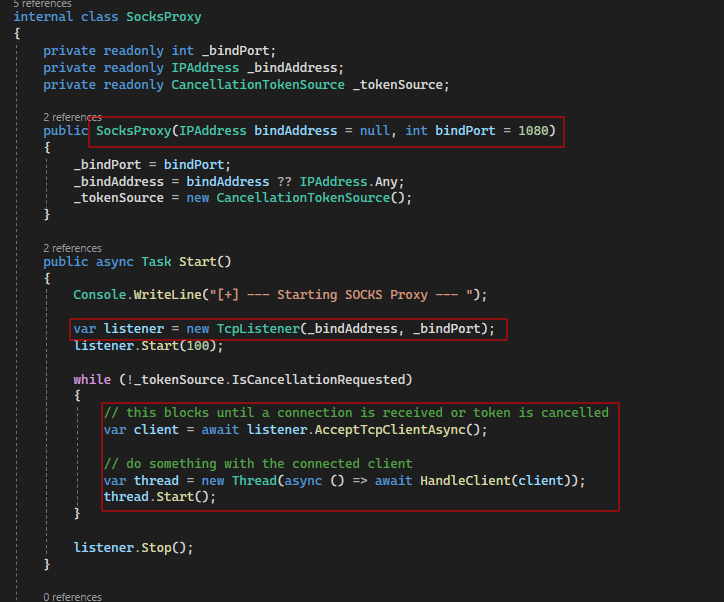
Our implementation uses a SocksProxy class that takes a bind address (0.0.0.0) and port (1080). Then a Start() method is defined, which binds a TCP listener (TcpListener) on the specified address/port.
A handler function (HandleClient) is called for each connection the proxy receives, which then deals with the SOCKS exchange asynchronously.
The handler function first obtains the raw TCP network stream from the received client connection. Using async read/write operations, the received packet’s content is read so that the specific SOCKS version can be obtained (i.e. 0x04 for SOCKS4 or 0x05 for SOCKS5).
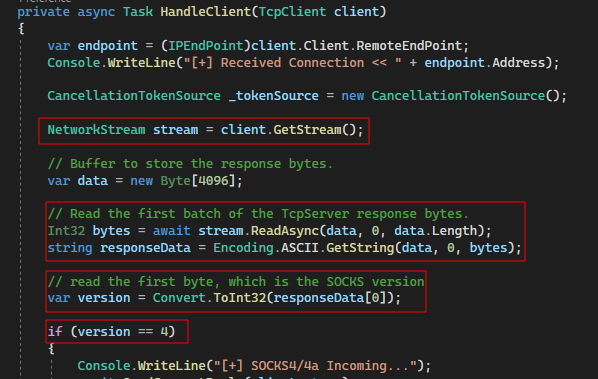
If a SOCKS4/4a request is received, a helper function (FromBytes) is called. This function takes the raw bytes of the received SOCKS4 request packet and interprets them to obtain the destination host and port to which the originating client is trying to connect.
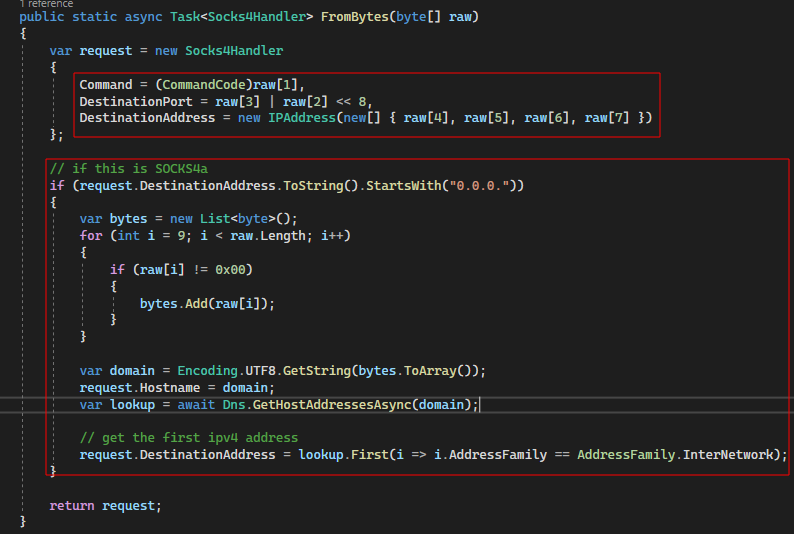
Notice how the recovered destination IP address is checked to verify whether a SOCKS4 or SOCKS4a request was received. If the destination IP address starts with “0.0.0.”, it implies a SOCKS4a request, and the code logic then proceeds to recover the hostname from the end of the request packet. In turn, the hostname is used in a traditional IPv4 DNS lookup.
With the destination IP address and port obtained, the proxy logic attempts to establish a connection with the remote endpoint:

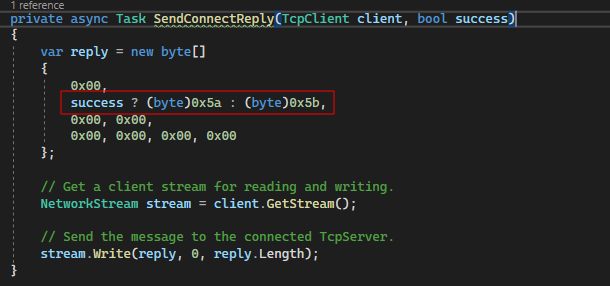
Depending on the success or failure of the remote connection, the proxy must forward a reply to the client. As mentioned in the SOCKS4 discussion earlier, the reply is either 90 (0x5a) or 91 (0x5b).
With the initial SOCKS4 request/response taken care of, the proxy now needs to handle the data transfer between the client and the remote endpoint and vice versa.
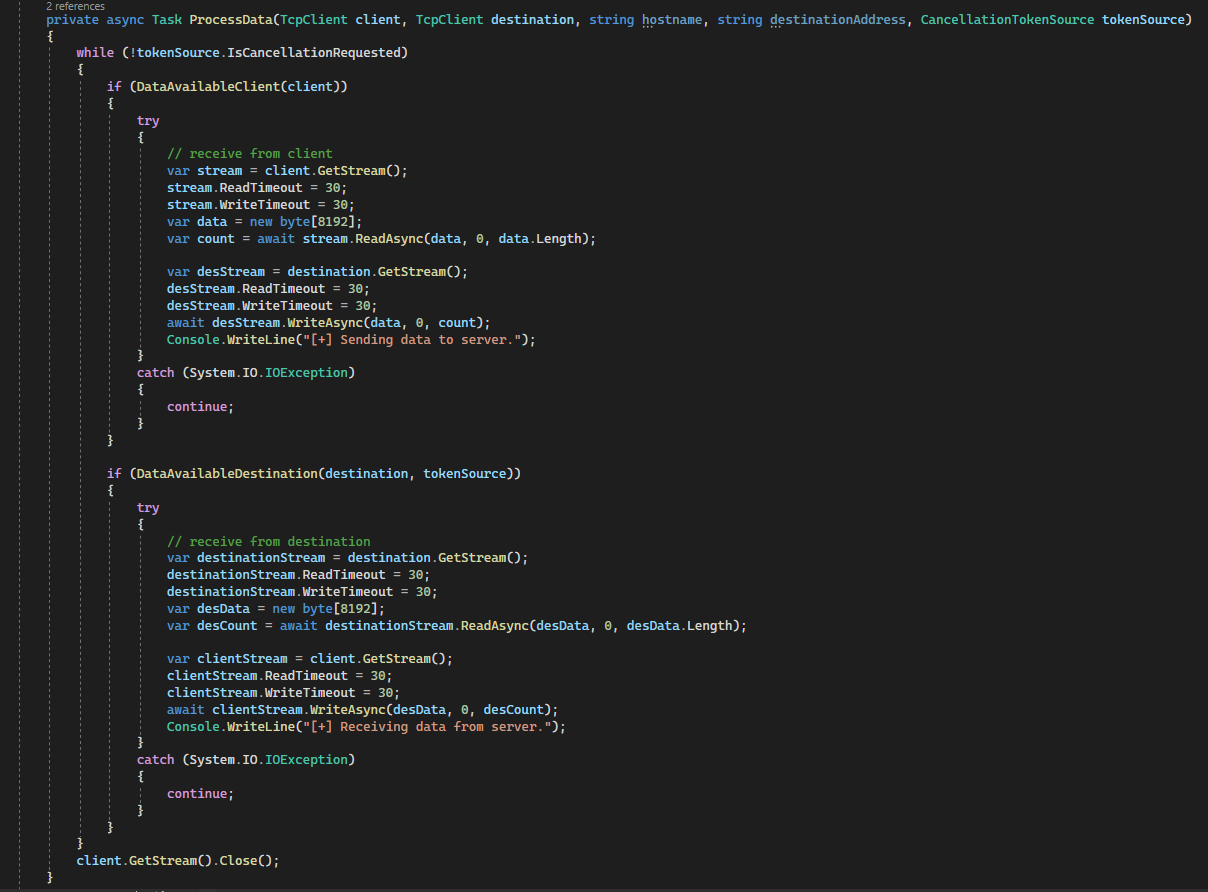
In Daniel Duggan’s code snippets, the exact data transfer logic was not shown. When we initially thought about the data transfer (and looked at online resources), it was understood that one could simply take the data received on the client’s stream (if there is data) and forward it to the destination stream – see code snippet above. Similarly, the inverse would work for data received from the destination endpoint. But…
When we started testing the logic (i.e. with SMB requests), we noticed that the proxy would hang and timeout. This seemed rather peculiar, especially as HTTP traffic was processed perfectly fine.
After many hours of Wireshark dumps, debugging, and numerous print statements (a.k.a. Console.WriteLine), we found the culprit. Wait for it…. RST packets.
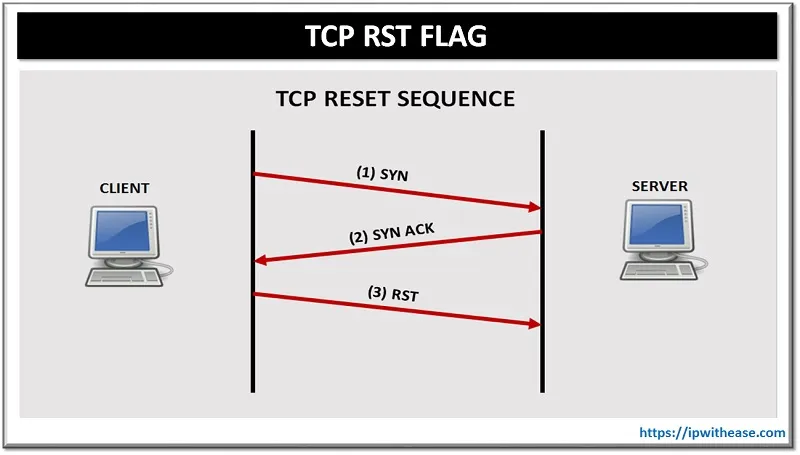
The code snippets that Daniel Duggan had posted assumed the connection to the destination endpoint was always successful. Now, yes, when initially connecting, that would be true. However, many protocols (i.e. SMB requests) may receive an RST/ACK response from the destination endpoint. This could be for many reasons, such as client trying to communicate via SMBv1, whereas the remote endpoint only allows SMBv2.
As the proxy code is simply expecting a data response, it doesn’t know that the remote endpoint rejected the forwarded packet. This took us down a whole new rabbit hole, as (at first) it appeared C# didn’t have a way 1) to detect the RST packet and 2) return an RST packet to the originating client.
After scouring the interwebs, we finally came across this note in a StackOverflow article:
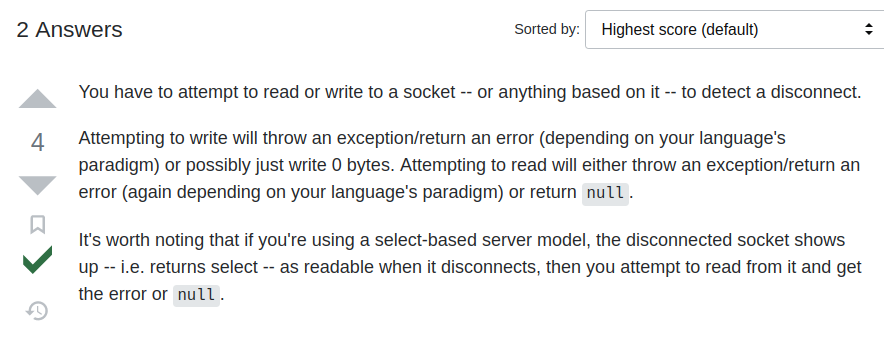
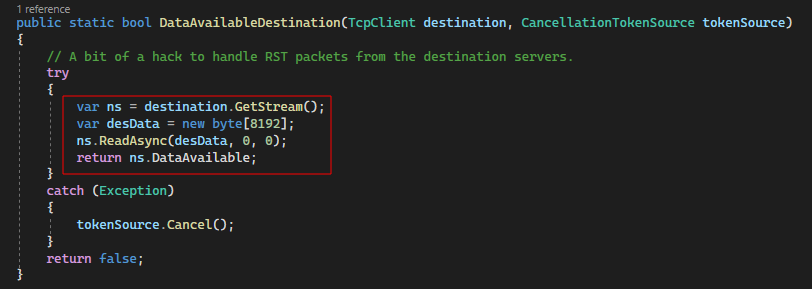
It turns out that the way to detect the RST packet is to try writing to the stream. If the stream is disconnected (a.k.a. RST packet was received), the write operation will fail and raise an exception.
The code to implement this check was relatively straightforward, given that it matched the existing write operations on the destination stream quite closely:
At this stage, the proxy could detect the RST packet. Great, but how do we forward the RST packet to the originating client?
Queue another timesink of several hours just for us to realise that an RST packet is synonymous with a ‘disconnected’ connection – duh! Hence, the proxy should disconnect the client connection instead of ‘forwarding’ the RST packet.
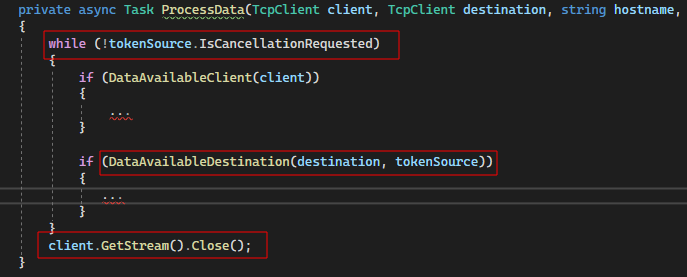
In practice, this meant that a flag (or then token) had to exist within the data processing loop (ProcessData), such that when the RST packet was received, the client could be disconnected. Fortunately, the CancellationTokenSource in C# works really well for this.
The token can be shared between the data processing loop and the RST check (DataAvailableDestination). If the RST check fails, the token can be cancelled (tokenSource.Cancel()), which stops the main loop and terminates the client connection. Pretty neat!
At this stage, we had a fully operational SOCKS4/4a proxy (largely made possible due to Daniel Duggan’s code snippets).
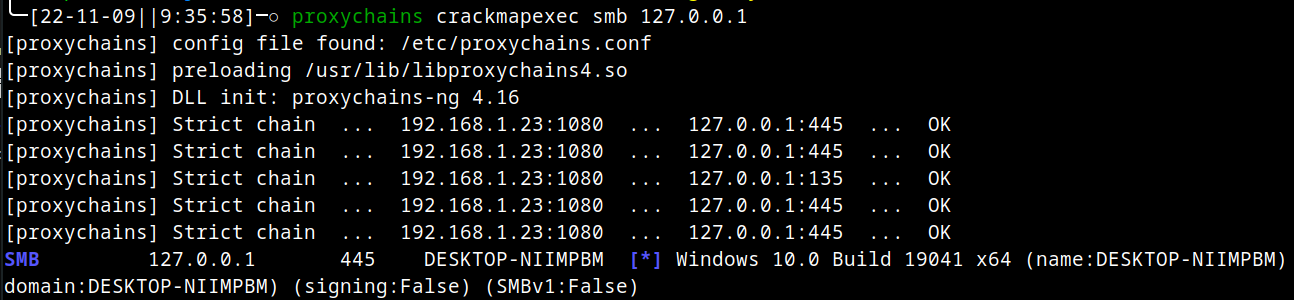
We tested the proxy implementation between a local machine and a remote Windows VM, and traffic was routed perfectly – even SMB traffic while using CrackMapExec through the proxy.
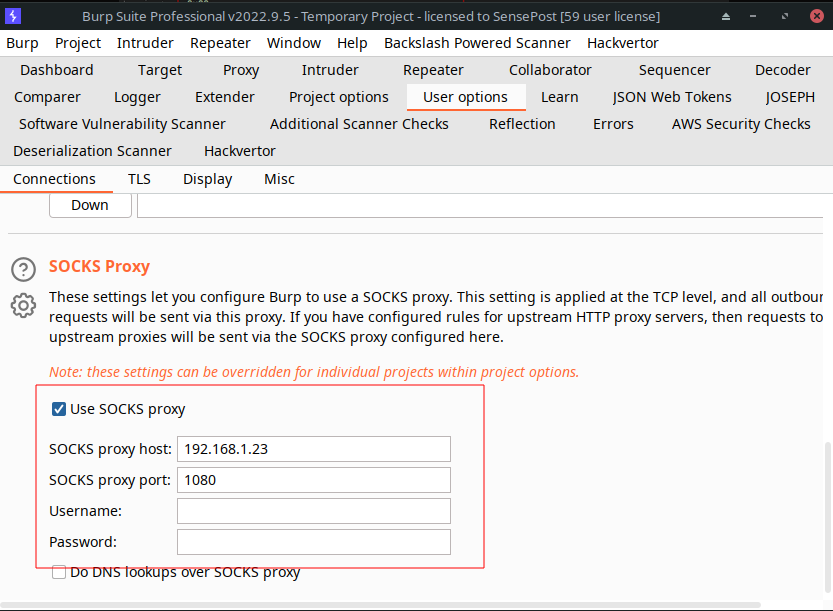
Excited to transition to the custom TLS logic, we reconvened with our colleagues to compare notes around the implementation progress. The conversation quickly identified an oversight. We ideally wanted to use Burp Suite or Postman to raise connections via the compromised host to the remote endpoint. So, we fired up Burp Suite locally and tested the proxy. Turns out that Burp Suite only supports SOCKS5 proxies – Oh, noes!
Adding SOCKS5 Support
With the bulk of the proxy logic already developed, adding SOCKS5 support was relatively easy. The only aspect that caused some issues initially was the SOCKS5 auth handshake.
In the SOCKS4 logic, the first request received contains all the remote endpoint details. In comparison, SOCKS5 works with two separate packets (1 x auth request, 1 x connect request). Not fully realising this, we initially tried to interpret the auth request as the connect request. Needless to say, that was a silly mistake.
After reading RFC 1928 for the second time, we realised our mistake and correctly implemented the auth/reply + connect/reply sequence:
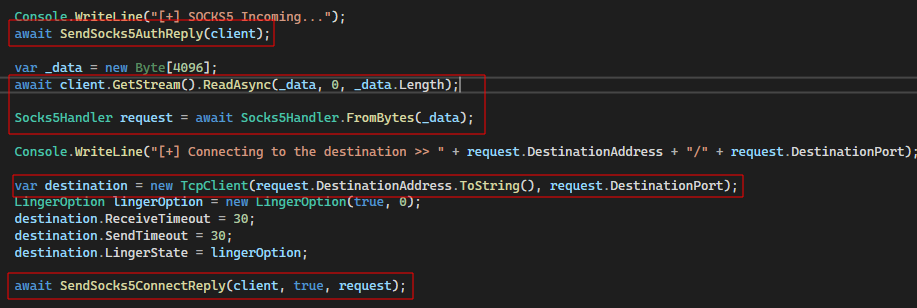
To fast-track development, we decided that the proxy would only support “no authentication”. This meant the auth reply could be made static by always returning a 0x00 reply:
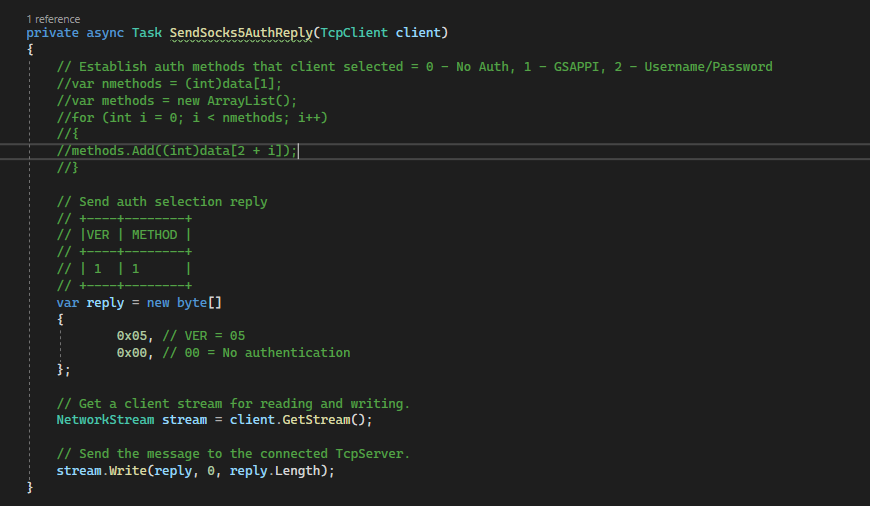
Note: We initially thought of supporting username/password authentication. The code logic to detect it as a client auth method is commented at the top of the code snippet. Pull requests are welcome!
The interpretation of the subsequent connect request from the originating client was also simplified. Instead of catering for IPv4, IPv6 and DNS, we decided to just support IPv4 – mainly as that is how Burp Suite would use the proxy by default:
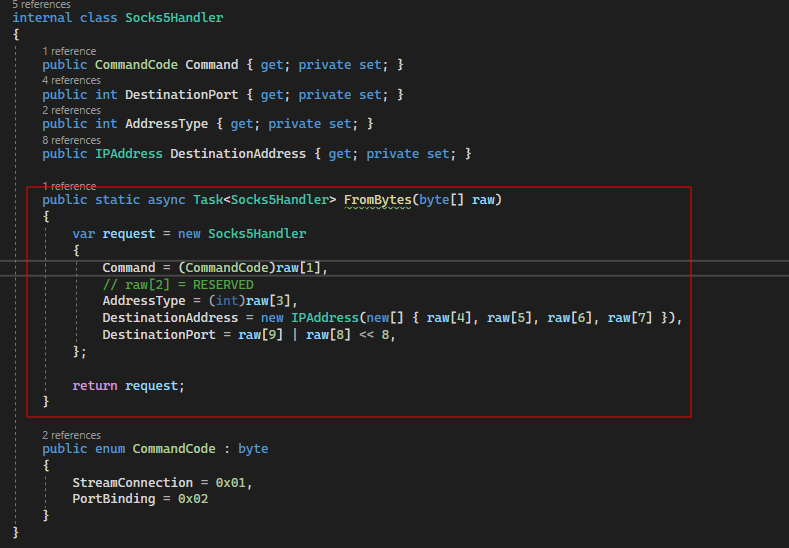
Note: In retrospect, DNS support could likely be easily added by reusing the SOCKS4a logic. IPv6 support can also be added but requires a change to the TcpClient invocation in the main proxy logic.
With the connect request handled, the last piece was returning the reply to the originating client. Following the SOCKS5 RFC, we need to return a 0x00 (request granted) or 0x05 (connection refused) status together with the BNDADDR and BNDPORT fields:

Note: We might be wrong in our understanding, but we understood the BNDADDR and BNDPORT fields to contain the upstream endpoint’s details.
At this stage, we had a fully operational SOCKS4/4a and SOCKS5 proxy. Going back to the Burp Suite support, we configured Burp to use the SOCKS5 proxy (running on a Windows VM) and submitted a web request:
curl http://httpbin.org/ --proxy 127.0.0.1:8080
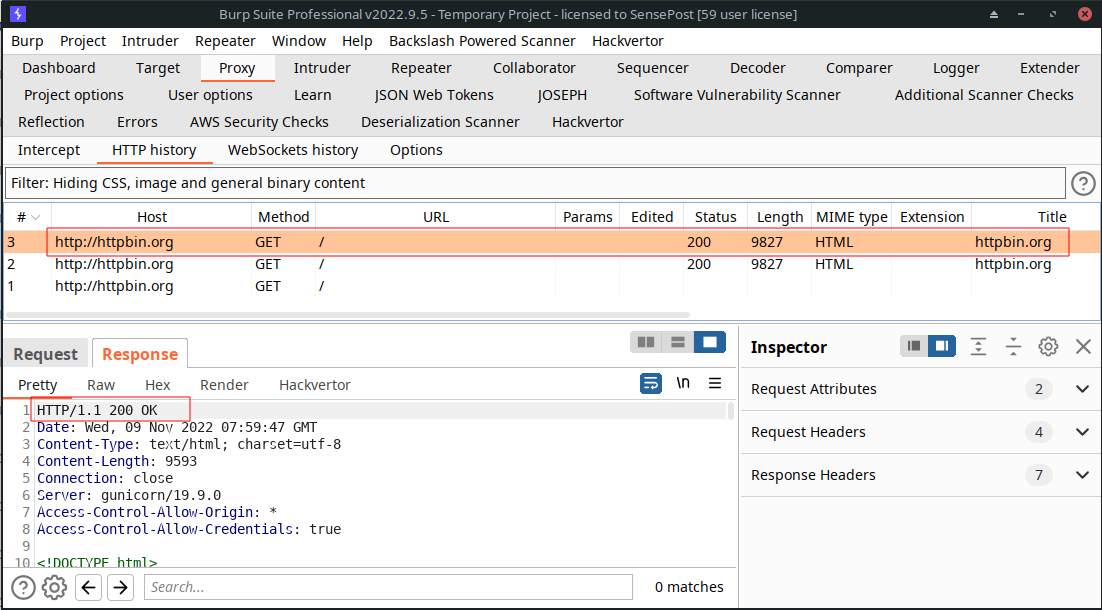
Eureka! The traffic was passed through the SOCKS5 proxy, and Burp Suite displayed the HTTP traffic as expected.
Adding the Custom TLS Logic
While we now had a working SOCKS proxy, it did not yet meet our ultimate requirement. In particular, we wanted an ‘authenticating’ SOCKS proxy that could use a specified client certificate from the target host’s local Windows Certificate store to establish TLS/SSL connections.
The current SOCKS implementation simply passed TCP traffic between the originating client and the upstream endpoint. To address our requirement, the SOCKS proxy logic had to be adjusted such that TLS/SSL connections would terminate on the proxy, the client certificate be added, and then forwarded onwards.
To allow TLS/SSL connections to terminate on the proxy, the proxy had to present a server certificate to the originating client. To achieve this, we first created and installed a self-signed certificate as follows on a test Windows VM:
Makecert -r -pe -n "CN=MySslSocketCertificate" -b 01/01/2015 -e 01/01/2025 -sk exchange -ss my
The MakeCert tool is a deprecated utility forming part of Windows SDK installations, which allows you to create an X.509 certificate, signed by a specified key, that binds a provided CN to the public part of the key pair.
With the invocation above, we are specifying the following:
- we want a self-signed cert (-r),
- make the private key exportable (-pe),
- give it a CN (-n),
- give it a start and end validity date (-b / -e),
- the location of the subject’s key container, which holds the private key (-sk), and
- the name of the subject’s certificate store where the generated certificate will be stored (-ss)
On newer Windows installations, Microsoft recommends using the New-SelfSignedCertificate PowerShell Cmdlet instead of MakeCert:
New-SelfSignedCertificate -Type Custom -Subject "CN=MySslSocketCertificate" -KeyAlgorithm RSA -KeyLength 2048 -CertStoreLocation "Cert:\CurrentUser\My"
To use the server certificate within the C# logic, we coded a small helper function that retrieves the certificate from the Windows Certificate store:
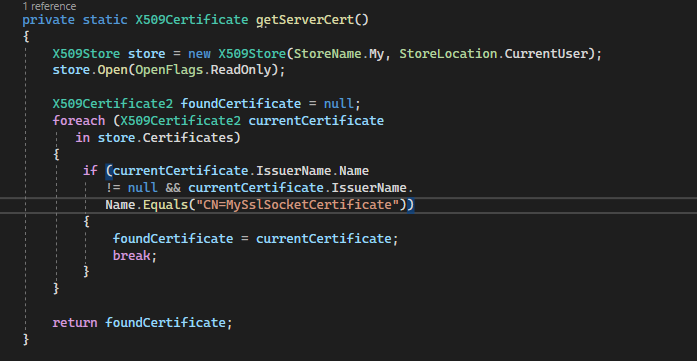
Note: We retrieve the server certificate based on a lookup against the generated certificate’s Common Name (CN).
Next, we updated the proxy such that TLS/SSL connections could be detected. We played around with a few iterations but ultimately decided to just check the destination port for TCP/443:
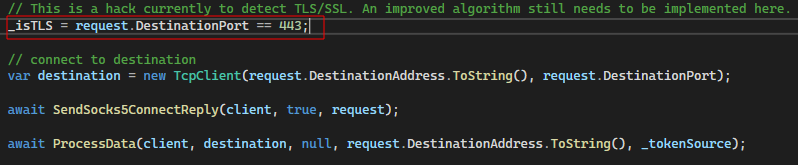
Note: This was a quick hack and is not ideal, given that TLS traffic would be observed on many other ports. Ideally, a TLS connection could be detected by inspecting the first few bytes of the received data stream – however, we had issues in doing so; since the stream isn’t peakable by default in C#. Put simply, the data is lost when you read from the stream.
Note 2: There are some peakable stream solutions available online, which likely could address the above-mentioned problem. (article 1, article 2). As before, pull requests are welcome!
Assuming a TLS/SSL connection is received, the data processing logic needs to ‘upgrade’ the TCP stream. In C#, this involves wrapping the received TCP stream inside an SSLStream object and authenticating the proxy to the originating client:
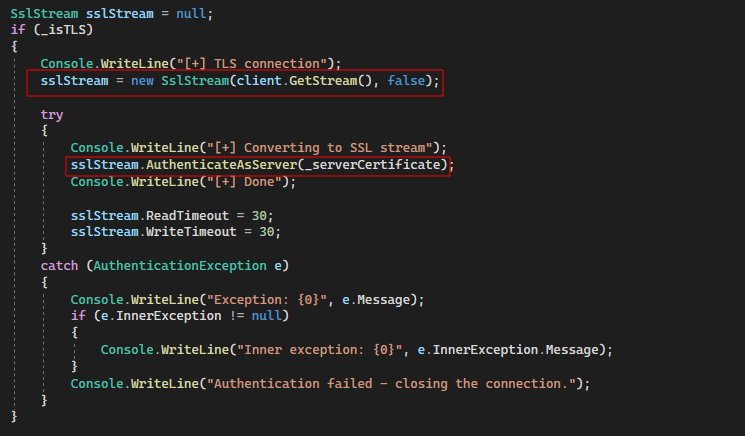
It is important to note the tie-in here with the self-signed certificate. When the proxy ‘authenticates’ to the client, it presents the self-signed certificate. In turn, the client can decide to accept or reject it.
So far, so good. However, the logic change above only creates the SslStream between the client and proxy. The logic must still deal with the upstream connection – proxy to the remote endpoint.
To satisfy our requirements, a client SSL certificate had to be added to the upstream connection. To achieve this, we first wrote a helper function that could retrieve a certificate from the user’s Windows Certificate store:
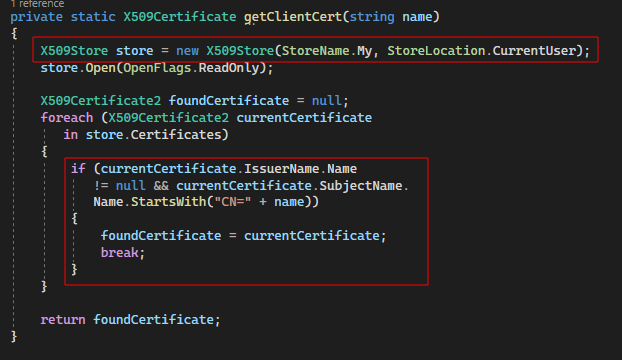
Note: This helper function is almost identical to the server certificate retrieval. The exception is that the function takes a name argument, which is used during the CN comparison.
Sidebar: Private Key Exportable Flag
You might wonder why the code snippet above can access the client certificate even though the exportable flag might be set.
Marking a certificate’s private key as exportable gives the user permission to export the key (i.e. into a PFX file). However, the ability to read vs export the key are two separate things.
Using the private key for authentication, signing, or decryption is not in any way related to exportability. Instead, Windows exposes the Crypto APIs that one can call to use the private key for various operations, which are gated only by whether the calling user has permission to use the key. This is independent of export.
With the certificate loaded, a connection is now established to the remote endpoint. Once established, the TCP stream is again wrapped inside a SslStream object. However, if the proxy is configured to use a client certificate (as in our case); the cert is added during the SSL exchange:
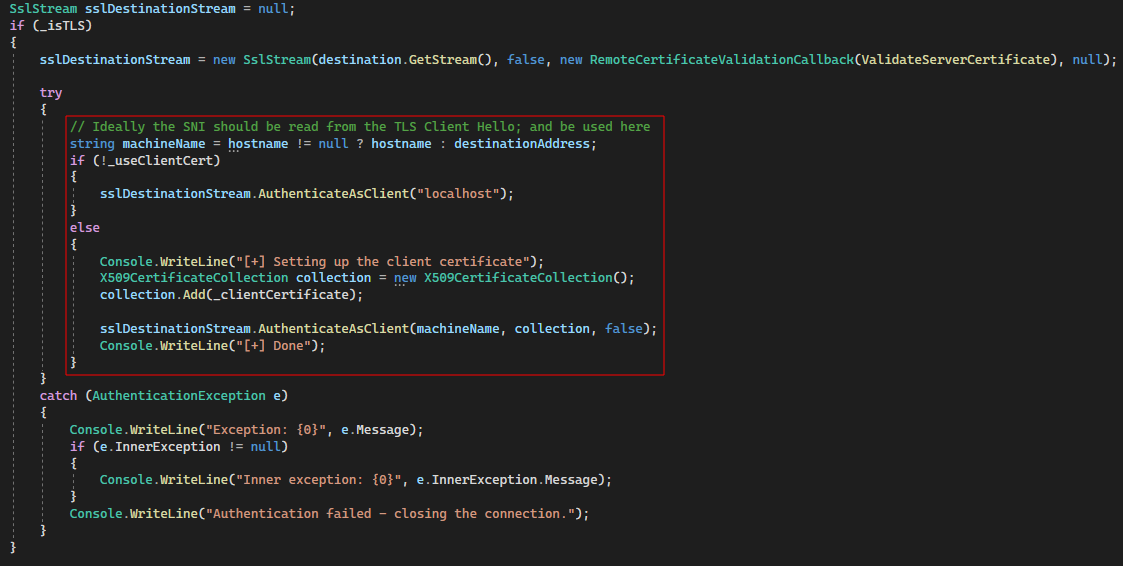
This implies that whenever the proxy receives a TLS connection, the specified client certificate gets added to the SslStream and then data processing resumes. Basically, it replicates the client certificate logic that Burp Suite and Postman have built in.
The only other change required was regarding the data reading and writing logic. For non-TLS connection, C# uses the TcpStream for reading and writing. Access to the stream can be obtained by calling the .GetStream() function.
In contrast, the proxy logic had to be updated to deal with the SslStream. A SslStream does not have a .GetStream() function in C#. Instead, you must invoke the read/write operations directly on the object:
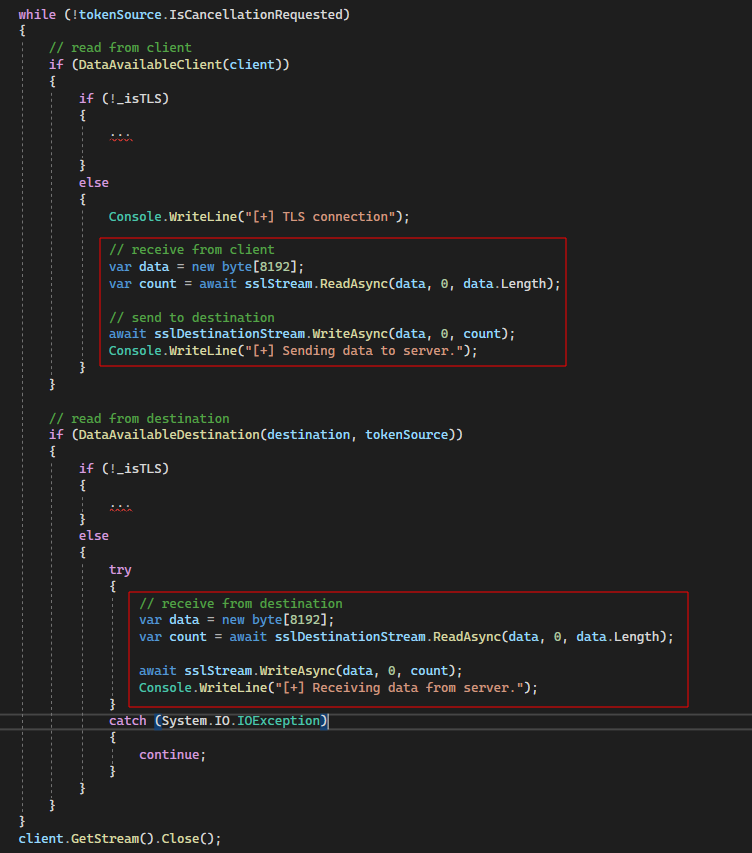
With these changes, the proxy could pass non-TLS connections as normal, while TLS traffic was now modified with the added client SSL certificate.
The source code for the C# SOCKS proxy with the added client certificate handling; can be found here: https://github.com/sensepost/sockstlsproxy
Final Proof of Concept
Now, we are sure you are wondering whether the proxy actually works?
The Test API Endpoint
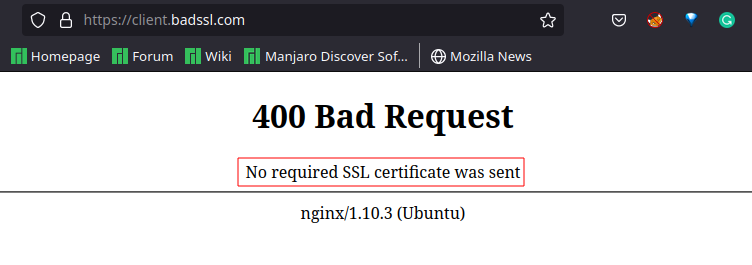
For demonstration purposes, we will use the BadSSL client certificate endpoint:
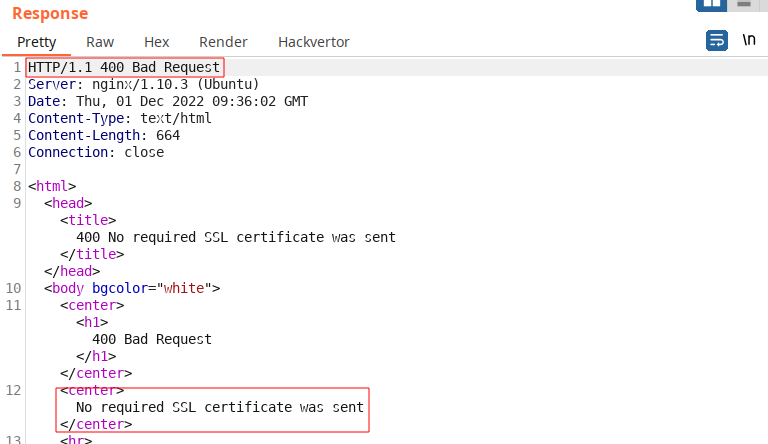
When browsing the endpoint using no client SSL certificate, you are presented with the following error message:
The Victim Windows Host
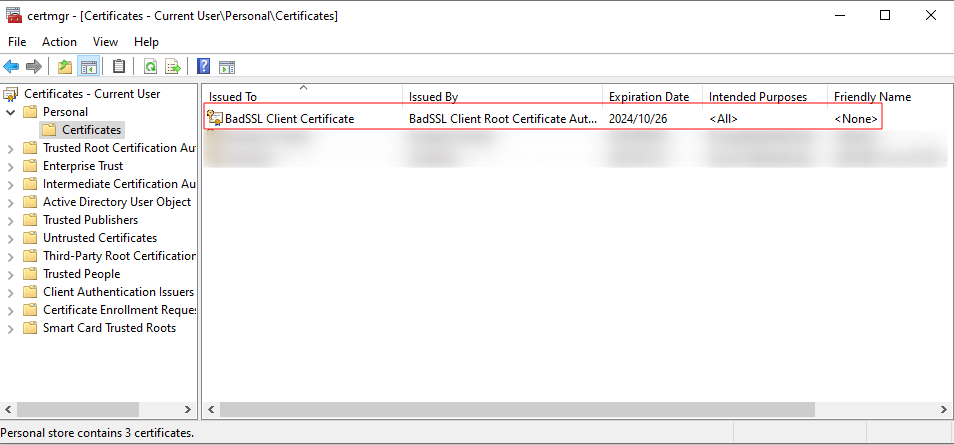
To simulate the Victim host we encountered during the assessment, we have a Windows 10 VM pre-created. On the VM, we download the BadSSL client certificate (.p12):
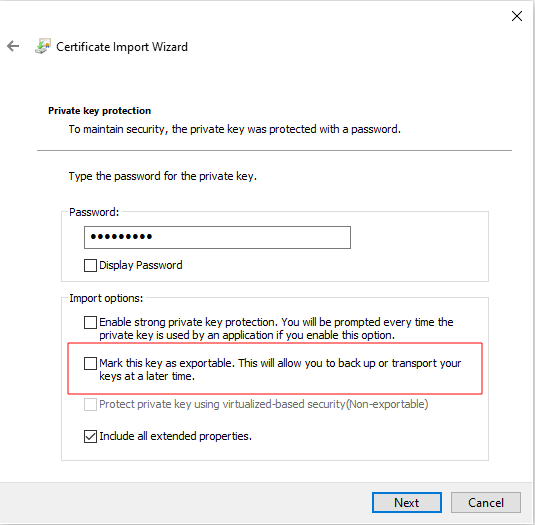
The client certificate is installed into the user Certificate store, while making sure the ‘exportable’ flag is unchecked:
The installation is confirmed by exploring the user’s personal certificates:
We can confirm that the private key is marked as non-exportable by attempting to export the certificate:

Using the Custom C# Proxy
We now shift our focus to an attacking scenario. Let’s imagine we compromised the victim host and now notice the client certificate on the machine. We intend to communicate with the BadSSL endpoint, but we cannot export the certificate and its private key!
We start by creating our own self-signed certificate and installing it on the victim machine:
New-SelfSignedCertificate -Type Custom -Subject "CN=MySslSocketCertificate" -KeyAlgorithm RSA -KeyLength 2048 -CertStoreLocation "Cert:\CurrentUser\My"
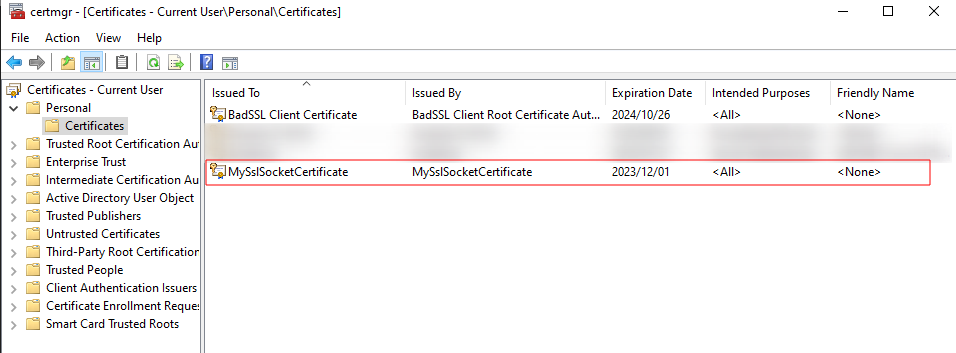
[Note: The above certificate will facilitate TLS\SSL connections between the C# proxy and the victim host.]
Next, we transfer the C# proxy to the victim host and execute it, specifying that we want to make use of a client certificate (true) and the Common Name of the certificate (BadSSL Client Certificate)

Notice how we specify the CN of the client certificate in the last argument. This instructs the proxy to use the certificate for TLS/SSL connections.
With the proxy running, we’ll assume that web traffic can somehow be passed down to the victim host on TCP/1080 (the port can be configured in the proxy invocation). For example, maybe we had set up an SSH port forward ahead of time:
sh -R1080:localhost:1080 -p 11121 jumpbox
Note: How you gain access to the proxy port is not critical to our demo. We opt for the remainder of the section to connect directly to the port on a bridged VirtualBox network.
In a local Burp Suite instance, we have an HTTP request that we would like to forward to the BadSSL endpoint. Without the client certificate, the endpoint returns an HTTP 400 response (as was seen earlier):
To evaluate the C# proxy, we configure Burp Suite to use it while running on the victim host:
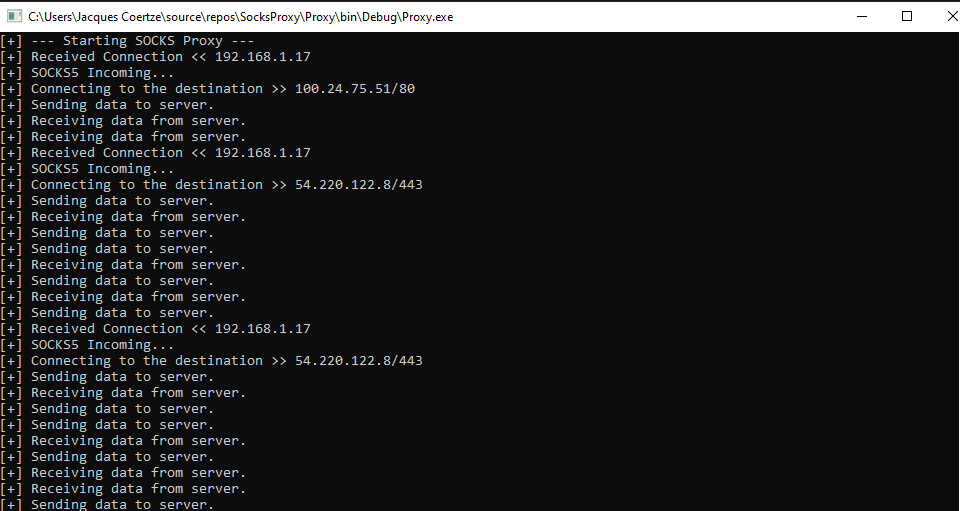
Now, the moment of truth… will the request succeed in allowing access to the upstream endpoint? We hit send on the request in Burp and notice some interaction on the running proxy:
Back in Burp Suite, we receive a valid response from the upstream endpoint. Eureka!
Conclusion
This blog post has investigated the fundamentals of the SOCKS4/4a/5 protocols and shared a custom C# SOCKS proxy implementation.
The main takeaway from this blog post is we have a custom SOCKS proxy whereby one can use a locally installed client SSL certificate on a victim host to establish remote TLS connections. That is, all without requiring the client SSL certificate to be exported!
We trust and hope that this proxy will serve you well in similar circumstances in the future. Having a C# SOCKS proxy in itself may prove useful when dealing with red team operations, as it may provide flexibility instead of using the built-in proxies that Metasploit or Cobalt Strike provides.
References
- https://en.wikipedia.org/wiki/SOCKS
- http://ftp.icm.edu.pl/packages/socks/socks4/SOCKS4.protocol
- https://www.rfc-editor.org/rfc/rfc1928
- https://github.com/cfcs/ocaml-socks/tree/master/rfc
- https://rastamouse.me/socks4a-proxy-in-csharp/
- https://github.com/ring04h/s5.go
- https://github.com/enthus1ast/nimSocks/blob/master/nimSocks/server.nim
- https://gist.github.com/whoisjeeva/b685ee4df9fb78832a8b4eda59fc7b64
- https://gist.github.com/zHaytam/3730d512eb5eaf37fb3bd3d176185541