In part 1 of this series, we set up the NanoPi R1S as a USB attack tool, covering OS installation, installation of P4wnP1, and even keylogging a “passed through” keyboard. In this part, I am going to focus on operations as an Ethernet attack tool, using two scenarios. Firstly, as a box which can be connected to an unused Ethernet port, and provide remote access to the target’s network, and secondly, as an Ethernet Person in the Middle (PitM), where it can be placed in between a legitimate device and its upstream switch, and mask its own traffic using the legitimate device’s IP address and MAC address. In the second scenario, we can also defeat Network Access Control measures, because the legitimate device will handle all of that.
One thing to be cautious of, though, is causing any unusual network traffic that might raise alarms. An obvious example is doing DNS lookups for armbian.org when a scheduled apt update happens, or trying to resolve 0.debian.pool.ntp.org. More obscure might be specific DHCP options and parameters that are unique to Linux, that are out of place in a Windows-only network. It’s a good idea to be familiar with all the processes running on your device, and exactly what they look like on the network, before you attach your device to a potentially hostile network! I’ll demonstrate one approach for minimising such unanticipated traffic a bit later.
Attack Preparation
Building on the previous blog post, I’ll assume that you have the built-in WiFi interface configured as a client to an access point that you control, or as an AP itself, such that we can connect to the R1S via WiFi, without P4wnP1 getting in the way. You can do this while connected to the serial console using nmtui on the command line, or nmcli if you really know what you are doing!
Now we need to start setting up the Ethernet interfaces.
The first suggestion is to rename the interfaces to correspond to the names on the case, LAN and WAN. This can help to avoid any confusion about which interface is which. You can do this with the following command, which configures systemd-network appropriately.
printf "lan\tplatform-1c1b000.usb-usb-0:1:1.0\nwan\tplatform-1c30000.ethernet\n" | while read iface path; do
cat << EOF > /etc/systemd/network/10-$iface.link
[Match]
Path=$path

[Link]
Name=$iface
EOF
done
This creates two files in /etc/systemd/network/ named for the lan and wan interfaces, with the path to the device that should be renamed. These should be standard on the NanoPi R1S, but could well vary on other devices. You should also make sure that NetworkManager is not trying to manage these interfaces:
cat << EOF >> /etc/NetworkManager/NetworkManager.conf

[keyfile]
unmanaged-devices=interface-name:wan,interface-name:lan
EOF
Once you have created these files, reboot to activate the rules, rename the interfaces, and reload NetworkManager.
Situational Awareness
Let’s consider the scenario where you have found an unused Ethernet port, and would like to connect your device. This is a potentially risky activity, because any Network Access Control (NAC) system in place could detect your unauthorised activity and alert Operations staff. Nonetheless, it may well be successful, so can be worth trying.
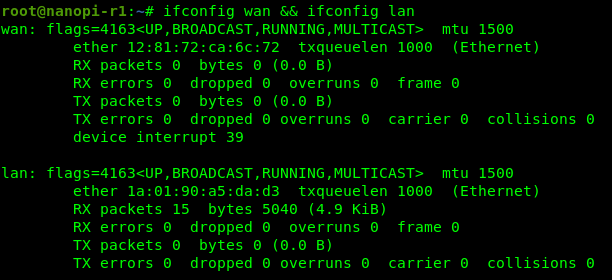
The first thing you will want to know is whether the target port is actually live or not. Fortunately, there are 3 LEDs on the NanoPi R1S that we can use to get some immediate feedback. Unfortunately, the LAN and WAN LED’s are rather difficult to see, being green, while the red SYS LED is much easier to see. My suggested config is below, with the SYS LED used to show the CPU utilisation, and the WAN and LAN LED’s being used to show link status (on when link is detected) and detected RX traffic (blinks off when receiving traffic only).
modprobe ledtrig-netdev # not loaded by default
cd /sys/class/leds/
echo cpu > LED1/trigger # labelled sys
echo netdev > LED2/trigger # labelled wan
echo wan > LED2/device_name
echo 1 > LED2/link
echo 1 > LED2/rx
echo netdev > LED3/trigger # labelled lan
echo lan > LED3/device_name
echo 1 > LED3/link
echo 1 > LED3/rx
ip link set dev wan up
ip link set dev lan up
To have this run everytime the R1S starts, I’d suggest adding the above to /etc/rc.local. Note that without the ip link set dev up part, link detection won’t work! If you’d rather have the RED LED indicate the WAN link, swap LED1 and LED2 in the script above.
Now, if you are walking around, and have your R1S powered up, simply plugging in an Ethernet cable into the WAN or LAN port will tell you if that cable is “live” or not, and if there is any activity on the cable. This can save you from leaving your R1S attached to a disabled or disconnected port. (That said, the R1S does also have indicator LED’s on the Ethernet ports too, so this is not entirely necessary!)

Then you can connect via WiFi, and start monitoring network traffic, before deciding how you want to proceed. For example, requesting a DHCP lease, or simply hijacking an unused IP address in the observed network range.
Automating Attack Scenarios
This also leads to a way of automatically differentiating between the two scenarios mentioned above. By monitoring /sys/class/net/lan/carrier and /sys/class/net/wan/carrier, we can detect whether either or both of the LAN and WAN interfaces are connected. If you would rather automate the network configuration, one option is to monitor these files, and if the LAN interface is live, to assume that this is a Person in the Middle scenario, while if the LAN interface has no carrier, to proceed with the “unused port” scenario. For example:
while [ `cat /sys/class/net/wan/carrier` == 0 ] ; do
sleep 1
done
if [ `cat /sys/class/net/lan/carrier` == 0 ] ; then
# execute "unused port" scenario
else
# execute Person in the Middle scenario
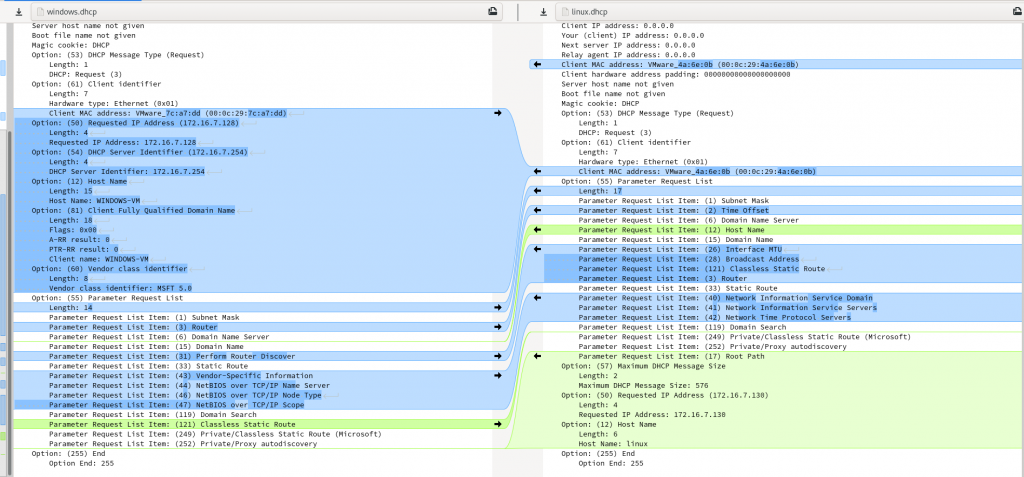
fiFrom this point, you can proceed to choose an IP address, or request one using DHCP. Just be aware that it is sometimes possible to differentiate between Windows and Linux DHCP clients due to different fields being requested, or variations in the populated fields sent to the server. Some time spent monitoring and fine-tuning your own DHCP requests may be time well spent! Then go ahead and start exploring the network that you are connected to!
On Network Access Control
You may have found an unused network port in a boardroom, but it could well be subjected to Network Access Control (NAC) checks. These come in a variety of forms, from 802.1x, to a network server making a connection to a service on the new device to check things like Antivirus configuration, etc. If the new device is unable to pass inspection, the switch port will either be disabled, or configured into a restricted VLAN, with no access to the really interesting systems. Rather disappointing!
One easy way to get around such controls is to perform a Person in the Middle attack against an existing device. This could be a PC, a printer, or even an IP phone. In many cases, devices like printers are unable to perform 802.1x authentication, and it is therefore disabled on that specific network port. In other cases, the device has the necessary authorisation to be on the network, and as a result, the network port is already allocated to the correct VLAN. All the Person in the Middle device needs to do is make sure that any traffic that it sends looks the same as the victim’s, so that the switch doesn’t detect anything untoward. Many switches can be configured to shut a port down if it detects more than just one MAC address on a port, which you really don’t want to have happen!
In order to do this, I have taken inspiration from the seminal work in this area (“A bridge too far” by Alva Lease ‘Skip’ Duckwall IV), and created a simple shell script that sets up the appropriate iptables rules to make any traffic from the R1S look like it came from the victim. The basics of the process can be found in an older version of the slimjim script on GitHub. Essentially, figure out what the MAC and IP addresses are of the intercepted machine, then use Linux ebtables (layer 2) and iptables (layer 3) rules to ensure that all traffic from the Person-in-the-Middle device towards the broader network comes from the intercepted machine’s MAC and IP addresses. If you also want to be able to interact with the intercepted machine, choose an upstream device’s MAC and IP address to use, and masquerade as that device. Given the privileged position that the device is in, directly attached to the victim, you can choose ANY upstream device to masquerade as.
The early incarnations of slimjim depended on manual addition of MAC and IP addresses of reachable devices to the ARP and routing tables respectively. It also required the operator to use a command like tcpdump -nneli lan -Q in to identify the MAC and IP addresses of the intercepted device, and perform some manual configuration before running the script. Current versions of slimjim do all of that for you, as well as mapping observed DNS traffic to the relevant addresses. The cost is a python script, which may not be feasible on more resource-constrained devices than the R1S!
Once the bridge is configured, even without having identified the details of the victim, the Network Access Control solution should be able to connect through to the victim to perform whatever authentication processes are required, and activate the port accordingly.
Stealing credentials from the Network Access Control
One useful tip is to understand how the Network Access Control actually works. In some cases we have seen, the NAC solution establishes an authenticated connection to the new device using a protocol like SSH or SMB, and provides credentials which can be harvested and reused. This connection is used to conduct an inventory, or verify that the anti-virus is up to date, etc. Running a suitable honeypot service on those ports may result in clear-text credentials (or equivalent hashes) dropping into your lap! These credentials are often for highly privileged accounts, able to log in to all workstations connecting to the network!
This is not the case with 802.1x solutions, unfortunately!
Network Namespaces
Linux has had support for namespaces for around 18 years (since 2002), but to a lot of people, they are still a mystery. There are namespaces for a variety of different resource categories, such as processes, filesystem, network, user id’s, etc. These are often used by container tools such as docker, to limit what resources a contained system can see. They can also help to prevent naming collisions, much like you can have more than one person named John if their family names (“containers”) are different.
Of interest for us in this instance are network namespaces, because they provide a way of making network interfaces (and their entire networking stack) only visible to a subset of programs running on a system. By allocating a network interface to a network namespace, only processes running inside that network namespace are able to see or access that interface.
Opsec Considerations
As mentioned earlier, inadvertent network traffic generated by the R1S, such as DNS lookups, can give the entire game away. One way to avoid this is to isolate the Ethernet interfaces in a network namespace, for example pitm, and be very deliberate about which processes are started in that namespace. The current slimjim script takes care of this as well, creating a screen instance inside the namespace. Any processes started inside the pitm namespace have access to the Ethernet interfaces, while processes created outside the namespace don’t. In this way, we can be sure that there will be no surprise traffic hitting the target’s network and revealing our presence!
Getting slimjim Installed
To install slimjim on the R1S, you should go through the following steps. First, disable IPv6 on the ethernet interfaces:
cat << EOF > /etc/sysctl.d/01-disable-ipv6.conf
# disable IPv6 on Ethernet interfaces
#
net.ipv6.conf.wan.disable_ipv6 = 1
net.ipv6.conf.lan.disable_ipv6 = 1
EOF
Unfortunately, the Linux IPv6 stack does some automatic collision detection, which can allow unexpected traffic out onto the Ethernet interfaces. Next, install required packages:
apt install -y dnsmasq tcpdump ebtables redsocks iftop python3-pypcap python3-dpkt python3-pyroute2 python3-iptables python3-setuptools python3-cffiWe want to prevent redsocks from starting automatically, because it won’t have access to the network interface unless it is run inside the pitm namespace. The slimjim script will launch it for us inside the namespace. We also want to update the IP address that redsocks listens on to be on the Ethernet bridge. We can do this with:
systemctl disable --now redsockssed -i -e 's|log = .*;|log = "stderr"|' -e 's|daemon = on;|daemon = off;|' -e 's|local_ip = 127.0.0.1;|local_ip = 169.254.0.1;|' /etc/redsocks.conf
We won’t actually be using redsocks in this tutorial, but there is information on how to use it in this blog post which uses some similar Person in the Middle techniques.
Next we clone the slimjim repo from GitHub:
git clone https://github.com/RoganDawes/slimjim
slimjim/slimjim
Running slimjim will start a screen session with the slimjim script in the first window. You will see it waiting for packets from the victim, to identify the MAC and IP addresses to use.

Note: before the slimjim script is run, no traffic will pass between the LAN and WAN interfaces. I’d advise making use of the automation techniques described previously by detecting which interfaces are active to start slimjim automatically when the LAN interface is connected. Alternatively, start slimjim manually before breaking the target’s network connection.
Once the victim’s MAC and IP addresses have been identified, the window can be closed if so desired. Another window will be running a python script called pitm_snoop.py, which watches network traffic to identify neighbouring devices and update ARP and routing tables. This is necessary because slimjim prevents the R1S from performing its own ARP lookups to avoid revealing its presence.
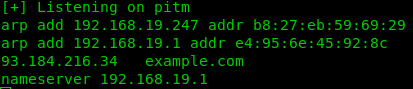
Another window will be running an instance of dnsmasq, configured to perform local “hosts file”-based lookups only. The hosts files are also created and updated by pitm_snoop.py, based on observed DNS traffic to and from the victim. In this way, you can get an idea of which hosts the intercepted machine is talking to, and gain an idea of the network layout. If you do wish to make use of the target’s name servers, you can edit the namespace’s custom /etc/resolv.conf file (normally found at /etc/netns/pitm/resolv.conf).
Another way of figuring out who the victim is talking to is to run iptraf. slimjim launches an instance of iptraf, to show what network traffic is passing through the pitm bridge in a user-friendly way.
At this point, you can start exploring the network, and achieving your red team goals!
Dealing with Network Namespace complexities
The use of a network namespace to isolate the Ethernet interfaces can make things a little awkward sometimes, particularly when you need to be able to direct traffic from your control interface to the bridge, or vice versa. To address this I have created a pair of virtual network interfaces, numbered 169.254.20.1 (inside the namespace) and 169.254.20.2 (outside the namespace). Using these it is possible to route traffic into and out of the namespace. My preferred way of doing this is with SSH tunnels, as follows:
On the R1S, add a /etc/hosts entry for the virtual interface inside the pitm namespace:169.254.20.1 pitm
Add the following entries into your personal ~/.ssh/config file:
Host pitm
User root
ProxyJump nanopi-r1
RemoteForward 1080

Host nanopi-r1
User root
RemoteForward 1080
Then, if you install your ssh public key on the R1S, you can ssh directly into the pitm namespace using the following command:
ssh pitmThis makes use of the OpenSSH “ProxyJump” feature, and tunnels one ssh connection inside another, in order to reach the virtual interface inside the namespace. This enables neat functionality, such as remote network monitoring using Wireshark on your local computer:
ssh pitm tcpdump -nli pitm -w - | wireshark -k -i -And of course, all the other SSH port forwarding tricks are available too.
Note: This slimjim-based solution does not work on networks using 802.1x-2010, which can use MACsec to encrypt packets between the victim and the switch. In that case, I’d suggest looking into Gabriel Ryan’s SilentBridge. The good news, though, is that MACsec traffic can pass across the pitm bridge without breaking anything, so even if you are that unlucky, at least you may be able to get away without being detected!
Conclusion
By the end of this post you should hopefully have a good idea about how you could use your R1S to PiTM on networks as silently as possible without raising suspicion. This and other techniques will be covered in detail in the RingZer0 training that SensePost is offering in August.